

Appearance
TP-Link Omada Integration
Connect CaptiFi to your TP-Link Omada network. This guide covers the complete setup for Omada hardware controllers, software controllers, and the paid Omada Cloud-Based Controller (CBC).
Important
The External Portal URL and Pre-Auth domains must be entered exactly as shown. Incorrect values will prevent the captive portal from working.
Omada Cloud Essentials is not supported
The free Omada Cloud Essentials tier (controller addresses like xxx-omada-essential-device.tplinkcloud.com) has no external portal API, so CaptiFi cannot connect to it. If your access points are managed by Cloud Essentials, move them to an OC200/OC300, the free self-hosted software controller, or the paid Cloud-Based Controller. A CaptiFi Plug and Play device also works with no controller at all. Email support@captifi.io if you are not sure which you have.
WiFi 7 access points or Starlink internet?
Running the BE9300 WiFi 7 ceiling mount APs (EAP772/EAP773), or a venue on Starlink? See the dedicated Omada WiFi 7 + Starlink guide. It covers controller version requirements, 6 GHz guest SSID limitations, and how to work around Starlink's CGNAT.
Prerequisites
- TP-Link Omada Controller: hardware (OC200/OC300), self-hosted software, or the paid Cloud-Based Controller (the free Cloud Essentials tier is not supported)
- Controller firmware 5.x or later recommended (v5.15+ required for WiFi 7 EAPs such as the EAP772/EAP773)
- Omada EAP access point(s) adopted and online
- Admin access to the Omada Controller
- CaptiFi account at my.captifi.io
Overview
The TP-Link Omada integration involves four steps, plus two optional ones:
- Guest SSID: create a dedicated guest wireless network
- External Portal: configure the captive portal redirect to CaptiFi
- Walled Garden: allow pre-authentication access to CaptiFi domains
- Controller Connection: link your Omada Controller to CaptiFi
- Open API access (optional): list your access points and connected guests in CaptiFi, and with an Admin-role app let CaptiFi manage the guest WiFi
- Let CaptiFi set up the portal (optional, Admin-role app): CaptiFi does Steps 2 and 3 on your controller for you
Step 1: Create a Guest SSID
Set up a dedicated wireless network for your guests.
1.1: Create the Network
- Open your Omada Controller (local or cloud) and open your site
- Go to Network Config → Network Settings → WLAN (on Omada 5: Settings → Wireless Networks)
- Add a new wireless network and configure:
- SSID Name: your guest WiFi name (for example "Free WiFi")
- Security: None (open), recommended for guest WiFi
- Guest Network: off. Omada's Guest Network option stops guests reaching the controller's portal address, so leave it off, or add an exception for the controller's address. Keep guests away from your own devices with a separate VLAN (1.2) instead
- SSID Broadcast: on
- Under Band, select your preferred band (2.4 GHz, 5 GHz, or both)
- Click Save
1.2: Assign to a VLAN (Recommended)
For network isolation, assign your guest SSID to a separate VLAN:
- Go to Network Config → Network Settings → LAN (on Omada 5: Settings → Wired Networks → LAN)
- Create a new network/VLAN for guest traffic
- Return to your wireless network settings and assign the guest SSID to this VLAN
Step 2: Configure External Portal
This is the most critical step. You must configure your Omada Controller to redirect WiFi guests to CaptiFi's external portal.
Let CaptiFi do Steps 2 and 3 for you
With an Admin-role Open API app (Step 5), CaptiFi can create this portal and the pre-authentication list on your controller itself: see Step 6. The steps below are for doing it by hand, and for venues whose app has the Viewer role.
2.1: Create a Portal
- Go to Network Config → Authentication → Portal (on Omada 5: Settings → Authentication → Portal)
- Click Create New Portal
- On the Basic tab:
| Setting | Value |
|---|---|
| Portal Name | CaptiFi (or any name) |
| Portal | On |
| SSID & Network | Your guest SSID |
| Landing Page | Original URL |
Leave the Portal URL field on the Basic tab as it is. That is the controller's own address, not CaptiFi's.
- On the Authentication tab:
| Setting | Value |
|---|---|
| Authentication Type | External Portal Server |
| Custom Portal Server | URL |
| Address | Choose https:// in the drop-down, then enter app.captifi.io/guest/omada?site_id=YOUR_SITE_ID in the box next to it, without the https:// part |
- Click Save
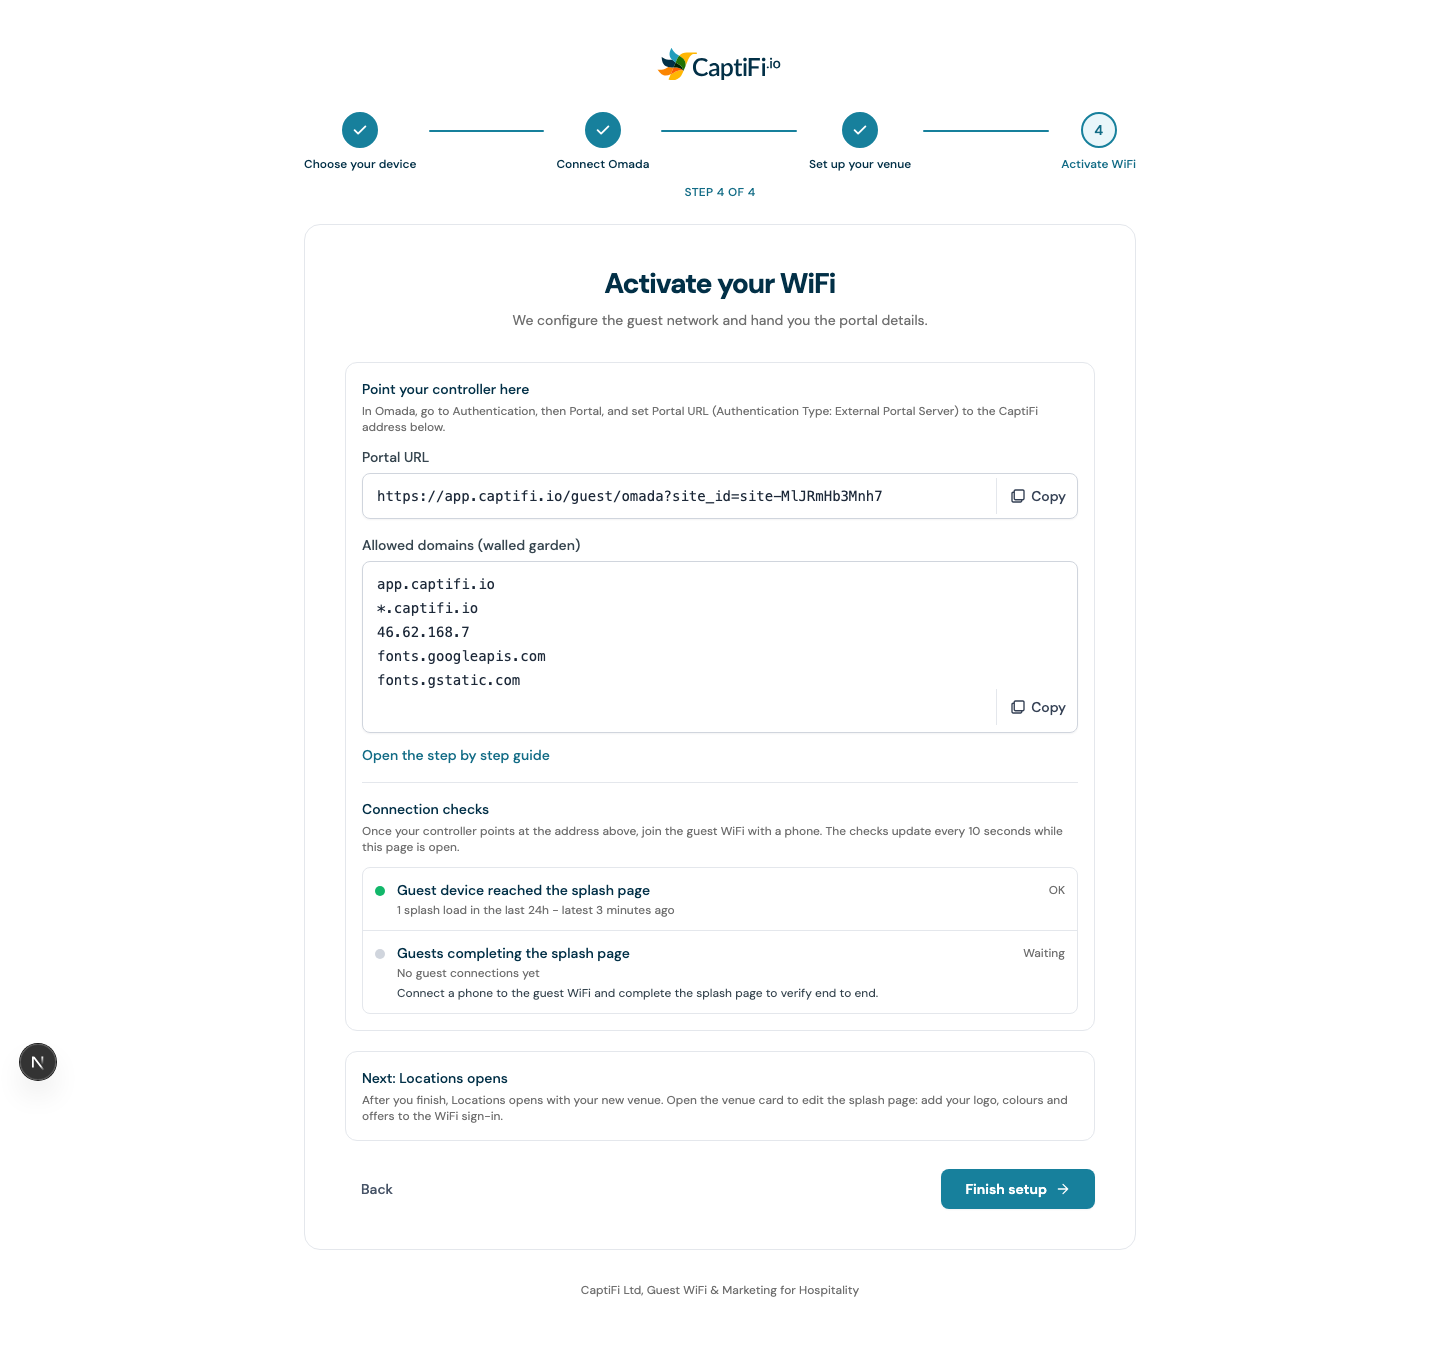
The wizard's Activate your WiFi step on my.captifi.io shows the full address for your venue with a copy button. Paste everything after https:// into the box. The box refuses an address that starts with https://.
Your site ID
Replace YOUR_SITE_ID with your CaptiFi site ID. You'll find it in your CaptiFi dashboard, or ask support@captifi.io. This entry URL accepts the redirect parameters from Omada controller versions 4, 5 and 6 automatically.
Connection checks in the set-up wizard
If you are setting up through the wizard on my.captifi.io, the WiFi step lists two checks under Connection checks, below the portal URL and the allowed domains: Guest device reached the splash page and Guests completing the splash page. Once the portal above is saved, join the guest SSID with a phone. The first check turns green when the sign-in page loads and the second when the form is completed; until then the second shows a grey question mark and Waiting on the check above. They update every 10 seconds while the page is open, and Finish setup unlocks once both are green.
2.2: Session length
How long a guest stays online after signing in is set in CaptiFi (Session length under Edit venue on My Venues). CaptiFi sends it to the controller with every sign-in, so there is no timeout to set in Omada for an external portal.
Step 3: Walled Garden / Pre-Auth Domains
The Walled Garden (also called Pre-Authentication Access) allows guests to reach CaptiFi's servers before they log in. Without these entries, the splash page cannot load.
3.1: Add Pre-Auth Domains
- On the Portal page, open the Access Control tab (on Omada 5, look for Pre-Auth Policy or Walled Garden in the portal settings)
- Turn on Pre-Authentication Access
- Under Pre-Authentication Access List, click Add for each of these four entries:
| Entry | Type |
|---|---|
app.captifi.io | URL |
46.62.168.7 | IP Range, subnet mask 32 |
fonts.googleapis.com | URL |
fonts.gstatic.com | URL |
Omada does not accept wildcard entries such as *.captifi.io, and you don't need one: the sign-in page loads only from the hosts above.
TIP
Some Omada Controller versions use IP-based walled garden entries only. If your controller doesn't support domain-based entries, add the IP address 46.62.168.7.
3.2: Save Portal Configuration
Click Save or Apply to save your portal configuration.
Step 4: Connect Controller to CaptiFi
Link your Omada Controller so CaptiFi can manage guest authentication.
Create an Operator Account in Omada
CaptiFi authorises guests through Omada's hotspot operator API, so it needs a dedicated operator account (not your main admin login):
- In your Omada Controller, open your site and click Hotspot in the left menu. Omada 6 opens Hotspot Management in a new tab; on Omada 5 it is Hotspot Manager
- Go to Operators and add an operator (for example username
captifi) with a strong password, and select your site
Connect in CaptiFi
- Ensure your Omada Controller is reachable from the internet (port forwarding may be required)
- Default port: 8043 (software controller) or 443 (OC200/OC300 hardware controller)
- Log in to my.captifi.io
- In the set-up wizard, under How do guests connect to WiFi?, choose TP-Link Omada and click Continue
- Enter:
- Controller URL: the address CaptiFi can reach your controller on directly, including the port, for example
https://YOUR-PUBLIC-IP:443for an OC200 or OC300, orhttps://YOUR-PUBLIC-IP:8043for a software controller (your controller's domain works too). On the paid Cloud-Based Controller, use the controller URL from your Omada cloud account. TP-Link's remote access page will not work here: that is the page your browser shows when you open an on-site controller from Omada Cloud, on anomada-cloud.tplinkcloud.comaddress, and CaptiFi cannot sign in through it. Do not pasteomada://links from the Omada app either: they are not controller addresses - Controller ID: the 32-character ID only. Open your controller at its own address (for example
https://YOUR-PUBLIC-IP:8043) and sign in. The address bar then reads something likehttps://YOUR-PUBLIC-IP:8043/0123456789abcdef0123456789abcdef/, and the 32 characters straight after the host and port are the ID. If you paste the whole address, CaptiFi keeps just the ID. Pasting the address of TP-Link's remote access page will not connect your controller, because the Controller URL still has to be your controller's own address - Operator username and Operator password: the account you just created
- Controller URL: the address CaptiFi can reach your controller on directly, including the port, for example
- Click Connect controller. CaptiFi tests the login and confirms the link
If your account is already set up and you are adding another venue, go to My Venues, click Add venue and choose TP-Link Omada. The Connect your Omada controller step that follows asks for the same four values. Once CaptiFi has signed in, it shows your portal address with the connection checks. That step has no access point section: add the Open API app afterwards from the venue's card, as in Step 5.
Verify Port Forwarding
If your controller is on-premise, verify remote access:
- Find your public IP at whatismyip.com
- Test by visiting
https://YOUR_PUBLIC_IP:8043from outside your network - You should see the Omada login page (you may need to accept a security warning)
Step 5: Give CaptiFi Open API access (optional)
Guest sign-in works without this step. Add it if you want the venue's access points listed on the Access Points page in CaptiFi, with each one's name, model, online or offline status and when it was last seen, and the guests on the controller right now on the Connected Guests page. It is also what lets CaptiFi record how much data guests use, for WiFi data usage in Analytics. CaptiFi reads all of these through Omada's Open API. Once guests sign in through them, the Popular access points chart in Analytics can show those access points by name.
The role you give the app in Omada decides what else CaptiFi can do on your controller:
| Role | What CaptiFi can do |
|---|---|
| Viewer | List the access points and the guests connected right now, and record their data usage |
| Admin | All of the above, plus change the guest WiFi name, apply the venue's bandwidth limits, disconnect a guest, and set up the portal and pre-authentication list on the controller for you (Step 6) |
Open API is on Omada software and hardware controllers from version 5.12, and on Omada 6. It is not on Omada Cloud Essentials, which CaptiFi does not support at all.
Create an Open API app in Omada
You need an Omada admin login for this part.
- In your Omada Controller, open Global View, then go to Settings → Platform Integration → Open API
- Click Add New App and name it, for example
CaptiFi - Choose Client mode and pick the role, Viewer or Admin (see the table above)
- Set Site Privilege to this venue's site only
- Omada shows a Client ID and a Client Secret. Copy both
The app must be able to see exactly one Omada site, the venue's. If it can see none, or several, CaptiFi says so when you save and asks for the Site Privilege to be limited to the venue's site.
Enter the details in CaptiFi
In the set-up wizard, the Connect your Omada controller step has a section headed List your access points in CaptiFi (optional) with the same two fields. Enter the Client ID and Client Secret there.
For a venue that is already set up:
- Log in to my.captifi.io and go to WiFi & venues → My Venues
- On the venue's card, open More and choose Connection. In the Controller section, find the Access points row and click Add Open API access
- Enter the Client ID and Client Secret, then click Save
CaptiFi checks the details against your controller and shows how many access points it found. It reports a wrong Client ID or Secret, or a controller it cannot reach, in plain words. The secret is never shown again after saving. The button on the row then reads Update, which opens the same form for new details, and the form has a Remove button that takes the access away again.
The form also shows the access level it found, Viewer or Admin, under the name of the Omada site it connected to. To move a venue from Viewer to Admin, create the app again in Omada with the Admin role (or change the existing app's role in Omada), then click Update and paste the new Client ID and Client Secret. If the form says the access level has not been checked yet, CaptiFi reads it at the next sync.
The access points are then listed on the Access Points page, and CaptiFi refreshes their status and last-seen time from the controller every 15 minutes. The guests on the controller appear on the Connected Guests page, read from the controller every 3 minutes.
Step 6: Let CaptiFi set up the portal for you
With an Admin-role Open API app (Step 5), CaptiFi can do Steps 2 and 3 on your controller itself. You need the guest SSID from Step 1 on the controller, and the controller connected to CaptiFi (Step 4). A venue whose app has the Viewer role keeps the manual steps above; the checks in 6.3 work with either role.
6.1: Choose the guest WiFi network
- On My Venues, open More on the venue's card and choose Connection
- In the Controller section, find the WiFi network row and click WiFi network
- Pick the SSID guests sign in on and click Apply
The picker lists the SSIDs your Open API app can see. An SSID with Omada's Guest Network option on is tagged Guest Network on: read The Guest Network setting below before you choose it. The picker cannot create a network, so if the list is empty, create the guest SSID in Omada first (Step 1) and open the picker again.
Choosing the network tells CaptiFi which SSID to check and, with an Admin-role app, which SSID to put the portal, the WiFi name and the bandwidth limit on. You can pick a different network at any time, and CaptiFi's settings move to it.
6.2: Set up the portal
Under the WiFi network row on the venue's Connection page, click Set up the portal on my controller, then Set up the portal in the Set up the portal on your controller? box (Not now closes it). CaptiFi then:
- creates a portal named CaptiFi on the chosen SSID, with Authentication Type set to External Portal Server and the address pointing at your venue's CaptiFi sign-in address, or updates the portal already on that SSID to point there
- adds any of the four pre-authentication entries from Step 3 that are missing
- applies the venue's bandwidth limit to the guest network when one is set in Edit venue (see Guest bandwidth limits)
It then lists what it did: whether the portal was created, updated or already pointed at CaptiFi, which pre-authentication entries it added (or that the list was already complete), and whether the bandwidth limit was applied or skipped because limits are off for this venue. You can click the button again after a change on the controller.
The button waits until a guest WiFi network is chosen; until then the row says Choose the guest WiFi network first. With a Viewer-role app the button is not shown, and the row says how to get an Admin-role app instead.
6.3: The controller checks
Once Open API access is saved, the Controller section of the venue's Connection page shows a Controller set-up list, with either role. Each row is marked OK, Waiting or Check:
| Check | What it means |
|---|---|
| Guest WiFi network chosen | Whether you have picked the SSID guests sign in on (6.1). The row names the network once it is chosen |
| Portal points at CaptiFi | Whether a portal on that SSID has External Portal Server authentication pointing at your venue's CaptiFi address |
| Pre-authentication list | Whether all four entries from Step 3 are on the controller. When some are missing, the row names them, for example fonts.googleapis.com, fonts.gstatic.com |
| Guest Network setting | Whether Omada's Guest Network option is on for the chosen SSID. When it is on, the row shows Check, because that option stops guests reaching the controller's portal address |
The Guest Network setting
Omada's Guest Network option on an SSID stops guests reaching the controller's portal address. When the chosen SSID has it on, the Guest Network setting check shows Check and the WiFi network picker tags the SSID Guest Network on. To fix it, open the SSID in Omada and untick Guest Network, or add an exception for the controller's address, then open the venue's Connection page again. Keep guests away from your own devices with a separate VLAN instead (1.2).
Step 7: Test
- Connect a device (phone or laptop) to your guest WiFi
- The CaptiFi splash page should appear automatically
- If on mobile, you may need to open a browser and visit any HTTP site (e.g.,
http://example.com) - Complete the login form on the splash page
- Verify internet access after login
- Check your CaptiFi dashboard: the guest should appear in your logs
Troubleshooting
| Issue | Solution |
|---|---|
| Splash page not appearing | Verify the portal is on, your guest SSID is selected under SSID & Network, and on the Authentication tab Authentication Type is External Portal Server with the CaptiFi address in Custom Portal Server (not in the Basic tab's Portal URL) |
| "Portal unreachable" error | Check that the Pre-Authentication Access List includes app.captifi.io and 46.62.168.7 |
| Blank or broken splash page | Ensure fonts.googleapis.com and fonts.gstatic.com are in the Walled Garden so page assets can load |
| Guest can't get online after login | Verify the portal authentication timeout hasn't expired; check VLAN/firewall rules aren't blocking post-auth traffic |
| Controller not connecting to CaptiFi | Check port forwarding is working for on-premise controllers (test from outside your network on port 8043) |
| CaptiFi says it could not reach the controller, or it did not answer | Check the URL and port (8043 on most controllers) and that the controller is reachable from the internet: on-premise controllers need port forwarding, tested from outside your network |
| CaptiFi says the address answered "not found" for the controller ID | Copy the Controller ID again from your Omada controller's address bar (the long segment straight after the host and port), and check the URL points at the Omada controller itself and not another device on that address and port |
| CaptiFi says this is TP-Link's remote access page for your controller | The Controller URL is the page you reach through Omada Cloud. Enter the address CaptiFi can reach your controller on directly: https://YOUR-PUBLIC-IP:443 for an OC200 or OC300, or https://YOUR-PUBLIC-IP:8043 for a software controller, with port forwarding set up for an on-premise controller |
| CaptiFi asks you to enter only the controller ID | The Controller ID box holds an address with no controller ID in it. Enter the 32-character ID from your controller's own address, straight after the host and port |
| CaptiFi says the controller refused the operator username or password | Use the operator account created under Hotspot → Operators, not your admin sign-in, and check the password |
| CaptiFi says the Open API app can see no site, or more than one | In Omada, under Settings → Platform Integration → Open API in Global View, limit the app's Site Privilege to this venue's site, then save the Client ID and Client Secret in CaptiFi again |
| CaptiFi says the controller refused the Client ID or Client Secret | Copy both again from the app's entry under Open API in Omada and enter them in CaptiFi |
| No Open API option in your Omada Controller | Open API is on Omada software and hardware controllers from version 5.12 and on Omada 6. Update your controller, or skip the step: guest sign-in works without it. Omada Cloud Essentials has no Open API and is not supported by CaptiFi at all |
| Set up the portal on my controller is greyed out, or missing | Greyed out: no guest WiFi network is chosen yet, and the row says Choose the guest WiFi network first. Click WiFi network on the same panel and pick the SSID. Missing, with a line saying your app has the Viewer role: create the app again in Omada with the Admin role (or change its role), then click Update under Access points and paste the new Client ID and Client Secret |
| The Guest Network setting check shows Check | Omada's Guest Network option is on for the chosen SSID, which stops guests reaching the controller's portal address. Untick it on the SSID in Omada, or add an exception for the controller's address, then open the venue's Connection page again |
| The WiFi network picker lists no networks | The Open API app sees no SSIDs on the venue's site. Create the guest SSID in Omada (Step 1), then open the picker again |
| Portal only works on some APs | Ensure all EAPs are adopted, online, and broadcasting the guest SSID; re-provision APs if needed |
| HTTPS sites not triggering redirect | Guests may need to visit an HTTP site first (e.g., http://example.com) to trigger the portal redirect |
| Walled Garden not accepting domains | Some Omada firmware versions only support IP-based entries; add 46.62.168.7 as an IP entry instead |
Multiple Sites
If you manage multiple Omada sites or locations:
- Each location can have its own splash page design in CaptiFi
- To use one portal address for every location, enter
app.captifi.io/guest/omadawith nosite_id(choosehttps://in the drop-down). Omada sends the access point's MAC asapMac, and CaptiFi sends the guest to the location that access point belongs to. With Open API access (Step 5) the access points CaptiFi lists for each location work straight away; otherwise add them under WiFi Access Points, Add access point. See One Portal Address for Several Venues - Manage per-location settings in My Venues on your CaptiFi dashboard (each additional CaptiFi location beyond the one included in your plan is charged at your currency's extra-venue rate)
Next Steps
Need Help?
TP-Link Omada setups can vary depending on your controller type and firmware version. If you're stuck:
- Email: hello@captifi.io
- Live Chat: Available on captifi.io
- Omada Documentation: TP-Link Omada Support