
Appearance
Multi-Venue Management
Manage guest WiFi across all your locations from a single CaptiFi dashboard.
Pricing: Every plan includes one venue. Add as many more as you need on any plan from Essentials up, at the extra-venue rate for your billing currency (£25, $35, €30, C$45, A$49 or NZ$59 per month), charged from the day you add the venue (prorated) and removed from your bill when you delete it. On an annual plan, email hello@captifi.io and we add venues at the annual rate instead. Lite is for one venue, so on Lite Add location offers an upgrade to Essentials. The Pro plan adds the multi-venue dashboard, group analytics, and higher new-guest allowances, pooled across all your venues: see Plans & Pricing.
Overview
If you operate multiple venues — a restaurant group, hotel chain, franchise, or managed portfolio — you can:
- See every venue at a glance from a single login
- Compare guest analytics and performance across locations
- Give each venue its own splash page, or copy one design across all of them
- Run centralised or venue-specific email campaigns
- Manage access points, vouchers, and Paid WiFi per venue
Adding a New Venue
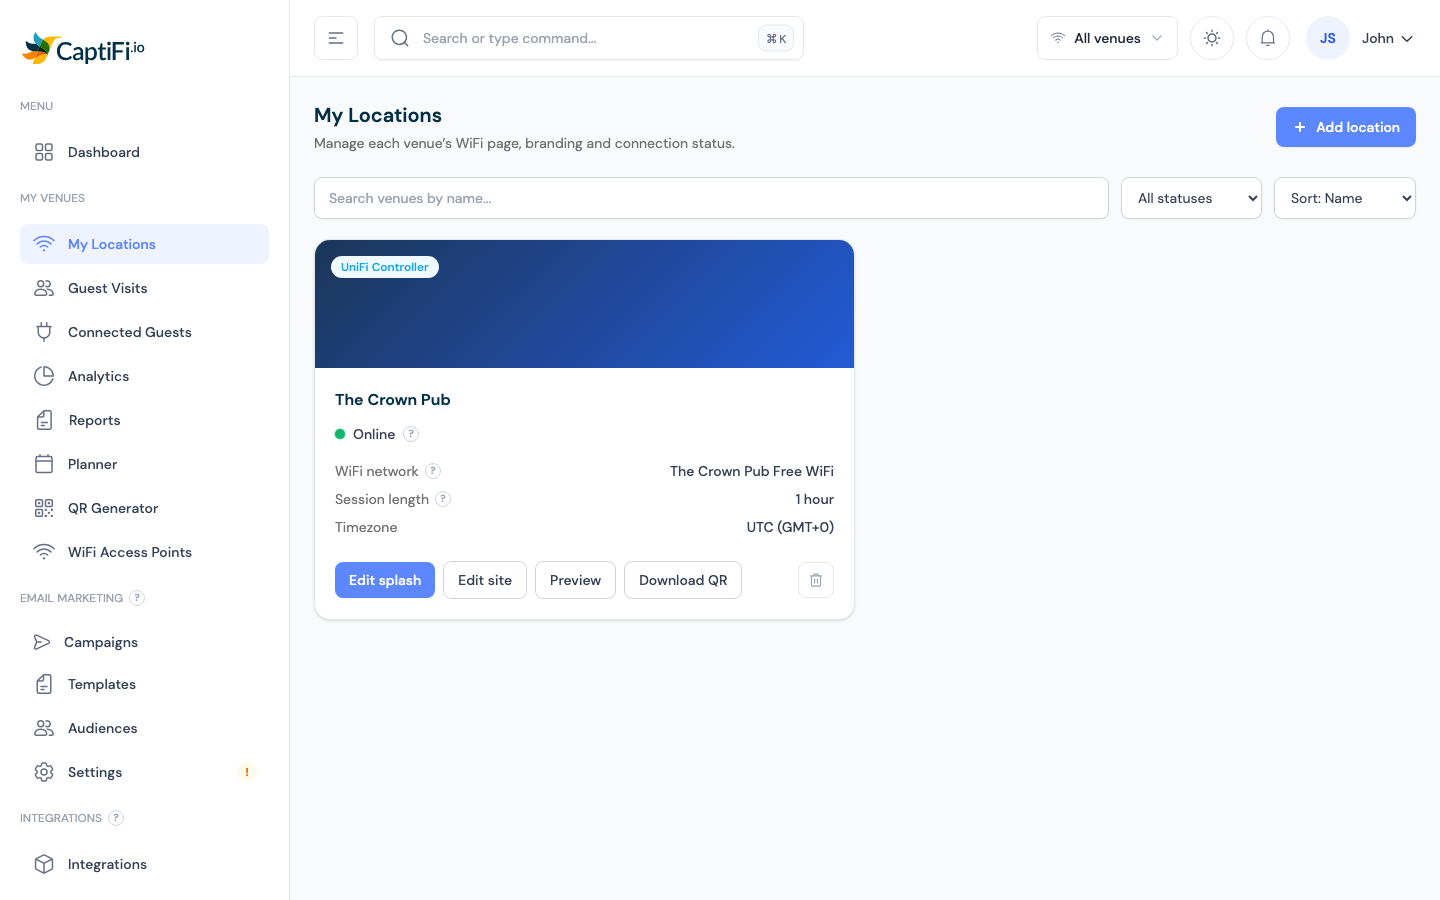
- Log in to my.captifi.io
- Go to My Venues → My Locations
- Click Add location (top right)
- The wizard asks:
- What WiFi hardware is at this venue? — CaptiFi Plug & Play, UniFi, TP-Link Omada, Cisco WLC, Aruba Instant On, Ruckus, Fortinet FortiAP, or Cisco Meraki
- Venue details — name, venue type, and timezone (plus hardware-specific steps, e.g. UniFi connection or device delivery)
- Click Add venue
The wizard shows the billing note before you commit: an additional location beyond the one included in your plan adds the extra-venue charge, from today and prorated to your billing date. The note quotes the GBP rate; if you are billed in another currency you are charged that currency's extra-venue rate from Plans & Pricing instead.
After creating the venue, set up its hardware (device activation or controller connection), design its splash page, and it's live.
Order a CaptiFi device for an existing venue
A venue with no CaptiFi device yet, and no WiFi controller connected, can order one from its card without being set up again. This covers a venue added for a CaptiFi device whose device was never ordered.
- Go to My Venues → My Locations
- On the venue's card, click Order a CaptiFi device
- Enter the delivery address and your card details, then click Place order
The refundable deposit for your billing currency (see Hardware) is taken from the card when you place the order. The order number and the device's activation PIN appear as soon as the order goes through, and you enter that PIN when you set the device up at the venue.
Once a device is ordered, the venue's card shows the order number and its status, for example Pending or Ready to ship, until the device is set up. Only the account owner can place the order; team members see the order's status on the card. Each venue has one device order at a time. If the order is cancelled or the device is sent back, the button returns so you can order again. To add more devices to one venue, email hello@captifi.io.
A venue that runs on its own UniFi, Omada, Meraki or other WiFi controller shows no Order a CaptiFi device button, because its guests sign in through that controller. To move such a venue to a CaptiFi device, email hello@captifi.io.
WiFi Settings (Edit site)
Each venue's core WiFi settings live in the Edit site panel. On My Locations, click Edit site on the venue's card, change what you need, then click Save changes.
- WiFi network name (SSID) - the name guests see when they pick a network. By default it is based on your venue name. On plug-and-play devices and UniFi controllers the change is pushed to your hardware, and takes effect within about 60 seconds. Two things to expect after a rename:
- Capitalisation counts.
MY CAFE WIFIandMy Cafe WiFiare two different networks to a phone, so a change of case is treated as a rename like any other. - Guests who joined the old name will not connect automatically. Their phones remember the old network, so returning guests pick the new name from their WiFi list once, then reconnect automatically after that. Re-print your QR codes if the old name is printed on them.
- Capitalisation counts.
- Session length - how long a guest stays online before they see the splash page again. Enter a number and pick a unit (minutes, hours, or days, up to 365 days), or choose Unlimited. This applies to your whole venue, whichever splash design is live; the same setting also appears in the splash builder's Advanced section.
Guest bandwidth limits
Bandwidth limits stop a few heavy users from slowing down everyone else. You can cap each guest's speed, their total data per session, or both.
- Open My Locations → Edit site
- Turn on Limit guest bandwidth
- Set any of the following, then click Save changes:
- Download speed (Mbps) - the fastest each guest can download. Leave blank for no download limit.
- Upload speed (Mbps) - the fastest each guest can upload. Leave blank for no upload limit.
- Data allowance per guest (MB) - the total a guest can use in a single session. Leave blank for unlimited data.
Limits apply per guest, not across the whole venue, so every guest gets the same allowance. The data allowance is per session: it resets when the guest's session expires (based on the session length above) and they reconnect through the splash page.
Sensible starting points
For a busy cafe or pub, 5 to 10 Mbps download and 2 to 5 Mbps upload keeps browsing, maps, and messaging smooth while preventing large downloads from hogging the line. Leave the data allowance blank unless you notice a small number of guests using very large amounts.
Enforcement depends on your WiFi hardware
Bandwidth limits are enforced on:
- UniFi (controller login or local API key)
- CaptiFi plug-and-play devices
- RADIUS-based systems: Aruba Instant On, Cisco, Ruckus and Fortinet
They are not yet enforced on:
- TP-Link Omada
- Cisco Meraki
- Cloud-only UniFi (Site Manager) setups
On the hardware in the second list your limits are saved but have no effect yet, and the Edit site panel shows a note telling you so. Enforcement for these platforms is on the way.
Selling faster WiFi?
If your venue uses Paid WiFi, each pass can carry its own download and upload speed that overrides this venue-wide limit for that guest, so the venue-wide limit becomes your free tier. See Speed Tiers.
Controller settings
The values your WiFi controller was set up with stay on the venue's card. On My Locations, click Controller settings on the card and a panel opens with:
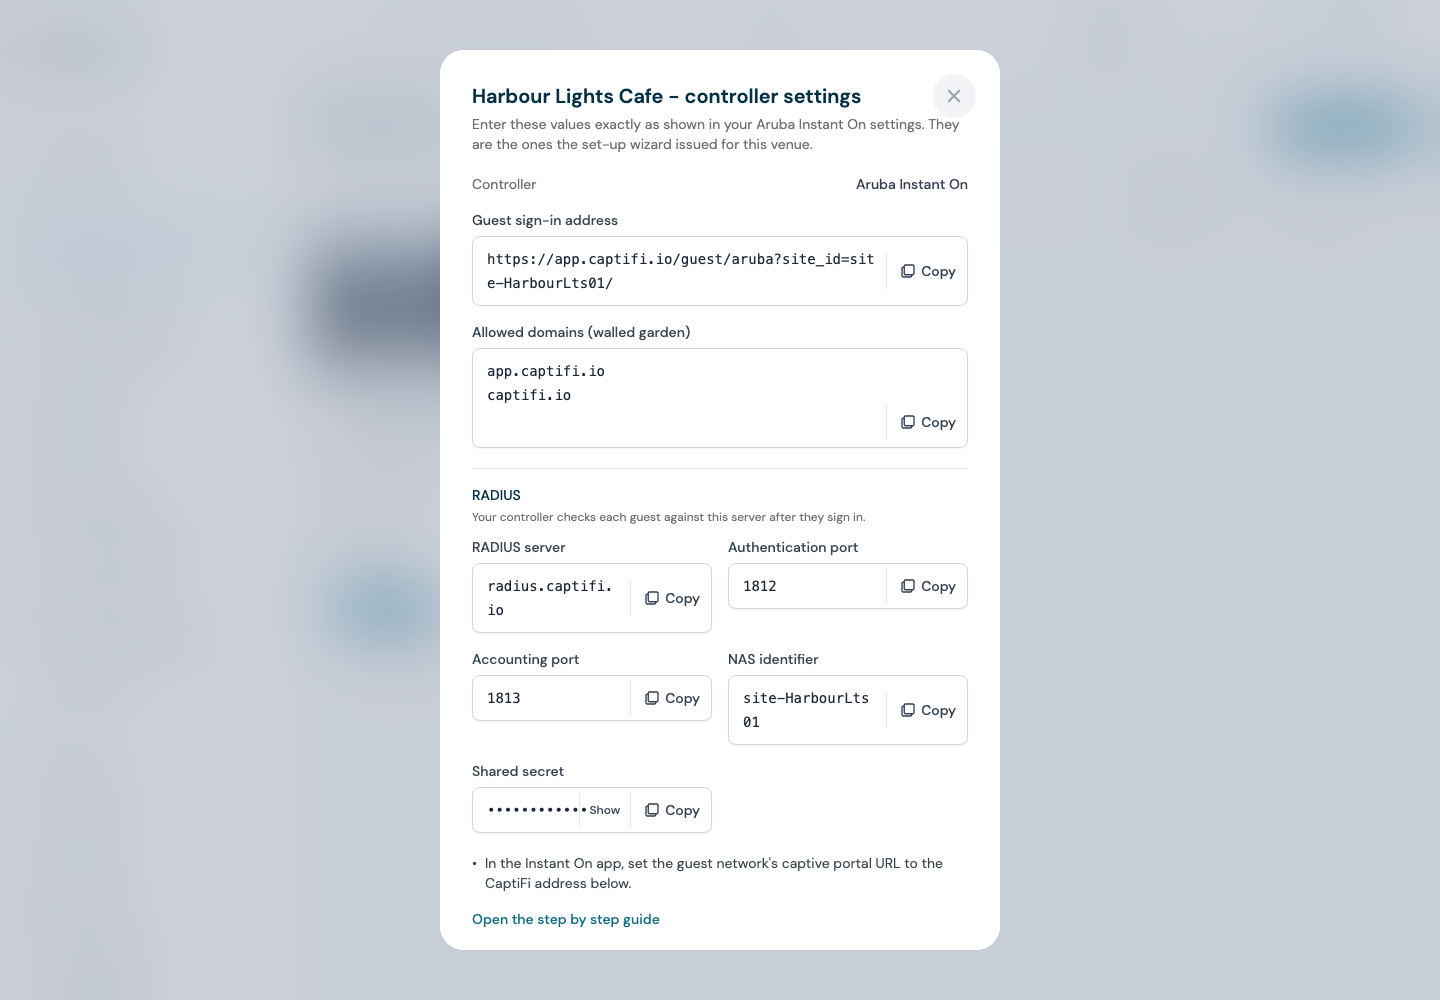
- Guest sign-in address: the portal URL your controller sends guests to.
- Allowed domains (walled garden): the domains guests must be able to reach before they sign in.
- On Aruba Instant On, Cisco Catalyst 9800 and Ruckus venues, the RADIUS block: RADIUS server, Authentication port, Accounting port, NAS identifier, the CoA port on Cisco, and the Shared secret. The secret is masked until you click Show, and Copy copies the real value either way.
- Notes for your controller, such as the redirect ACL name and WLC OS on Cisco, or the Redirect URL on Aruba Instant On.
- Open the step by step guide, which opens the set-up guide for that controller.
Each value has its own Copy button. They are the values the set-up wizard issued for the venue, so they match what you entered on the controller. On a venue with a CaptiFi Plug & Play device the panel shows the address and allowed domains for reference only, because the device applies them itself.
The shared secret is shown to the account owner only. A team member opening the panel sees Shown to the account owner only in its place, with every other value in full.
On the Integrations page, the Cisco Meraki and Cisco WLC cards link to My Locations so you can open the venue's Controller settings from there.
Pre-authorised devices
Casting devices (Chromecast, Fire TV, Apple TV), smart TVs, printers, card machines, games consoles and back-office tablets have no browser to complete the sign-in page, so on guest WiFi they retry it endlessly and never get online. Pre-authorising a device lets it skip the sign-in page altogether. The alternative is to put the device on your venue's private WiFi network.
- On My Locations, click Connection status on the venue's card
- Find the row "Printers, card machines, TVs and casting devices can skip the sign-in page." and click Pre-authorized devices
- Enter the device's MAC address, add a label if you want one (for example
Bar TV), and click Add device
The option shows for venues on CaptiFi access points and for venues connected to a UniFi controller. On any other connection the panel says "Not available for this venue's connection yet." Account owners and admins can manage the list.
Finding the MAC address
A Chromecast shows its address in the Google Home app, under the device's information. Most other devices show it in their network or WiFi settings. Type it with colons, dashes or no separators: A4:77:33:0B:12:9F, A4-77-33-0B-12-9F and A477330B129F are all accepted.
What happens next
On CaptiFi access points the device is allowed on every access point at the venue within a minute. It is allowed again automatically after an access point restarts or when the device next appears, and the list is re-checked daily. Removing the device from the list takes the allowance away again, and it then sees the sign-in page like any other device.
On UniFi venues CaptiFi authorises the device on your controller. The UniFi guide has the controller-specific notes under Keep printers, card machines and iPads online.
A device allowed this way never sees the sign-in page, is not counted as a guest and receives no marketing.
Offline alerts
When an access point or CaptiFi device at a venue goes offline, and again when it comes back, CaptiFi emails the people on that venue, and texts or sends an app notification to anyone who has switched those on. You choose who hears about each venue.
- On My Locations, click Offline alerts on the venue's card
- Untick anyone who should not get this venue's alerts. The list shows every login on the venue: you, your team members, and any login the venue has of its own
- Under Extra email addresses, type an address that has no CaptiFi login, such as your support desk or an on-call inbox, and click Add. You can add up to ten
- Click Save
To stop alerts for a venue altogether, switch off Send offline alerts for this venue.
A ticked person still follows the Access Point Status Notifications and SMS Access Point Alerts switches on their own Profile page (see Alerts), so someone with those switched off gets nothing from this venue until they switch them on. The panel marks who that applies to. An extra address gets the offline and back-online emails only, with a line at the bottom saying it was added to the venue's alerts. An address that already has a login on the venue cannot be added as an extra address: tick the person instead.
Only the account owner and team members with Manage devices & controllers can open Offline alerts, because it shows colleagues' email addresses. A venue's own login on someone else's account cannot open it either, and can switch its own alerts off on its Profile page.
Switching Between Venues
Use the venue switcher in the top bar to choose which venue you are looking at. Every page (dashboard, guests, analytics, access points) follows your selection.
The "All venues" option, which totals every venue into one set of figures, is part of the Pro plan. On plans below Pro the switcher shows it marked Pro and you pick one venue at a time, so the figures on screen always belong to the venue named in the switcher. See Plans & Pricing.
Per-Venue vs Shared
| Setting | How it works |
|---|---|
| Splash page design | Per venue — use Copy design on a venue card to clone one venue's design to another |
| WiFi network name, session length & guest bandwidth limits | Per venue, in My Locations → Edit site |
| Controller settings (sign-in address, allowed domains, RADIUS values) | Per venue, in My Locations → Controller settings |
| Pre-authorised devices (printers, TVs, card machines) | Per venue, in My Locations → Connection status → Pre-authorized devices |
| Who gets offline alerts | Per venue, in My Locations → Offline alerts |
| Guest data & analytics | Stored per venue; viewable one venue at a time, or aggregated across all venues on Pro |
| Email campaigns | Target all venues or a single venue in the campaign wizard |
| Integrations (Google Reviews, Mailchimp, Twilio, etc.) | Connected once, enabled and configured per venue |
| Vouchers & Paid WiFi | Configured per venue |
| Team members & billing | Account-wide |
Comparing Venues
- The Analytics page includes a Top Venues comparison when you have more than one location
- Compare opt-in rates, new vs returning ratios, and busiest hours to spot which locations need attention
- Reports generates a monthly PDF per venue for stakeholders
Removing a Venue
On My Locations, click the bin icon on the venue's card and confirm. The venue disappears from your dashboard, the extra-venue charge stops (unused time is credited to your next invoice), and its guest history is retained: support can restore the venue if needed.
Troubleshooting
| Issue | Possible Cause | Solution |
|---|---|---|
| Venue missing from analytics | No connected hardware yet | Ensure at least one access point is Online and assigned to the venue |
| Guest data under the wrong venue | AP assigned to the wrong venue | Check the AP's venue under WiFi Access Points; contact support to reassign |
| Unexpected charge after adding a venue | Extra-site billing | Each venue beyond your included one is charged at your currency's extra-venue rate, prorated: see Plans & Pricing |
| Can't add a venue | Permission or billing issue | Team members need the right permissions; check Billing for any payment problems |
| A pre-authorised device still sees the sign-in page | The allowance has not reached the access point yet, or the address is wrong | Wait a minute, check the MAC address against the device's own settings, then restart the device so it reconnects. See Pre-authorised devices |
Related Features
- Guest Analytics — per-venue and aggregated views
- Splash Page Builder — per-venue designs
- Plans & Pricing — what's included in each plan