
Appearance
Account & Settings
Account settings live in three places in the sidebar's Account section: Profile (you and your business), Team (colleagues and permissions), and Billing (plan and payments).
Profile
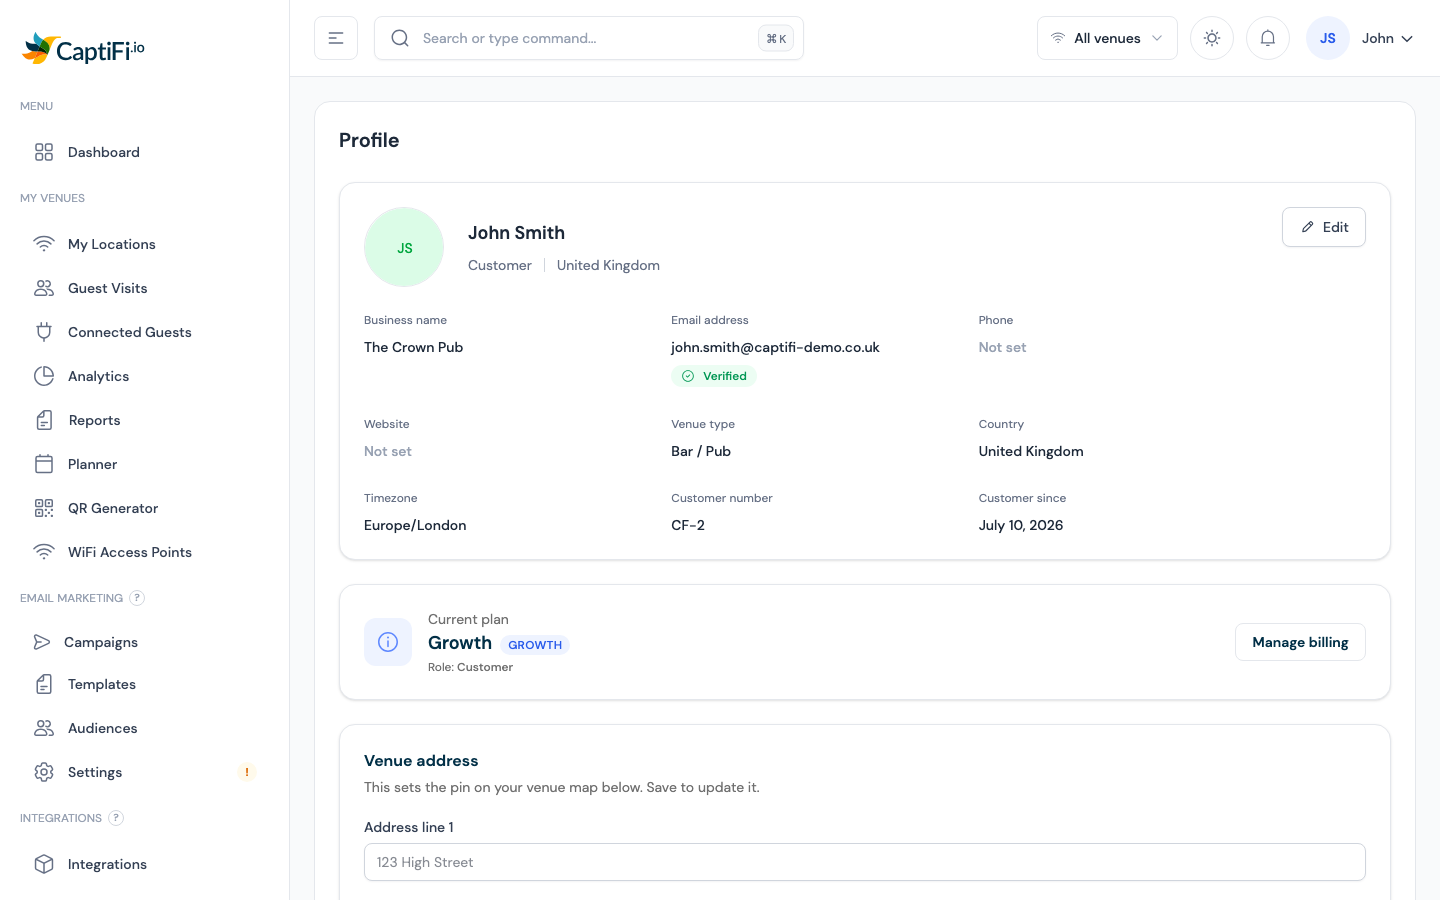
- Log in to my.captifi.io
- Go to Account → Profile in the sidebar
Personal & Business Information
Your profile card shows your business name, email (with a Verified/Unverified badge), phone, website, venue type, country, timezone, and customer number. To change any of it:
- Click Edit on the profile card
- Update any of: Full name, Business name, Email address, Phone, Website, Venue type, Country, Timezone — plus your profile photo
- Click Save changes
Changing your email
Changing your email address sends a verification link to the new address — click it to confirm. You can also hit Resend verification email from the profile card at any time.
Venue Address
The Venue address card sets your venue's location (and map pin). Pick the venue (if you have several), fill in Address line 1/2, City / town, State / region, Postal code, and Country, then click Save address. Your venue's timezone is derived automatically from the address.
Change Password
On the same page, the Change password card asks for your Current password, a New password (minimum 8 characters), and confirmation. Click Update password.
Forgotten your password? Use Forgot password? on the login page to receive a reset link by email.
Sign in with Google, Microsoft or Apple
The sign-in page at my.captifi.io has Continue with Google, Continue with Microsoft and Continue with Apple buttons. They sign you in to your existing CaptiFi account when the email address on your Google, Microsoft or Apple account is the same as the one on your CaptiFi account. Google covers Gmail and Google Workspace mailboxes on your own domain. Microsoft covers Microsoft 365 work accounts and personal Outlook.com accounts, matched on the account's sign-in name.com accounts.
The buttons never create an account: new customers still start at captifi.io/trial. Your password keeps working alongside them.
- Open the sign-in page at my.captifi.io
- Click Continue with Google, Continue with Microsoft or Continue with Apple
- Choose the account that uses the same email address as your CaptiFi account
- The first time only, enter your CaptiFi password when asked
- You are signed in
The first time you use it
The first time you use a provider, CaptiFi asks for your CaptiFi password once to confirm the account is yours, then links that provider to your account. After that, the button signs you straight in. If the Google, Microsoft or Apple account behind your email is ever replaced (for example your IT team deletes and recreates it), CaptiFi asks for your password once more and moves the link to the new account.
If you use two-factor authentication
If your account has two-factor authentication, you still enter your authenticator code after clicking the button, exactly as you would after a password. If you have ticked Trust this device for 30 days on that browser, the skip applies here too.
Apple and Hide My Email
When Apple asks how to share your email, choose Share My Email. CaptiFi can only match the real email address on your account, so Apple's Hide My Email option does not work for signing in.
Apple only asks the first time you use Sign in with Apple for CaptiFi. If you chose Hide My Email earlier and Apple no longer asks, open your Apple ID settings, go to Sign-In & Security, then Sign in with Apple, select CaptiFi and choose Stop Using Sign in with Apple. Click Continue with Apple again and choose Share My Email. Or sign in with your email and password.
Microsoft sign-in names
For Microsoft, the address CaptiFi compares is your account's sign-in name, the one shown under your name in the Microsoft account picker. Some Microsoft 365 organisations set that differently from the mailbox address (for example jsmith@contoso.onmicrosoft.com for a mailbox at john.smith@contoso.com). If yours differs from the email on your CaptiFi account, the Microsoft button cannot match your account: sign in with your email and password, or use Google or Apple if one of those accounts uses your CaptiFi email.
If it says no account uses that email
"No CaptiFi account uses that email address" means the email on the Google, Microsoft or Apple account you picked is not the email currently on your CaptiFi account (shown under Profile on this page). Sign in with that email and your password, or pick the provider account that uses it.
Team members invited to an account can use the buttons too once their invite is accepted, as long as the emails match. Forgotten password recovery is unchanged: the forgotten password link on either sign-in page still sends a reset link by email.
Two-Factor Authentication (2FA)
Protect your account with an extra layer of security, using any authenticator app (Google Authenticator, Authy, 1Password, Microsoft Authenticator).
Setting Up 2FA
- Go to Account → Profile and find the Two-factor authentication card
- Click Enable 2FA
- Scan the QR code with your authenticator app (or copy the secret manually)
- Enter the 6-digit code from the app and click Verify and activate
- Save your recovery codes — they're shown once. Store them somewhere safe (a password manager or printed copy)
Signing In With 2FA
After entering your password you'll be asked for a 6-digit code. You can tick Trust this device for 30 days to skip the step on a browser you own, and use a recovery code instead if you don't have your phone.
Managing 2FA
- Trusted devices — the 2FA card lists browsers you've trusted; revoke any of them (or all) at any time
- Disable 2FA — requires your current password
- Lost access? — if you lose your authenticator and recovery codes, contact hello@captifi.io and we'll verify your identity to restore access
Alerts
The Alerts card on Account → Profile chooses which emails and text messages CaptiFi sends you. Each switch saves as you move it, and a line under the card confirms the save. The choices are yours alone: a colleague on your team sets their own on their own Profile page.
Email Notifications
- Go to Account → Profile and find the Alerts card
- Under Email Notifications, move the switch for each email you want
Enable Email Notifications is the master switch. While it is off, the four switches below are locked and CaptiFi sends none of these emails; switch it back on and your earlier choices apply again.
Access Point Status Notifications emails you when an access point goes offline or comes back online. The account that owns a venue can also take you off that venue's offline alerts, or add addresses with no login, under Offline alerts. Server Status Notifications does the same for the controllers behind your venues. Guest Connection Notifications sends an email each time a guest connects to your WiFi, so leave it off at a busy venue. Monthly Analytics Digest sends a monthly report of guest statistics for your venues.
SMS Notifications
The SMS Notifications section appears once the CaptiFi team has enabled SMS alerts for your account. Contact support to ask for it.
- Switch on Enable SMS Notifications
- Enter the number the texts should go to in SMS Phone Number, with the country code (for example +447700900000), and click Save number
- Move the switches for the alerts you want: SMS Server Alerts when a controller goes offline, SMS URL Monitoring Alerts when a monitored address stops answering, and SMS Access Point Alerts when an access point goes offline
The number and the three alert switches are only shown while Enable SMS Notifications is on. The same number appears as Phone on your profile card, so changing one changes the other. Texts to guests are separate: see SMS Marketing.
Notifications
The bell icon in the top bar shows recent events across your venues, campaigns, and reviews. Click View all notifications for the full history with All/Unread/Read tabs and a Mark all read button. Which events are also emailed or texted to you is set under Alerts above.
Data & Privacy
Exporting Your Data
- Go to My Venues → Guest Visits
- Pick the venue you want (via the venue switcher)
- Click Export all (CSV) to download the complete guest log
GDPR Tools
From Guest Visits you can select guests and use the bulk actions:
- Anonymise (GDPR) — strips a guest's personal details while keeping the anonymous visit record
- Delete (GDPR) — permanently removes selected guests and their data
Both actions ask you to type a confirmation before running. Marketing consent is captured on your splash page, and every marketing email includes an unsubscribe link automatically. See GDPR Best Practices for detailed guidance.
Related Pages
- Account Registration: signing up and your first login
- Team Members — invite colleagues and control what they can access
- Managing Your Subscription — plan, payment method, and invoices
- Plans & Pricing — compare plans
- Guest Analytics — the data behind your dashboard