
Appearance
Set-up wizard
The first time you sign in to my.captifi.io the set-up wizard opens. It asks how guests connect to your WiFi, then shows only the steps that apply to that choice. Most venues finish in five to ten minutes.
You can close the wizard at any point. It saves each step as you complete it, and it reopens where you left off the next time you sign in, on any device.
Signed up on the website?
Your business details and plan were captured at sign-up, so the wizard does not ask for them again.
Step 1: Choose how guests connect
The first screen lists every way CaptiFi can run your guest WiFi. Click one card, then Continue. Nothing is selected for you.
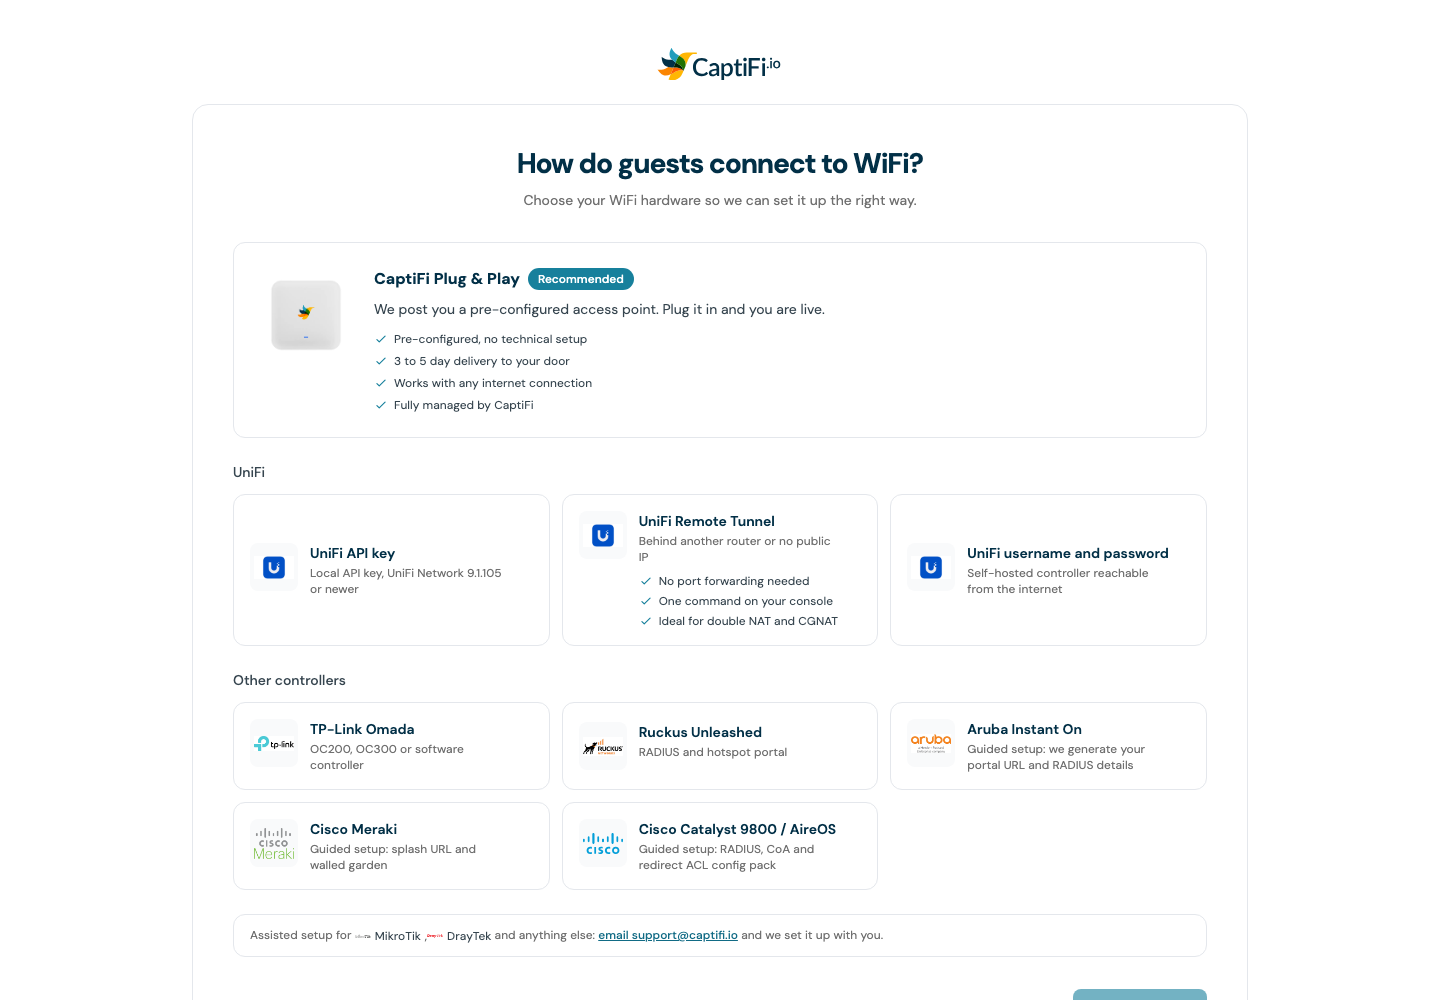
| Card | Choose it when | Steps that follow |
|---|---|---|
| CaptiFi Plug & Play | You want a pre-configured access point posted to you. No controller needed. On every plan. | Delivery and payment, venue, activate WiFi |
| UniFi API key | Your UniFi console is reachable from the internet and runs UniFi Network 9.1.105 or newer. | Connect with API key, venue, activate WiFi |
| UniFi Remote Tunnel | Your console sits behind another router, or you have no public IP (double NAT, CGNAT, 4G or Starlink). | Venue, install the tunnel, connect with API key, go live |
| UniFi username and password | A self-hosted controller reachable from the internet, signed in with a local admin account. | Find your controller, connect UniFi, venue, activate WiFi |
| TP-Link Omada | An OC200, OC300, software controller or the paid Cloud-Based Controller. | Connect Omada, venue, activate WiFi |
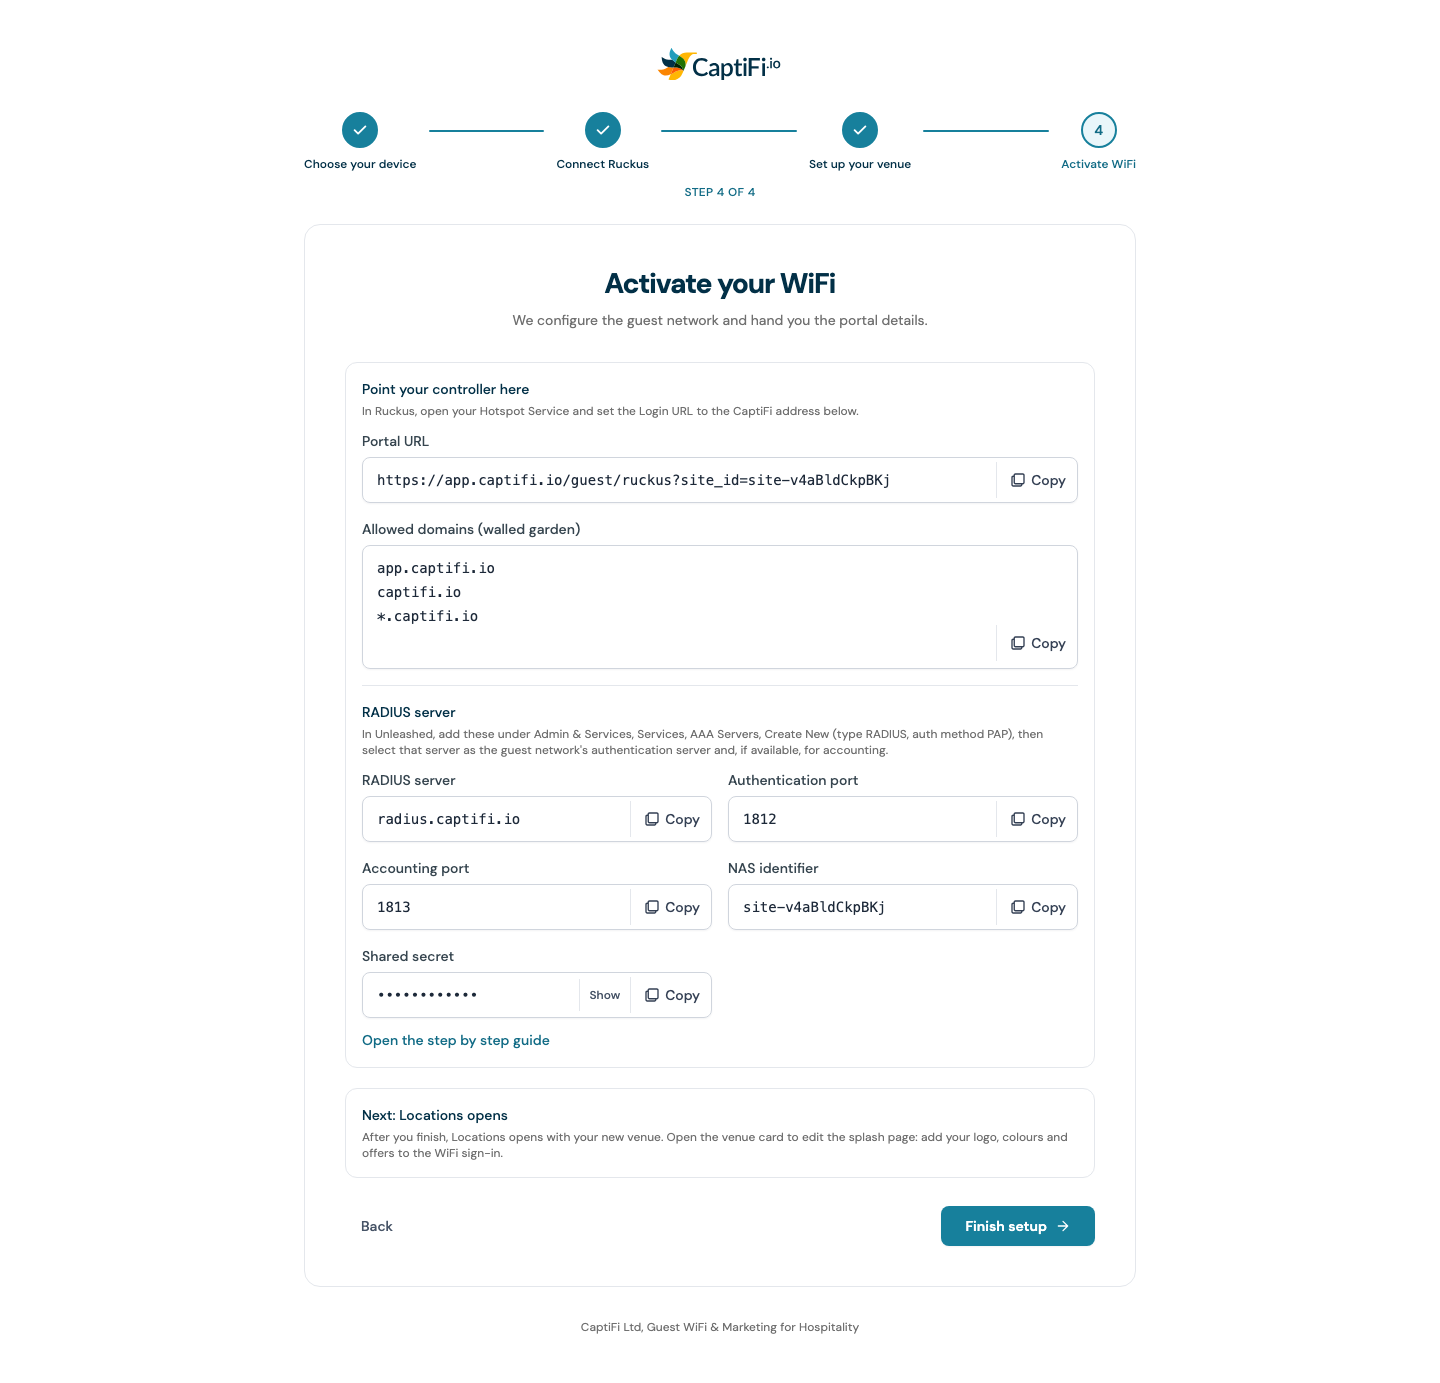
| Ruckus Unleashed | Ruckus access points running Unleashed. The wizard shows your portal URL and RADIUS values. | Connect Ruckus, venue, activate WiFi |
| Aruba Instant On | Aruba Instant On access points. Guided setup: the wizard generates your portal URL and RADIUS details. | Venue, configure your controller, check the connection |
| Cisco Meraki | Meraki MR access points. Guided setup: the wizard shows your splash URL and walled garden list. | Venue, configure your controller, check the connection |
| Cisco Catalyst 9800 / AireOS | A Cisco wireless LAN controller. Guided setup: the wizard builds your RADIUS, CoA and redirect ACL config pack. | Venue, configure your controller, check the connection |
| Fortinet FortiAP | FortiAP access points managed by a FortiGate. Guided setup: the wizard generates the portal URL, RADIUS shared secret and NAS identifier your IT team enters on the FortiGate. | Venue, configure your controller, check the connection |
On Lite you see the same cards, so you can pick CaptiFi Plug & Play and order the device with its refundable deposit, or pick the card for your controller. See The Lite plan.
MikroTik, DrayTek and anything not listed use assisted setup. Click the support@captifi.io link under the cards and we set it up with you. See Choosing your hardware if you are not sure which card to pick, or use the start with a CaptiFi device link under the cards and we set that up with you.
Step 2: Set up your venue
Every path asks for the venue next. The screen is the same for all of them.
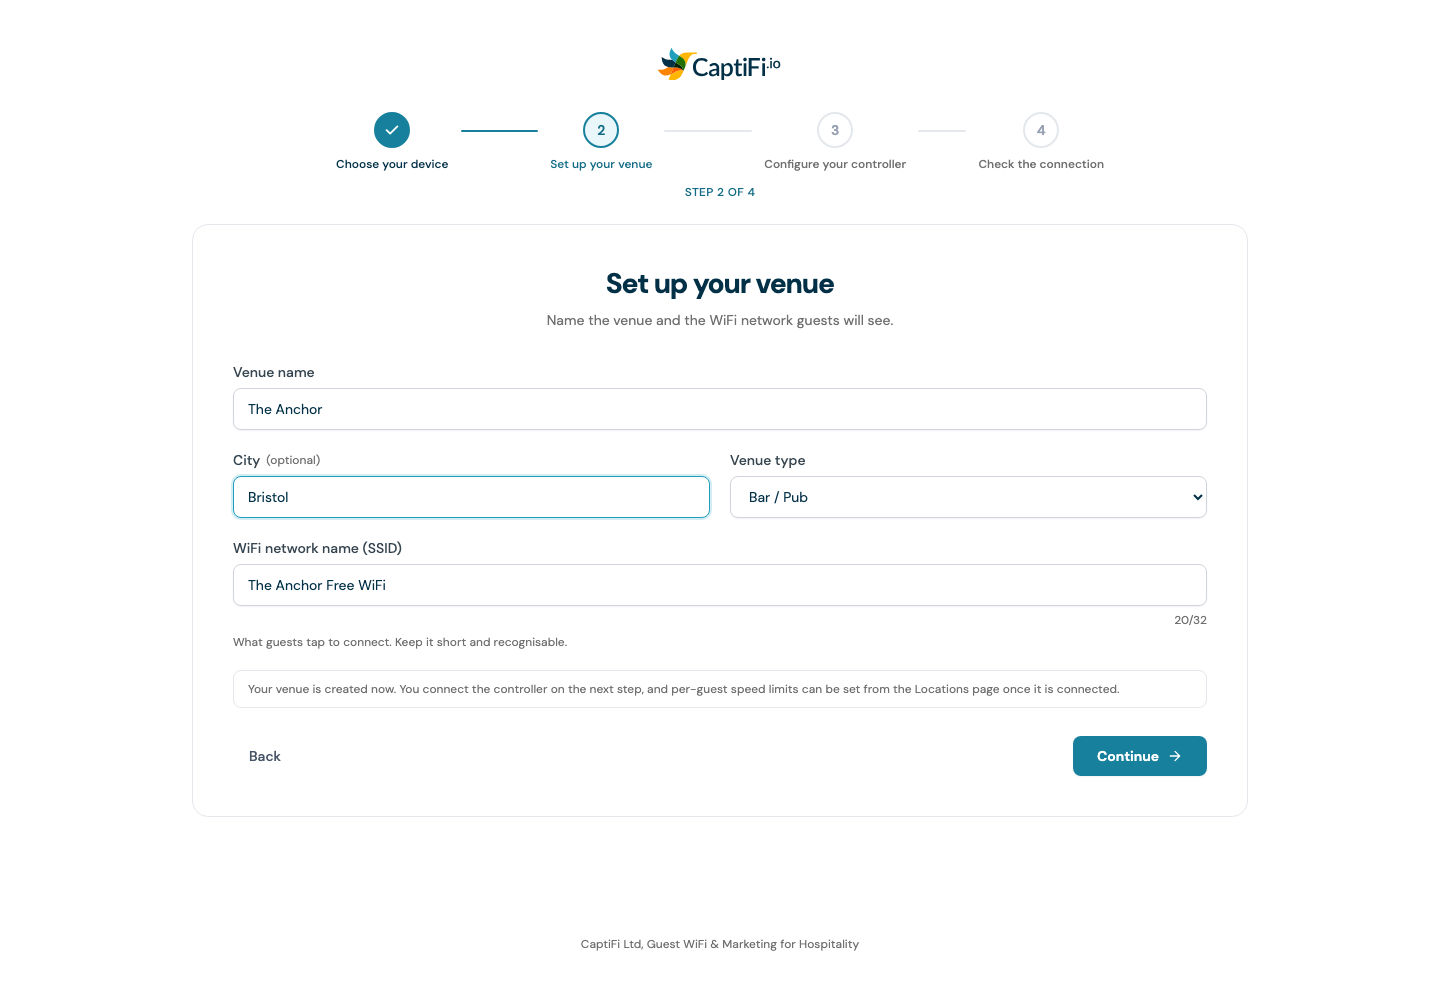
- Venue name: what the venue is called. Your business name is filled in for you.
- City: optional.
- Venue type: restaurant, bar or pub, cafe, hotel, retail or other. This sets sensible defaults for your splash page.
- WiFi network name (SSID): the network guests tap to join, up to 32 characters. A suggestion based on your venue name is filled in.
- UniFi paths that discovered more than one site on your controller also show a Controller site dropdown. Pick the site this venue maps to.
- The Cisco path shows a WLC OS choice: IOS-XE (Catalyst 9800) or AireOS.
- Click Continue.
For UniFi Remote Tunnel, Aruba Instant On, Cisco Meraki, Cisco Catalyst and Fortinet FortiAP the venue is created as soon as you click Continue, because the next step needs values that belong to it.
Path: CaptiFi Plug & Play
Delivery and payment
- Enter the delivery name, address and a phone number for the courier.
- Enter your card in the secure card form. A refundable deposit is taken now, in your billing currency (see Hardware), and returned when you send the device back.
- Click Place order.
If the deposit is declined, the message says your card was saved but the deposit was declined, and asks you to use another card or contact your bank. The card form comes back ready for another card and the delivery address you typed stays filled in, so enter the other card and click Place order again.
Your order confirmation prints as a receipt showing the order number, the deposit taken and your activation PIN. Write the PIN down: you enter it on the device when it arrives, and it is emailed to you as well.
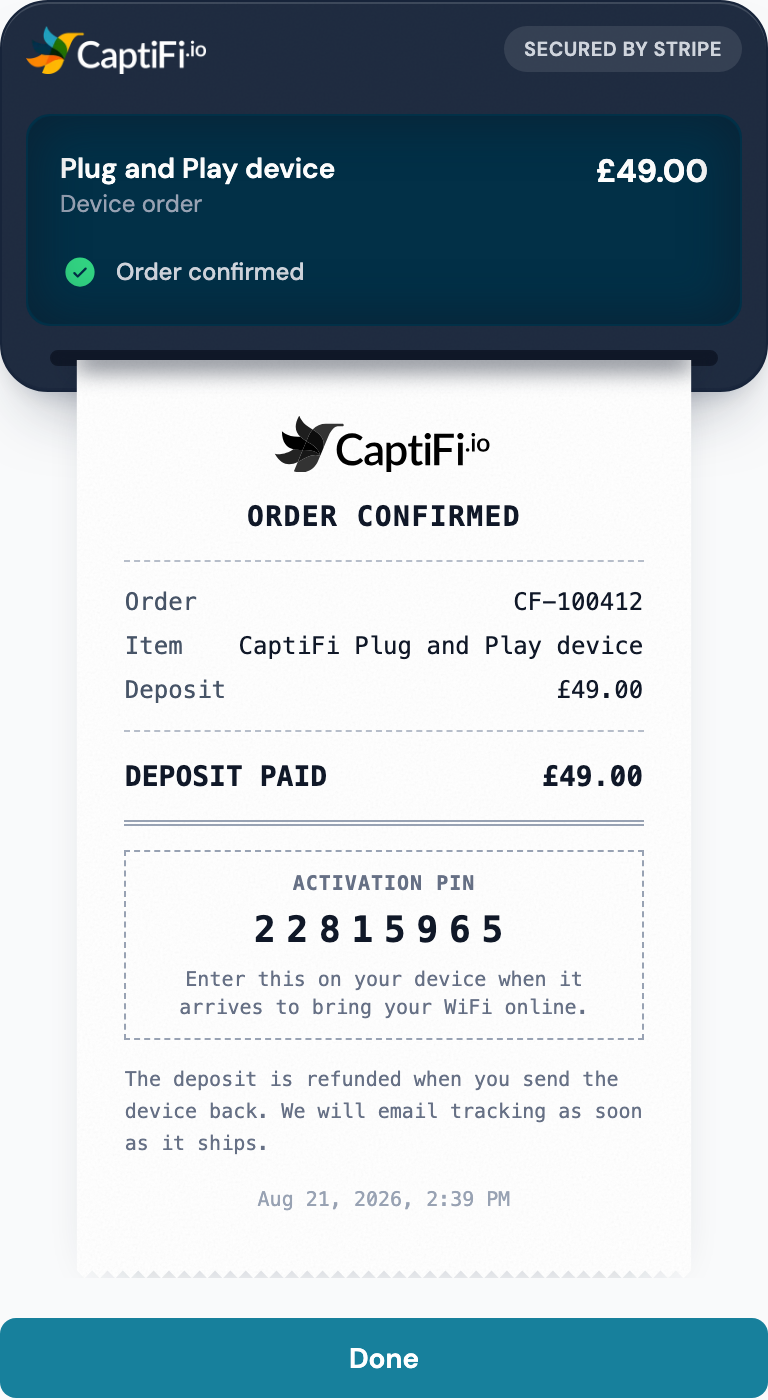
- Click Continue setup, then complete the venue step so everything is ready the moment the device arrives.
Activate WiFi
The final step confirms the venue is created. Click Finish setup to open your dashboard. When the device arrives, follow the Quick Start to plug it in and enter the PIN.
Path: UniFi API key
- Controller name: a label for your own reference.
- Controller URL: the public address or hostname of your console. CaptiFi adds
https://and finds the right port. - API key: paste the key from UniFi Network. Click Show to check it before you connect.
- Click Connect controller. CaptiFi signs in with the key and discovers your UniFi sites.
Then complete the venue step. The Activate WiFi step pushes the guest network and splash page to your controller and reports when it is done. If the push fails, click Retry; you can also finish and push again later from My Locations.
The full UniFi guide, including how to create the key and open your console to CaptiFi, is at Connect UniFi to CaptiFi.
Path: UniFi Remote Tunnel
The tunnel is for consoles CaptiFi cannot reach from the internet. Your console dials out to CaptiFi instead, so no port forwarding is needed.
Install the tunnel
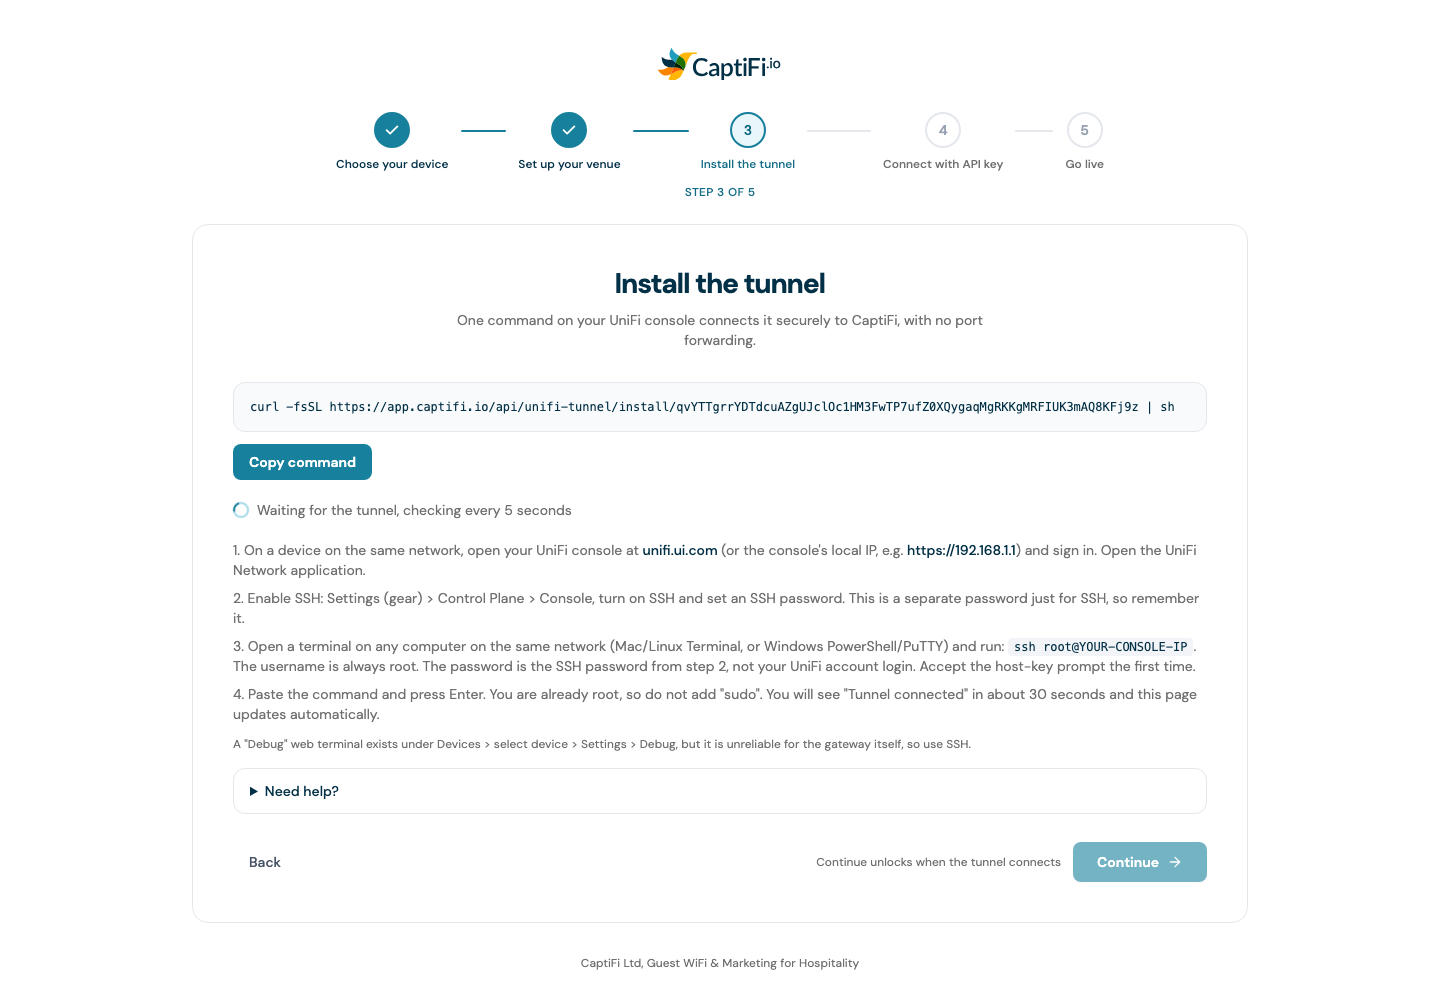
- Click Copy command. The command is unique to this venue.
- Turn on SSH on your console: Settings, Control Plane, Console, switch SSH on and set an SSH password.
- From any computer on the same network, run
ssh root@YOUR-CONSOLE-IP, paste the command and press Enter. - Leave the page open. It checks every five seconds and shows Tunnel connected on its own, usually within 30 seconds. Continue stays greyed out until then.
The step-by-step with every console variation is in the UniFi guide under Path B: Remote Tunnel.
Connect with API key
- In UniFi Network go to Settings, Control Plane, Integrations and click Create API Key. Copy it straight away, it is only shown once.
- Paste it into the UniFi API key field and click Connect controller.
The key is stored encrypted and never shown again. One click wires the server connection, the controller site and the splash configuration.
Go live
- The page lists the WiFi networks on your controller with how many devices are on each. Pick the one guests should sign in on, or choose Create a new guest SSID and type its name.
- Read the warning: every device on the network you gate is walled behind the splash page as it reconnects. Printers, tills and music players cannot complete a splash page, so gate a guest-only network.
- Click Go live. CaptiFi applies the portal and gates the network.
- Click Finish setup.
If you would rather do this later, click Finish later. You can gate a network at any time from My Locations.
After you finish
The finishing screen ends with the one thing to do next: join your guest WiFi with the phone in your hand and sign in as a guest. Your first guest shows on the dashboard within a minute, and the Your first guest card on the dashboard ticks off as you go.
If two days pass after you finish and no guest has signed in, CaptiFi emails you once to ask you to run that test yourself, naming your venue and your WiFi network. If the WiFi page does not open on your phone, or the sign-in does not go through, reply to that email with what you saw and we check the device and the page from our side.
Path: UniFi username and password
- Controller address: the local IP or hostname of your controller. Click Test connection. CaptiFi checks it is reachable and really is UniFi before asking for a login.
- Controller name, username and password for a local admin account. Tick the box if the account uses two-factor authentication, then enter the six-digit code when asked.
- Click Connect controller.
Then complete the venue step and Activate WiFi as for the API key path.
Path: TP-Link Omada
- Controller URL: a public IP or domain CaptiFi can reach, port 8043 by default.
- Controller ID: the long id segment from your Omada controller URL.
- Operator username and password: a dedicated operator account.
- Click Connect controller.
Then complete the venue step. The Activate WiFi step shows the portal URL to enter on your Omada controller. See TP-Link Omada for the controller-side steps.
Path: Ruckus Unleashed
- Controller name: a label for your Ruckus controller.
- Click Continue.
Then complete the venue step. The Activate WiFi step shows the portal URL for the Hotspot (WISPr) service and, under it, the RADIUS values Unleashed needs: the RADIUS server, authentication and accounting ports, NAS identifier and shared secret, each with a Copy button and the secret masked until you click Show. A line under the heading says where they go in Unleashed. The Ruckus guide covers the controller side step by step.
Path: Aruba Instant On, Cisco Meraki, Cisco Catalyst 9800, Fortinet FortiAP
These controllers are configured on the vendor's side. The wizard generates every value you need and then watches for the first traffic from your controller.
Configure your controller
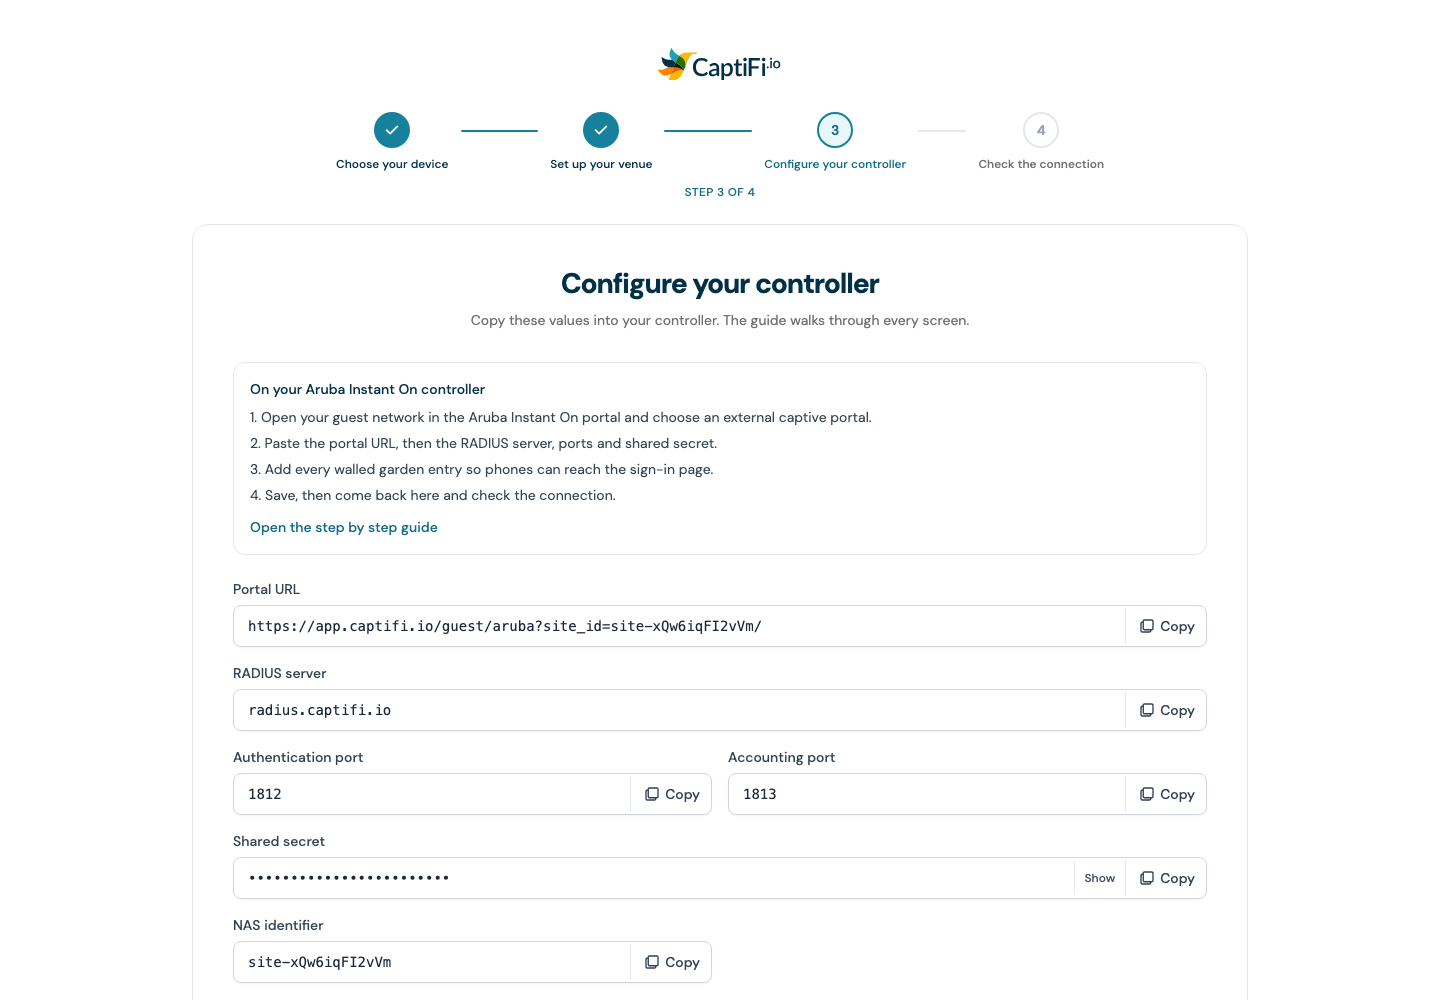
- Each value has its own Copy button: the portal URL, the RADIUS server and ports, the shared secret, the NAS identifier, the CoA port and redirect ACL name for Cisco, and the walled garden domains as one block. Copy everything copies the whole pack as plain text for your network team.
- Click Open the step by step guide for the vendor guide with a screenshot per click: Aruba Instant On, Cisco Meraki, Cisco Catalyst 9800 or Fortinet FortiGate / FortiAP.
- Enter the values on your controller.
- Click I have done this, check my connection.
The values stay available after the wizard: open the venue's card under My Locations and click Controller settings. Nothing is lost if you close the page.
Check the connection
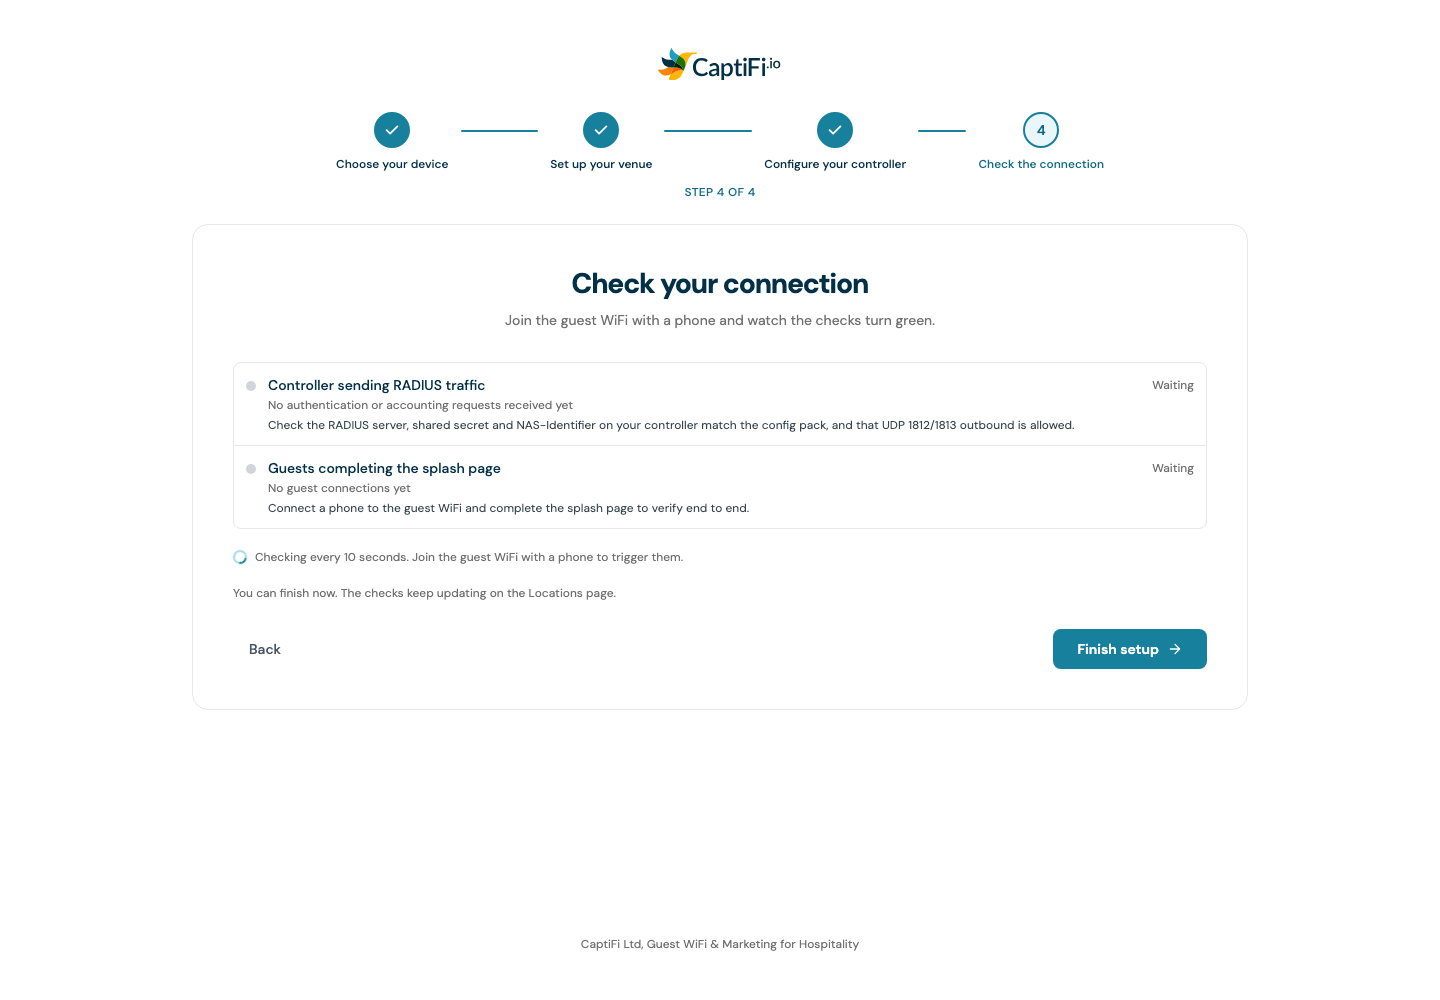
The page lists what CaptiFi has seen from your controller and refreshes every ten seconds:
- Controller sending RADIUS traffic (Aruba, Cisco and Fortinet): turns green when the first authentication request arrives. If it stays pending, check the shared secret and NAS identifier match exactly and that UDP 1812 and 1813 are allowed out.
- Guest device reached the splash page: turns green when a phone on the guest WiFi loads your sign-in page.
- Guests completing the splash page: turns green when the first guest signs in.
Connect a phone to the guest WiFi and complete the splash page to light all of them. You do not have to wait: Finish setup is always available, and the same checks keep updating on the venue's page under My Locations.
Finishing
When you click Finish setup, CaptiFi runs through a short checklist on screen: it checks the connection to your controller or device, gets the venue ready, prepares your dashboard and then opens it. Each line ticks off as it completes, and the whole thing takes a few seconds.
After the wizard
Your dashboard opens on My Locations. From here:
- Design your splash page: logo, colours, sign-in fields and questions, in the Splash page builder.
- Watch guests arrive under Guests as soon as your device or controller is live.
- Switch on integrations such as Google Reviews (Essentials and above) and Mailchimp (Growth and above) under Integrations. Integrations are not on Lite.
If something did not connect, the venue card on My Locations shows the connection state and lets you reconnect the controller or push the WiFi settings again. If the Activate your WiFi step reported that the controller refused the settings, you can still finish: open the venue card, then WiFi network, to re-apply them once the controller is reachable.