

Appearance
Splash Page Builder
The Splash Page Builder is where you design the WiFi login page your guests see. It's a full-screen editor with a live phone preview: every change you make appears instantly, exactly as guests will see it.
Opening the Builder
- Log in to my.captifi.io
- Go to WiFi & venues → My Venues
- On your venue's card, click Edit splash
The builder opens full screen. The left panel holds the page sections under three tabs, and the right side shows a live phone preview:
- Content: your logo, the welcome text, the guest sign-in form, the rewards line, the Connect button and your terms
- Design: the background, the card colours and the font, with the Style from website line at the top
- After sign-in: the screen guests see once they are online, your promotions and the advanced settings. Opening the After sign-in page section shows the connected screen in the phone preview
You can also click any part of the preview to jump straight to its settings. The builder switches to the right tab for you.
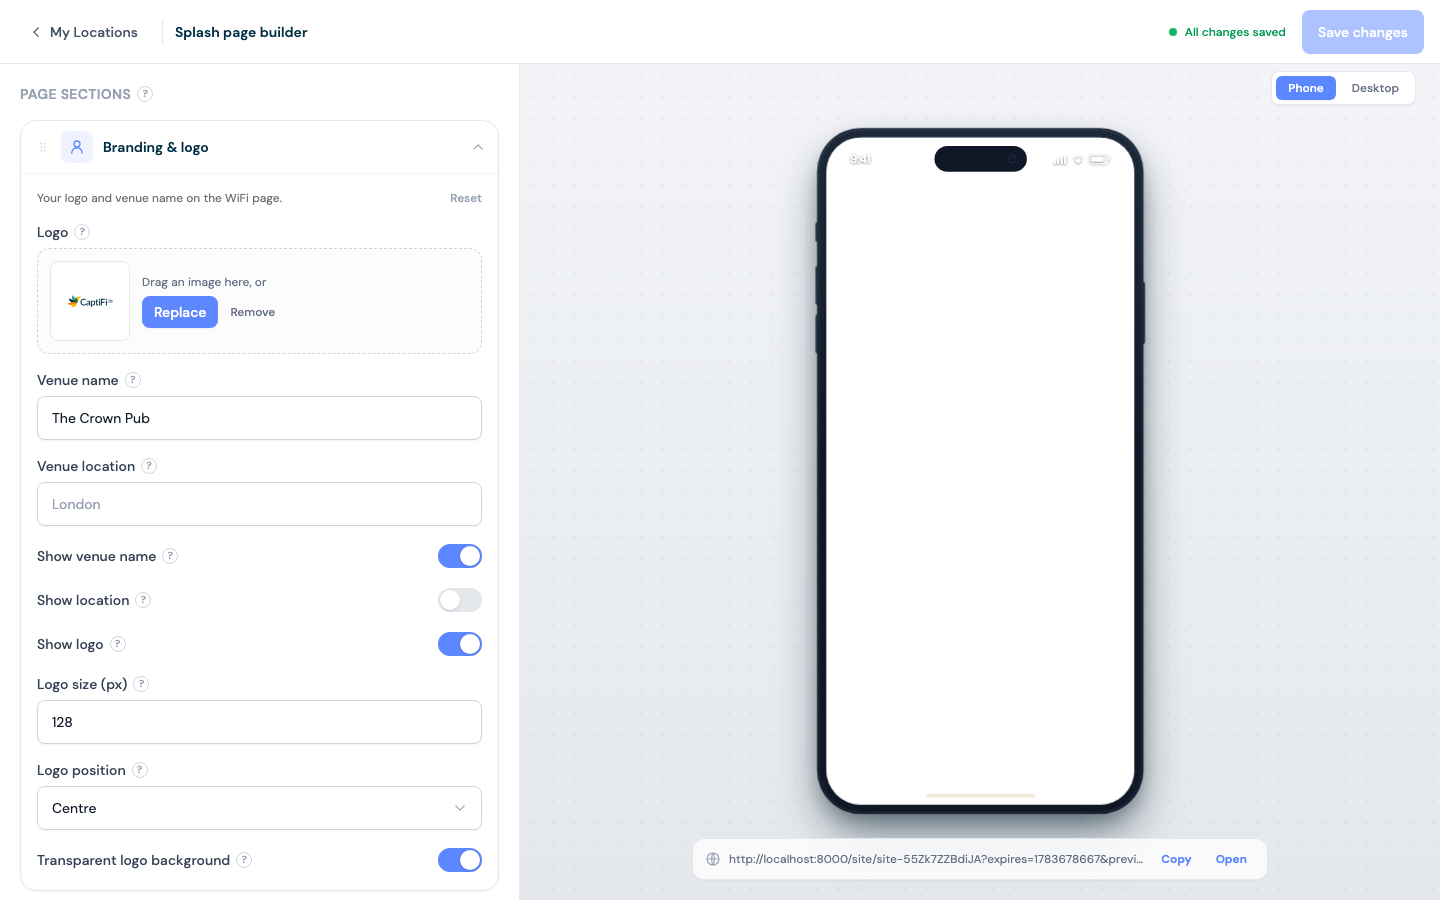
You can sign in on the phone preview to test the page. It walks the same form, consent step and connected screen a guest sees, and saves nothing: no guest record, no marketing consent, nothing in Connected Guests or Guest Visits, and no email or text. The connected screen says "Preview: nothing was saved." so you can tell a test from a real sign-in. The preview keeps your unsaved edits all the way through, so a question you have just switched on behaves as it will once you save.
When you're happy, click Save changes (top right). The top bar also shows your live splash page URL with copy/open buttons so you can check the real thing.
Style From Your Website
The fastest way to a branded page. Click Style from website at the top right of the builder, beside Save changes, or the Style from website line at the top of the Design tab (on a phone the top bar shows the button as a sparkle icon). A window opens with the website on your account filled in: check the address, or paste another, and click Read website.
CaptiFi reads the site, which takes 10 to 30 seconds. The window shows how far it has got and how long it has taken, and Cancel stops waiting. If the site can't be read, the window says why, and you can change the address or click Try again.
It then lists what it found, each piece shown as your design's value next to the suggested one:
- Colours: up to four colour choices, starting with the colour of your logo, then your site's theme colour and the colours its own stylesheets use most. Under the choice you pick, each colour it sets (button, button text, button hover, theme, accent and link) has its own swatch, hex code and tick box. The button text is always set to be readable on the button, and the stock colours WordPress, Elementor, Divi and Bootstrap put on every site are never offered. When the site has no photo, Plain background offers a flat page in your colour
- Logo and photo: your logo, downloaded from your site, and the site's background photo when it has one
- Font and name: the font, when your site uses one from Google Fonts, and your venue name, read from your site's title. A font WiFi pages cannot load, such as a licensed font like Gotham, is left out, and you can pick another under Colours. If your site uses each visitor's own phone or computer font (the system font), there is no font to copy, the window says so, and your font stays as it is. The venue name is never ticked for you, because it is also the sender name on your follow-up emails
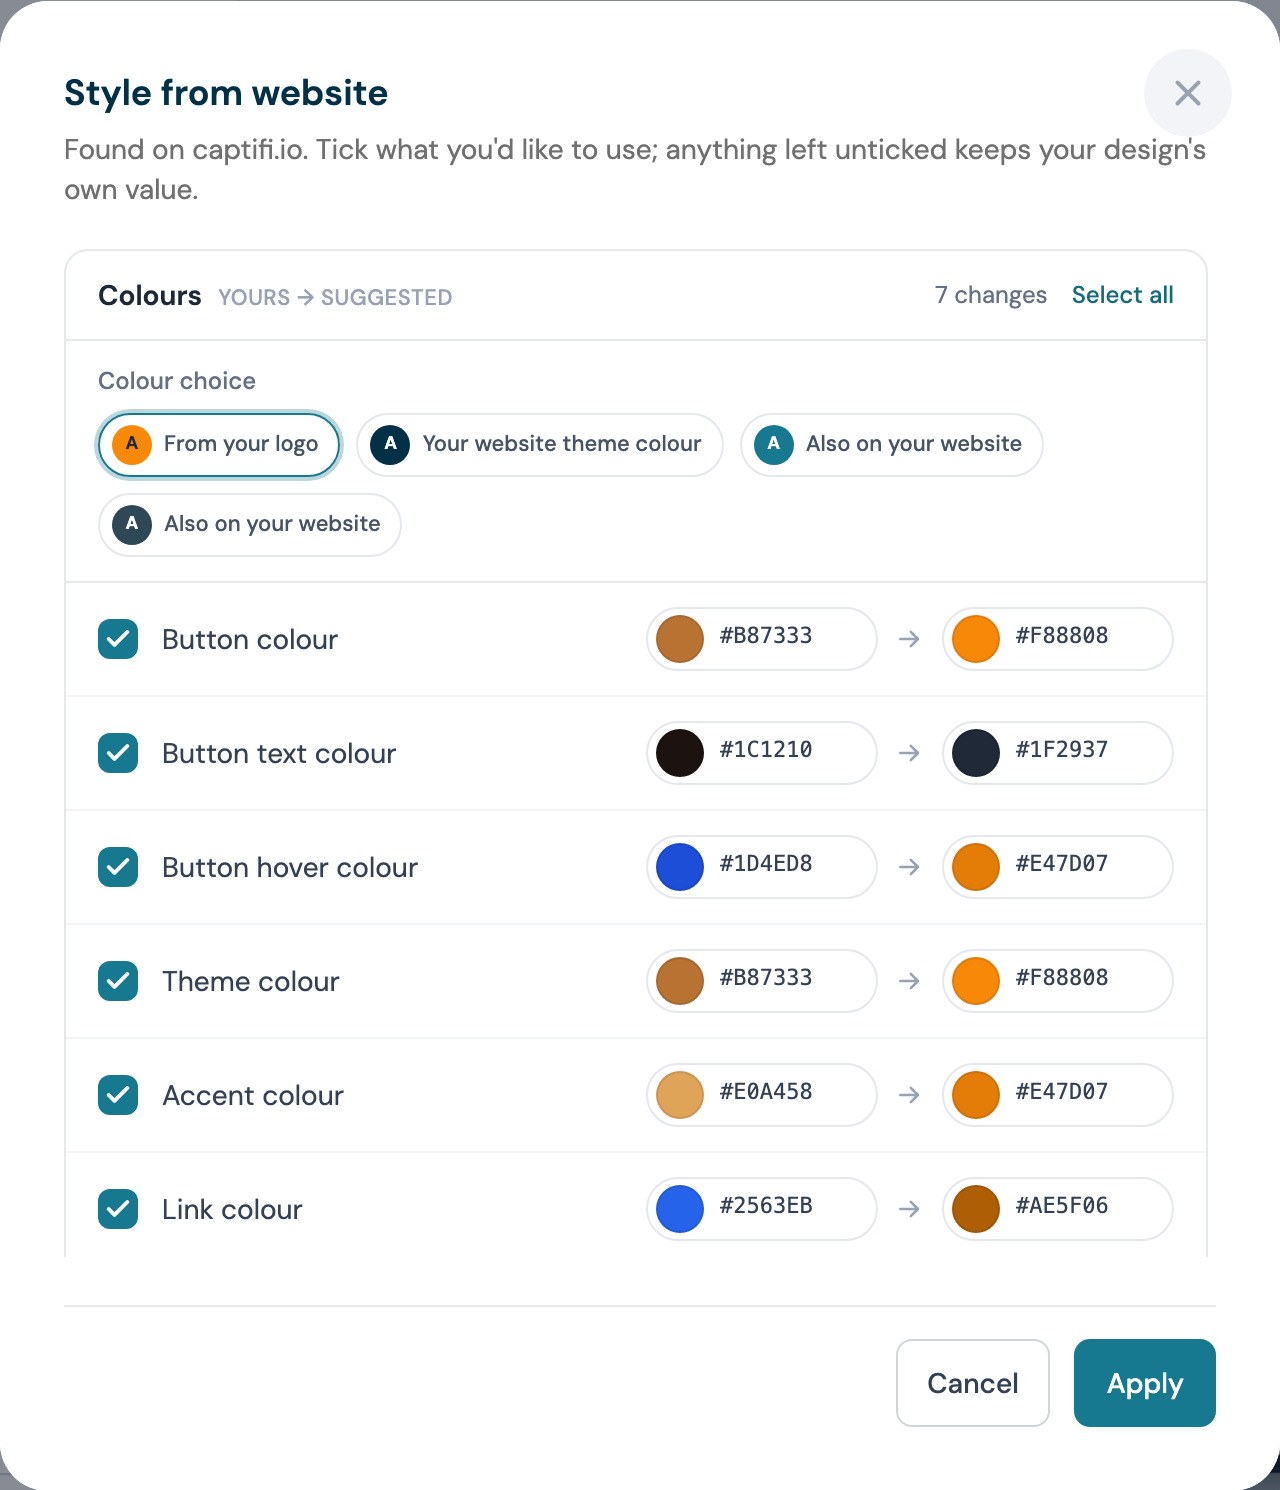
Each section counts its changes and has Select all or Deselect all. A colour your design already uses is marked as no change. Tick what you want and click Apply: the ticked pieces go into the live preview, and anything left unticked keeps your design's own value. Nothing is published until you click Save changes.
Once applied, a line at the top of every tab says the style from your site is in the preview. Change opens the same list again, so you can tick or untick pieces without reading the site again, and Undo takes the lot back out. Reading a website again replaces the earlier read. A field you change yourself after the read keeps your change, whatever you tick. When CaptiFi can't find a logo or any brand colours on the site, the window says so and leaves yours as they are.
Page Sections
Each section below sits on one of the builder's tabs. Content has Branding & logo, Welcome text, Guest sign-in form, Join our rewards, Connect button and Terms & privacy. Design has Background and Card & colours. After sign-in has the After sign-in page, Promotions and Advanced. Drag sections within a tab to reorder them in the panel. Each section has a Reset button that sets it back to the default design.
Branding & logo
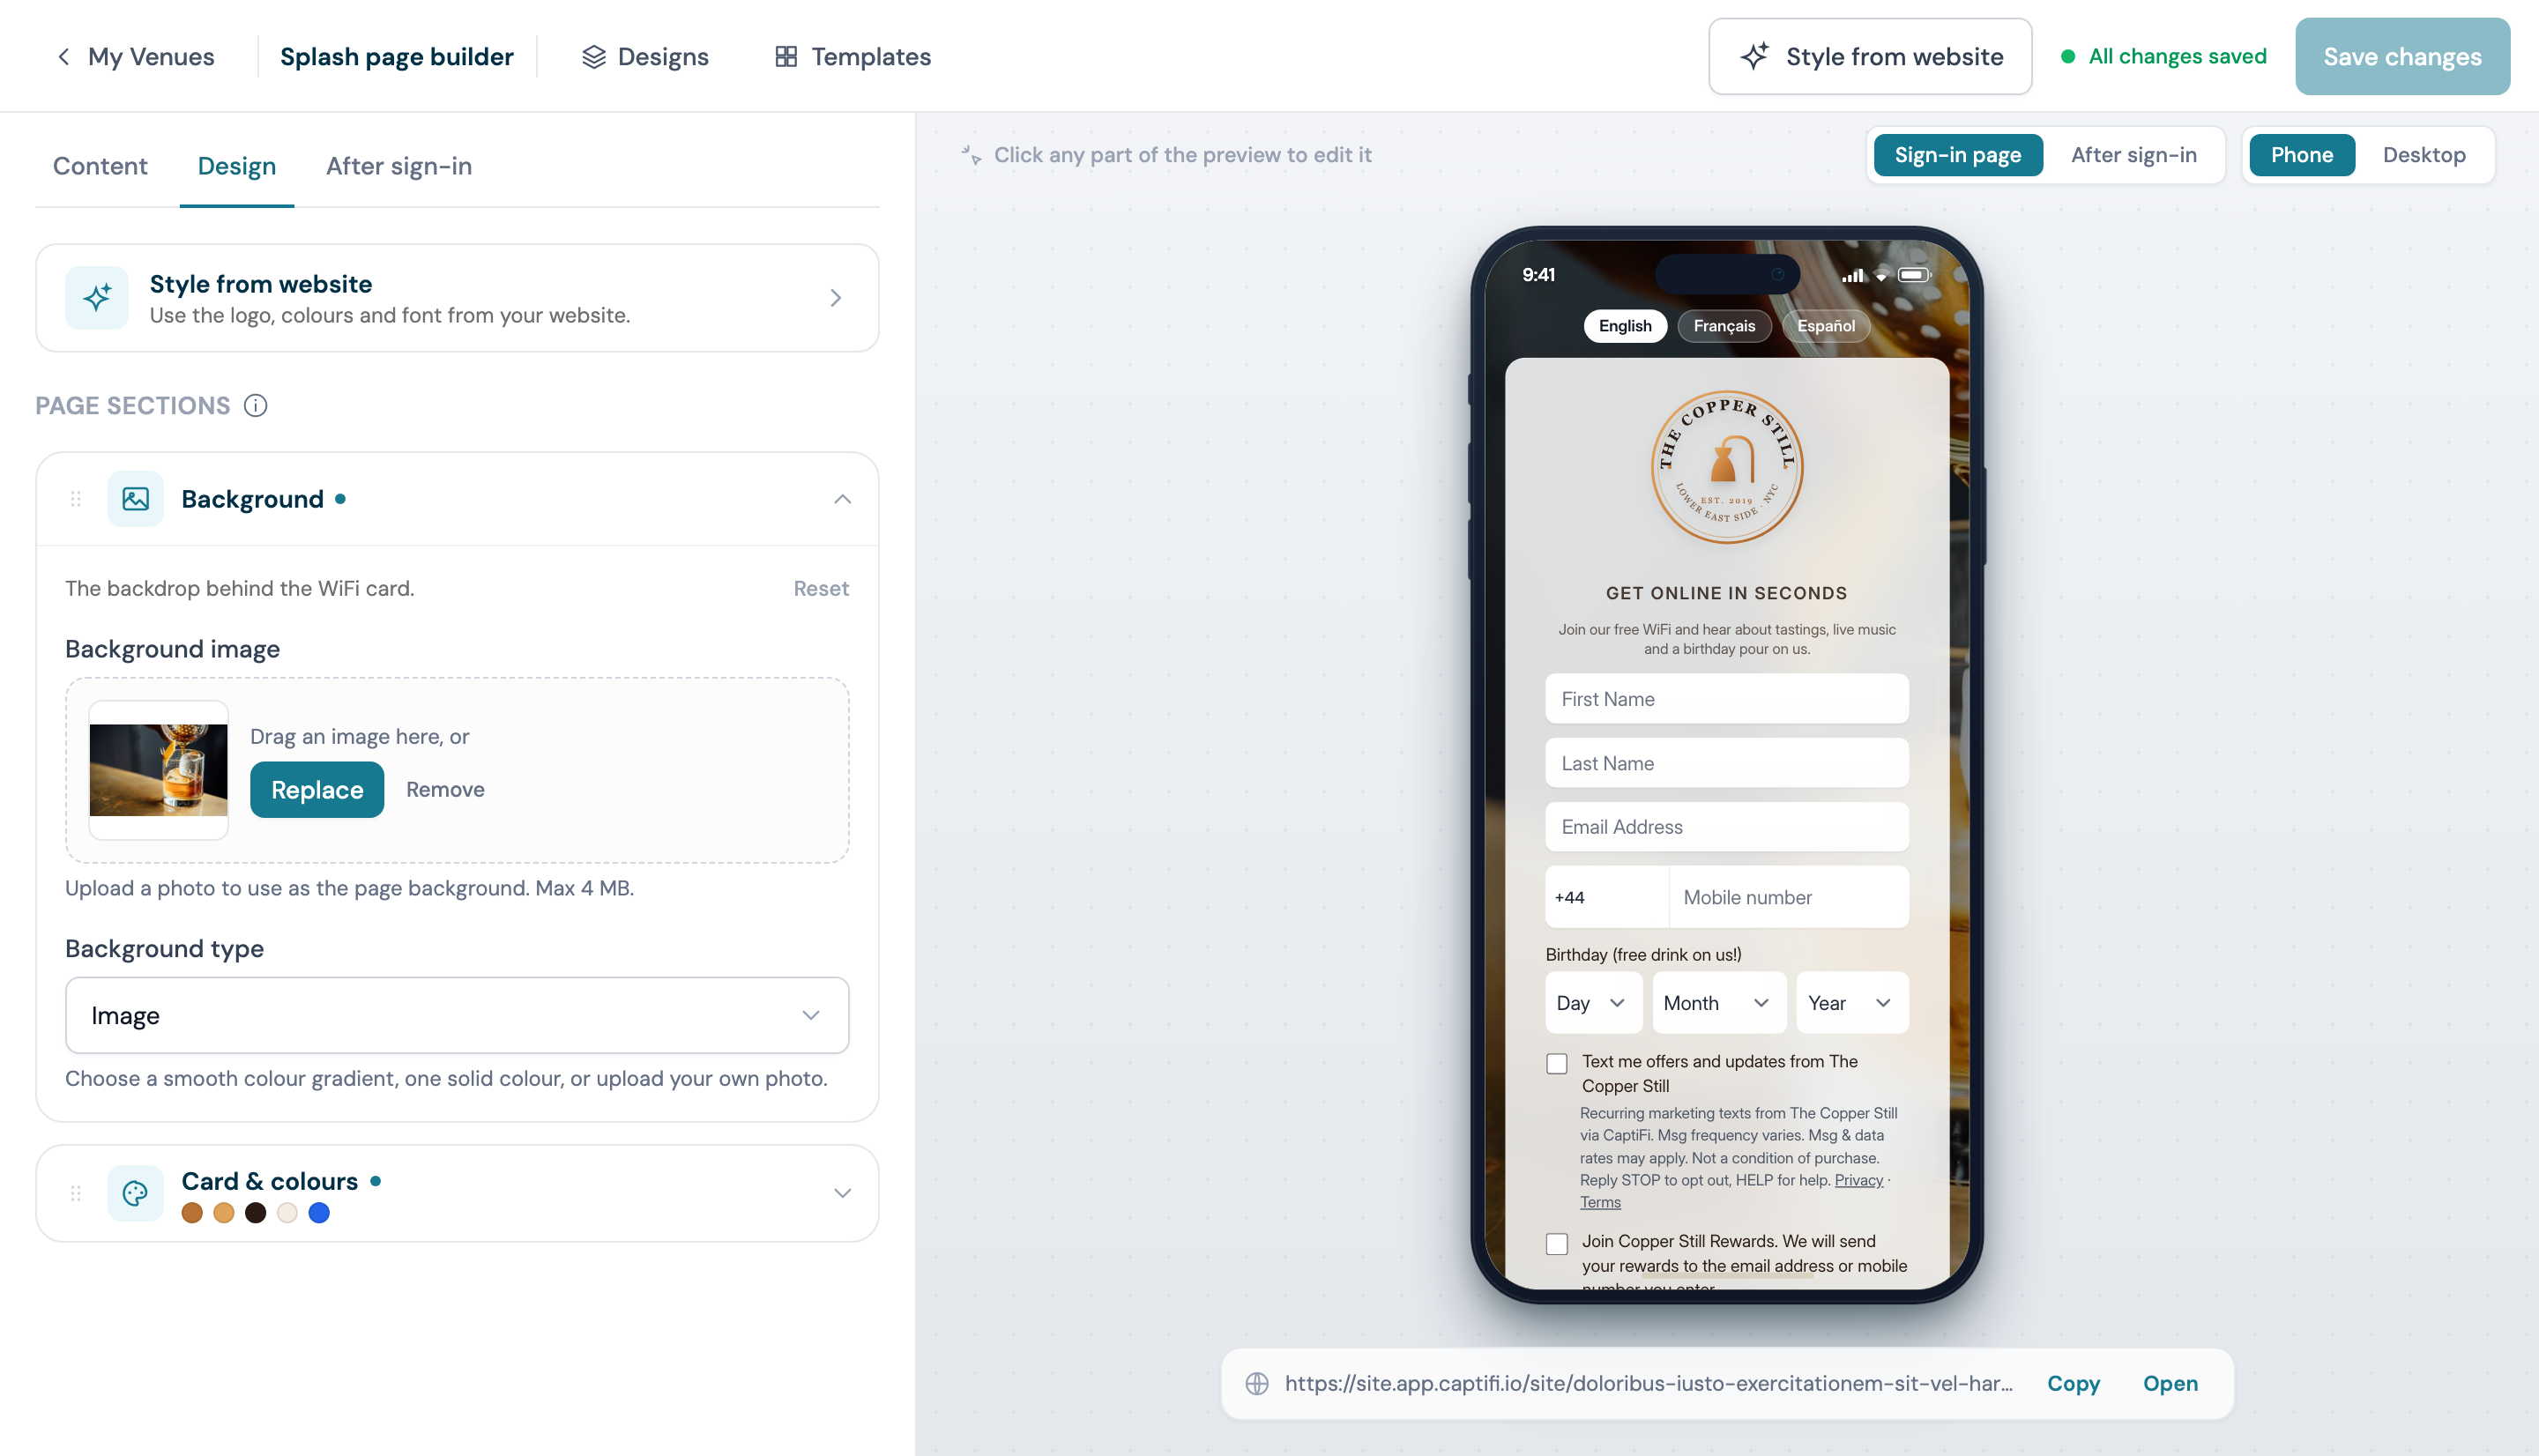
- Upload your logo as a JPG, PNG, GIF or WEBP image up to 4 MB, set its size and position (centre/left/right), and optionally give it a transparent background. New venues start without a logo: your venue name is shown until you upload one
- Set the venue name and location text, and choose whether to show them
Background
- Choose a gradient (start/end colours), a solid colour, or a background image (upload)
Welcome text
- Form title (default "Connect to Free WiFi") and an optional subtitle
- Toggle the connection-time badge on or off
Guest sign-in form
Control exactly what guests are asked for:
- First name: show/hide, required or optional, custom placeholder text
- Last name: show/hide, required or optional, custom placeholder text
- Email: show/hide, required or optional, custom placeholder text, and whether guests type it twice (see Asking for the email twice)
- Custom fields: add your own questions (e.g. "How did you hear about us?"). Answers appear as extra columns on your Guest Visits page. Once a question is saved, the name its answers are stored under stays fixed, so you can reword the question later and earlier answers stay in the same Guest Visits column. Each question can also have a version in every language you offer guests (see Your Own Questions in Each Language). Answers to a Dropdown question are also counted under Visitor types on the Analytics page and in your reports, and you can pick guests by their answer in a segment
A field that is switched off is not shown to guests at all, whatever its required setting. Switch it back on and its required setting is as you left it.
Two custom field types deserve a special mention:
- Checkbox - a tick box with your own wording. Set it to required and guests cannot connect until they tick it, ideal for confirmations like "I confirm I am 18 or over" at licensed venues
- Date of Birth - collects the guest's date of birth, with a configurable minimum age (13 to 25, default 13). Guests below the minimum age cannot submit the form. Licensed venues typically set 18. At venues in the US and Canada the field also becomes required for any guest who ticks the SMS opt-in checkbox (see Collecting numbers for SMS Marketing). A required Date of Birth field also powers age-gated Klaviyo accounts. A guest whose date of birth shows them under 18 still gets online, and CaptiFi keeps no marketing consent for them (see Guests under 18)
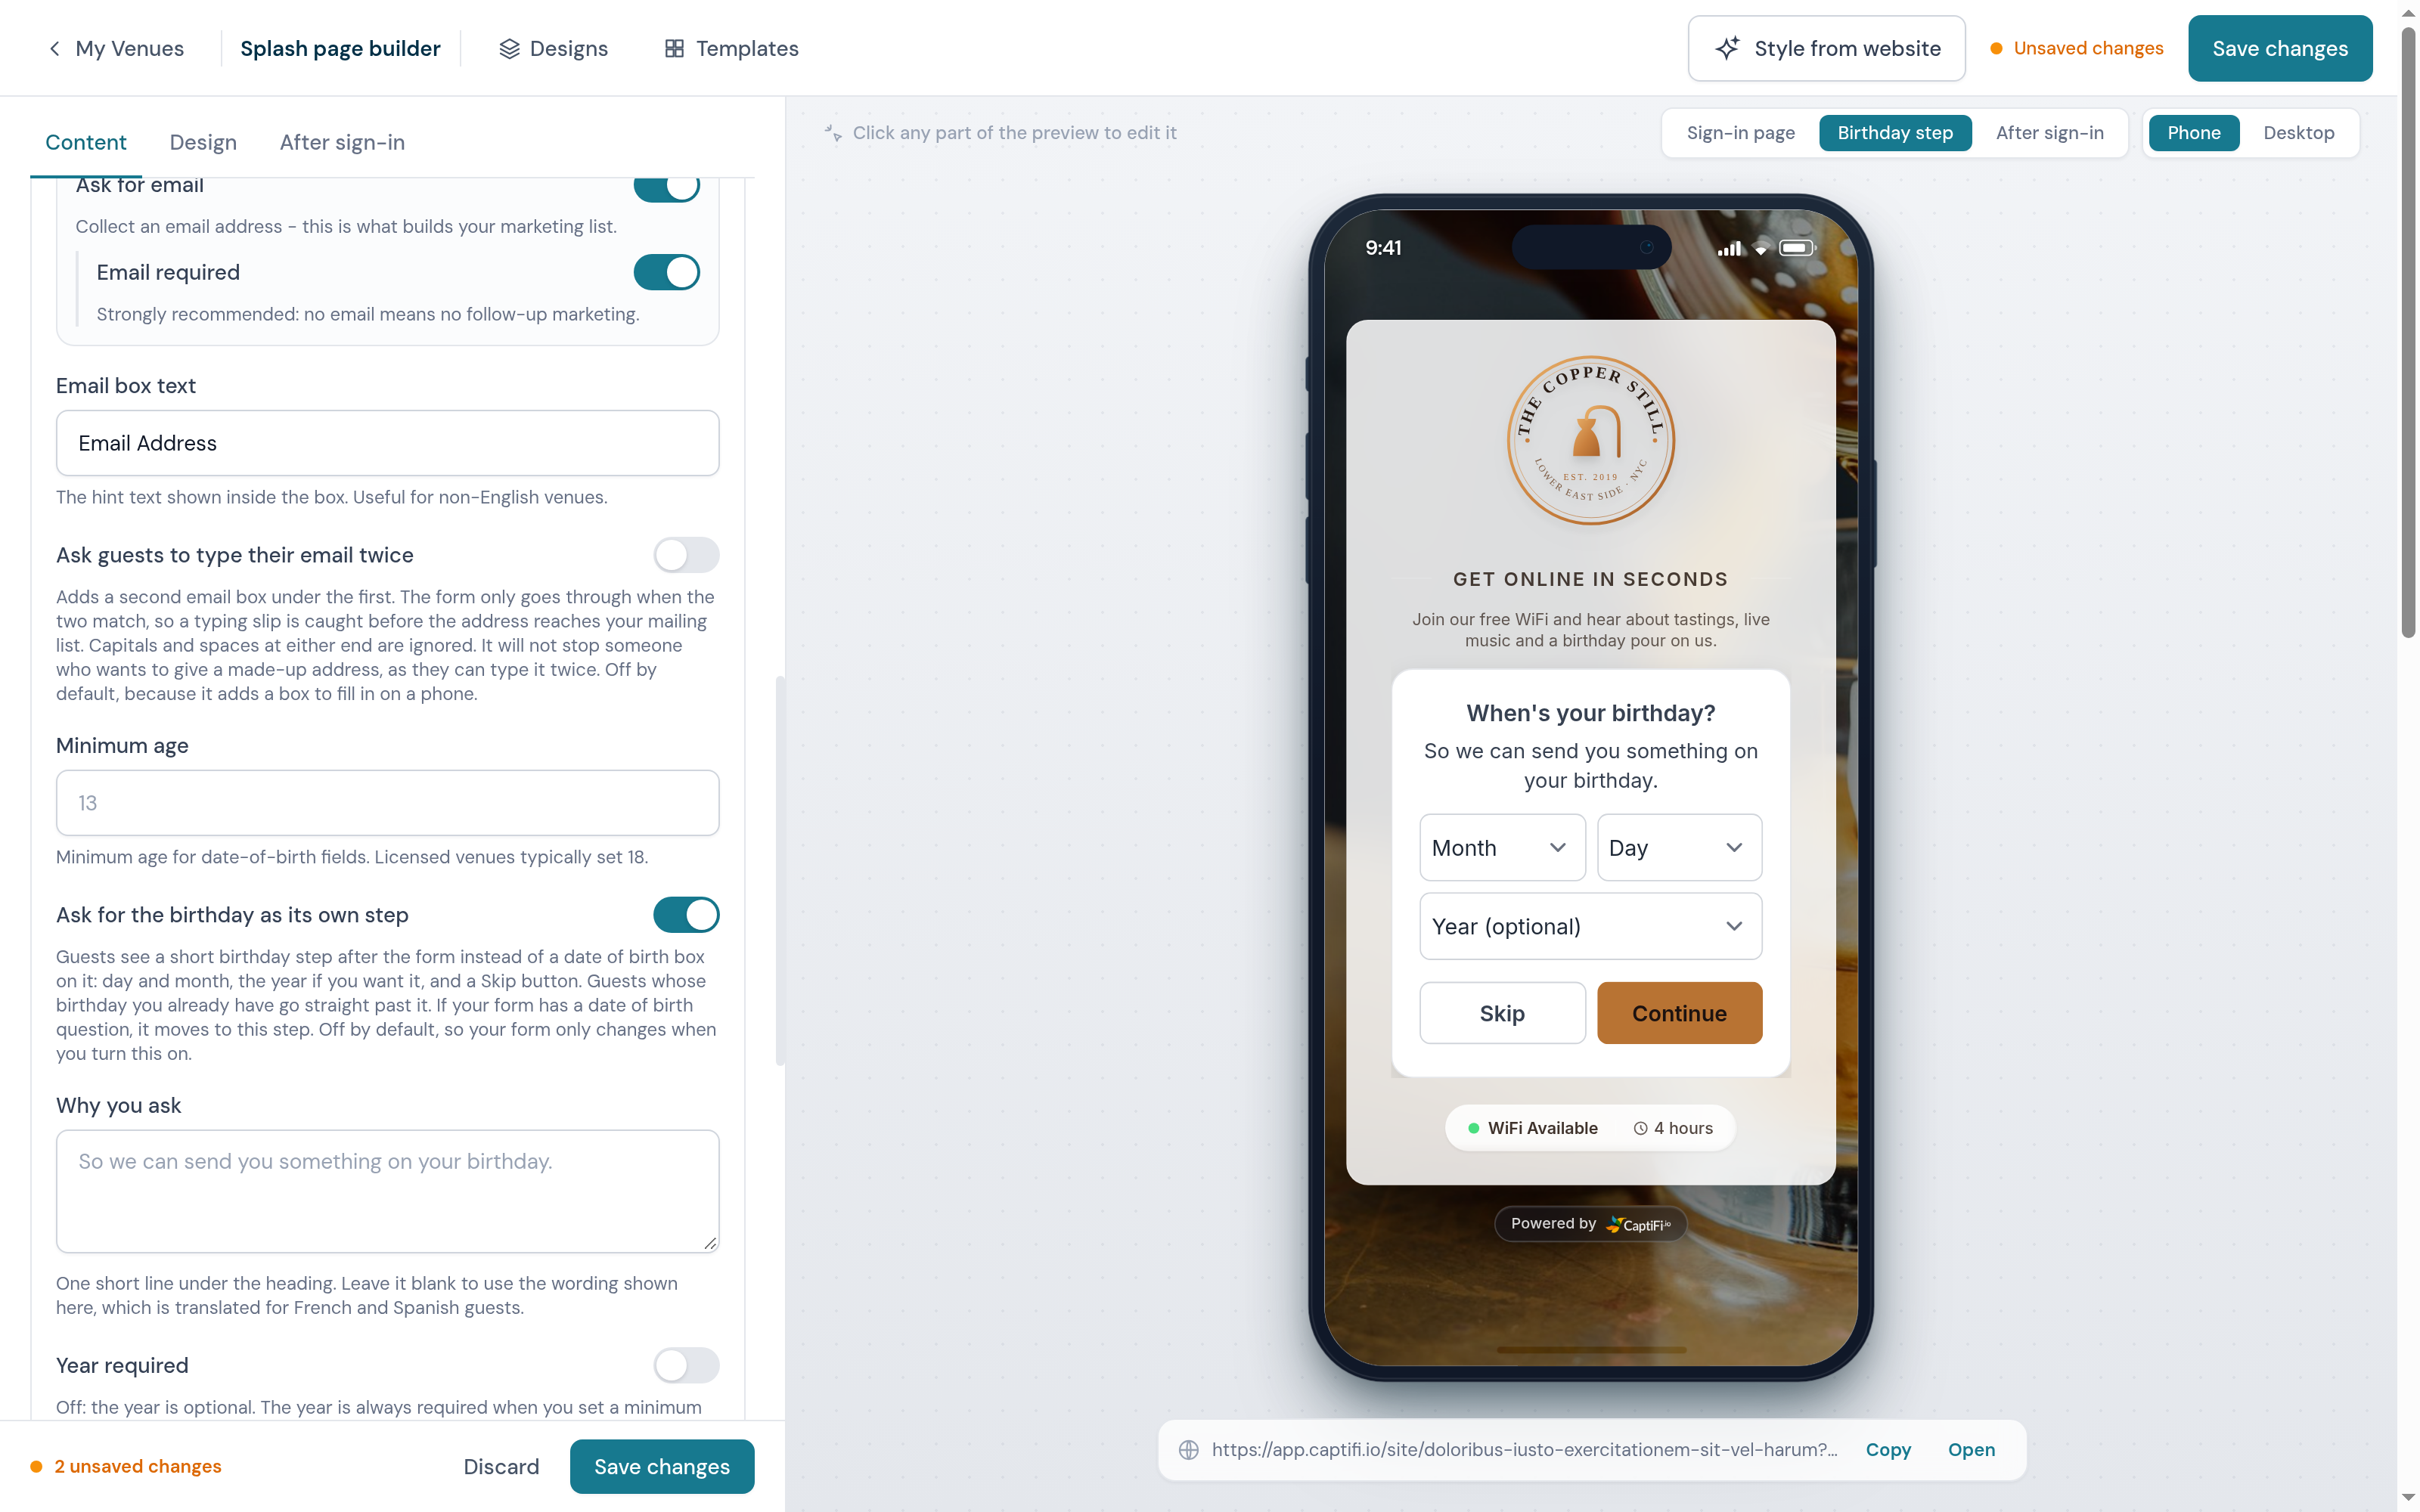
Birthday as its own step
Switch on Ask for the birthday as its own step (under the minimum age) and guests are asked for their birthday on a short step after the form. The step shows your reason in one line (the standard one is "So we can send you something on your birthday.", translated for French and Spanish guests, or write your own, up to 200 characters, with a version in each language you offer), day and month pickers that open the phone's own picker, the year, and a Skip button. If your form has a Date of Birth question, it moves to this step, and a full date is stored under that question as before.
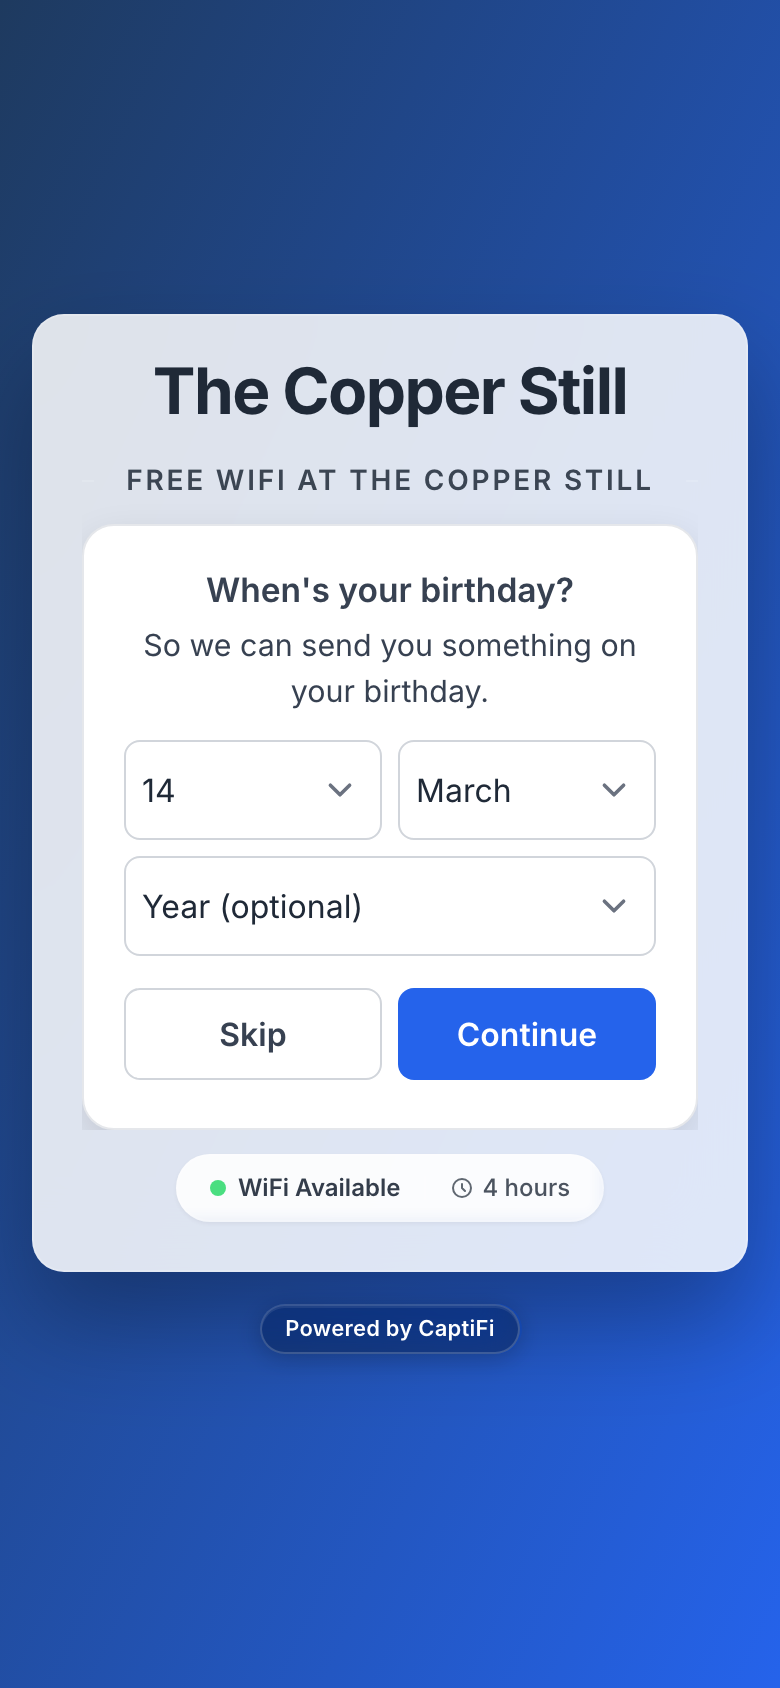
A guest whose birthday is already on file at any of your venues goes straight past the step. A guest who skips it is stored with no birthday, and a date that does not exist (31 February, say) is refused, so you hold a real birthday or nothing.
The year is optional unless you switch on Year required. It is required anyway wherever an age is checked: when you set a minimum age, when your Date of Birth question is required, and when your Klaviyo account is age-gated. A birthday given without a year still triggers your birthday workflows and automations on the right day, but it never counts as proof of age: a guest at a US or Canadian venue who ticks the SMS box gives a full date, under the box or on the birthday step, before they can be texted. If your Date of Birth question is required, the step has no Skip button and asks for the full date at your minimum age, so an age check you set up stays in place.
While the step is on, the phone preview has a Birthday step screen beside the sign-in page, so you can see it as guests will. It is off by default, so your form only changes when you turn it on.
Guests under 18
CaptiFi keeps no marketing consent, by email or by text, for a guest whose date of birth shows they are under 18 on the day they sign in, whatever they tick. The date comes from your Date of Birth question or the birthday step, or, when the form gives none, from the date already on file for that guest at your venues. Only a question that plainly asks for the guest's own date of birth counts, such as Date of birth or Birthday (in English, French or Spanish); a child's, a partner's or a pet's birthday never affects an adult's consent, and neither does a child signing in on a parent's phone or under the family email or number. A guest counts as 18 from their 18th birthday, by the date in your venue's time zone. They still get online as usual, whatever their age.
On the standard sign-in page they go online without the marketing question (with tick boxes the marketing box is on the form before the date is known, so a tick from a guest under 18 is not kept), and when the date of birth is on the form, the SMS opt-in box unticks itself and can't be ticked once the date is entered. If you made the SMS opt-in box required, it is never required of them. On any other sign-in page a box they tick is not kept. They are never offered a Join our list card after signing in. Consent a guest gave while under 18 is never carried to a later visit, through Welcome Back or for a returning guest whose question is skipped, and undoing an unsubscribe or lifting a suppression doesn't bring it back.
Guests who give no date of birth, and guests aged 18 or over, are asked as usual.
Less is more
Only collect the data you actually need: every additional required field reduces completion rates.
Fake email protection
When your form collects email, CaptiFi checks every address as the guest enters it. No setup is needed, the checks run on every splash page automatically:
- Keyboard mash ("fdsk@", "poooopookn@") and filler entries such as test@ or 12345@ are rejected with a polite prompt to enter a real address.
- Throwaway inboxes (Mailinator, YOPmail and thousands of other disposable email services) are not accepted. The blocklist keeps itself up to date automatically.
- Common typos get a "Did you mean...?" prompt: a guest who types gmial.com is nudged towards gmail.com instead of a dead address landing in your list.
- The domain must genuinely be able to receive mail (checked live against DNS).
- Addresses that have already bounced on CaptiFi are rejected on sight, at every venue.
Addresses that still slip through and later bounce are flagged with a Bounced badge on your Guest Visits page, so your list stays clean over time.
Asking for the email twice
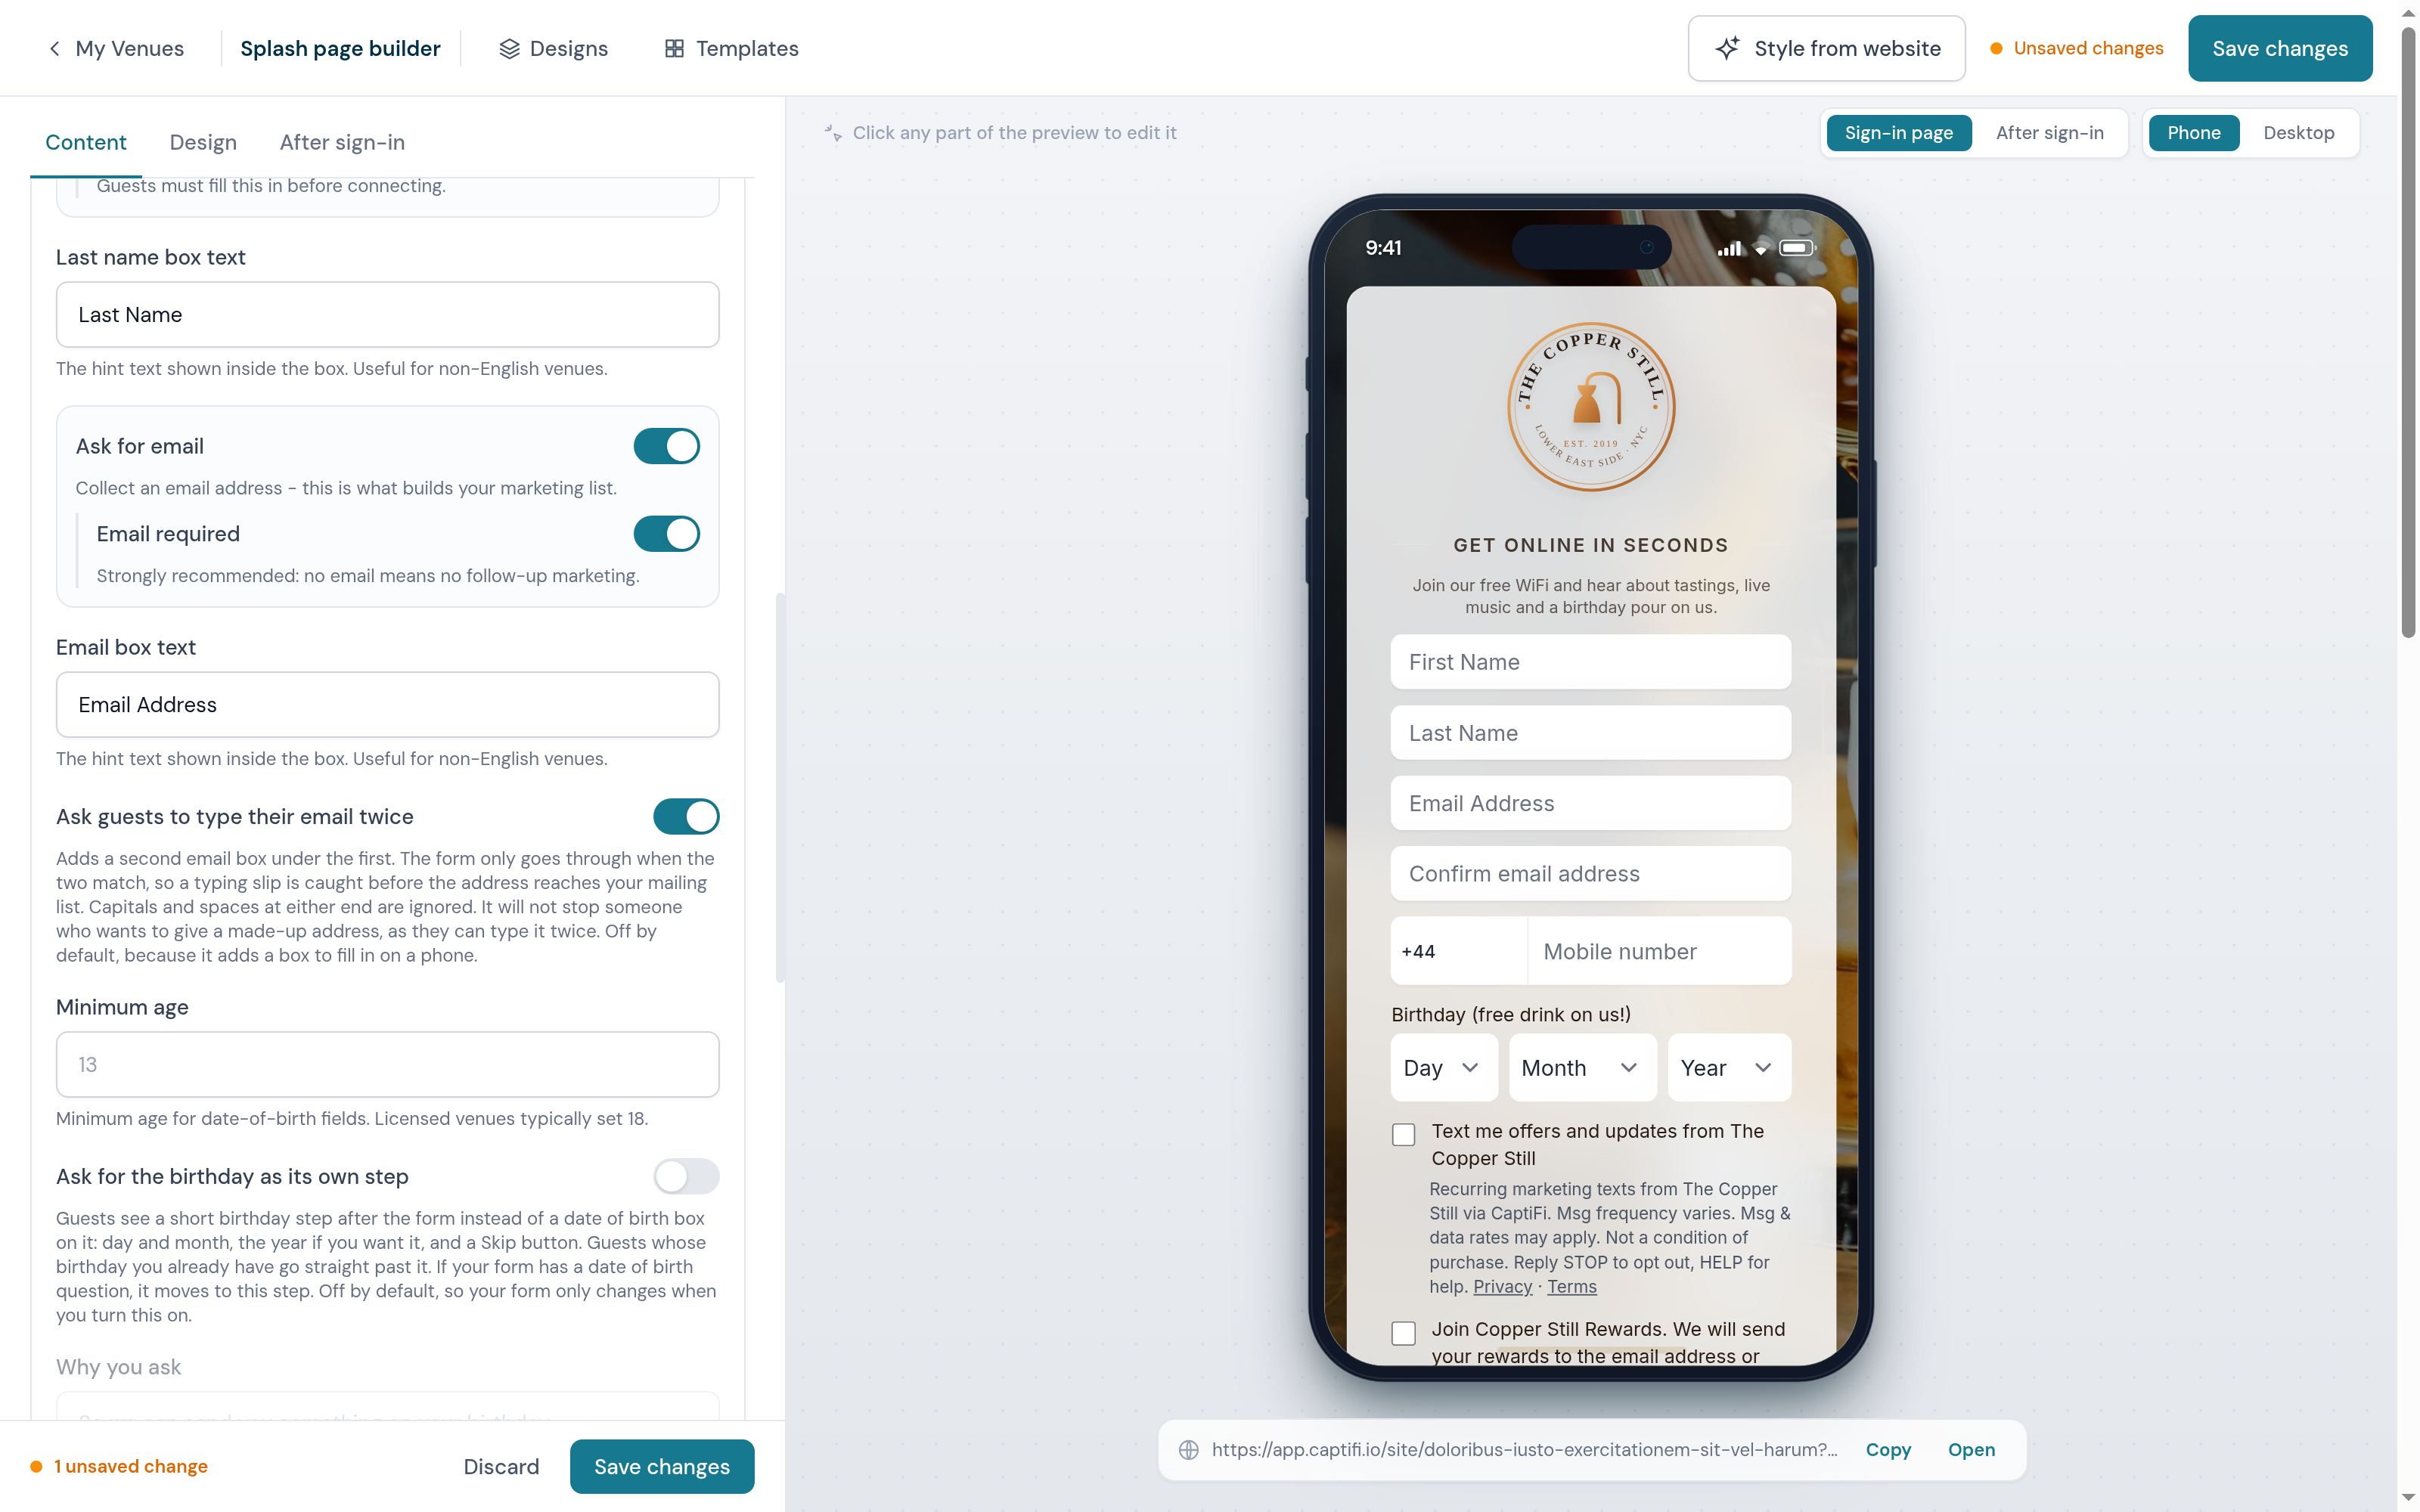
Switch on Ask guests to type their email twice, under the email box settings, and the form shows a second email box under the first. A guest can only connect once the two match, so a slip in one of them (a missed or swapped letter) is caught before the address reaches your mailing list. Capitals and spaces at either end don't count as a difference, and only the address in the first box is kept.
It won't stop a guest who has decided to make an address up, because they can type it twice. A reason to give a real address helps more there: if your welcome email carries an offer, say so in the Form subtitle or the marketing consent wording, so guests know it goes to the email they enter.
The switch is off until you turn it on, because each extra box makes the form a little slower to fill in on a phone. The phone preview shows the second box as soon as you switch it on.
Fake name protection
The first and last name fields are checked as well, on every splash page, with nothing to set up. A guest who types a made-up name is asked for their real one before they can connect:
- Two letters with no vowel, like "Ht" or the "Fl" of a shortened surname, are turned away. Real names of that shape, such as Ng, KC and Md, are accepted, and so is any two-letter name with a vowel (Li, Tu, Jo).
- Three or more letters with no vowel ("Hhk"), a held-down key ("Bennn"), a lone initial ("K.") and filler words such as "Name" or "Test" are refused.
- Words typed in place of a name, like "Lol", "Nope" or "Me", are refused in either box. A word that is also somebody's surname, such as "Hi", "No", "The" or "Guest", is refused as a first name but accepted as a last name.
Initials like "CJ" count as two letters with no vowel, so a guest who goes by initials is asked to type their name in full. Names written in other alphabets, such as 李伟 or Ольга, are never refused because of the alphabet. If a returning guest's saved name fails these checks, they see the sign-in form once in place of the Welcome back screen, and that visit is recorded under the name they type.
Collecting numbers for SMS Marketing
To text guests through SMS Marketing, add a Phone number question under Custom fields (there is a ready-made Phone preset with a country-code selector). Guests who share a number and accept marketing can then be texted, under the same consent that covers your email marketing.
If you would rather make texting strictly opt-in at your venue, also enable the SMS opt-in checkbox in the Terms & privacy section (you can edit the wording, and outside the US and Canada you can make it required). The checkbox only appears to guests when the form has a phone question, and once enabled, only guests who tick it can be texted: leaving it unticked counts as a "no", even if the guest accepted email marketing. See who receives your messages for the full permission rules.
At venues in the US and Canada the checkbox is always shown when the form has a phone question, even if you switched it off, and it can't be made compulsory, because carriers there only accept a separate tick that guests are free to leave blank. In the builder the two switches are locked with a note saying so, and you can still edit the wording.
Carriers there also allow drinks offers by text only to guests who have entered their date of birth, so at venues in the US and Canada ticking the box asks for it too. The guest must be 21 or over, or 19 at a venue in Canada, and the error under the date says so with your venue's name. If your form has a Date of Birth question, it becomes required for guests who tick the box, and your own minimum age still applies on top. If it doesn't, a day, month and year entry appears under the box once it's ticked (on a device that can't run JavaScript it shows from the start), and the date is saved on the guest's record only when the box stays ticked. Nobody needs a date of birth to get online: a guest can untick the box and carry on. Links in your texts to US and Canadian numbers open an age check page first, as described in who receives your messages.
The splash page adds the text message wording for you, in the guest's language (English, French, Spanish or Dutch). It appears only when your form asks for a phone number, and you can't edit or remove it. In the lines quoted below, Your Venue stands for your venue's name as your texts show it.
Outside the US and Canada, when the SMS opt-in checkbox is off, the line under your marketing question (or under the marketing box, on a design with tick boxes) reads "If you give a mobile number, Your Venue may also text you offers. You can opt out at any time."
The checkbox's standard wording is "Text me offers and updates from Your Venue", and wording you wrote for the box yourself is shown exactly as you wrote it. Outside the US and Canada nothing appears under the box until the guest ticks it. Then one small grey line shows underneath, "You can opt out at any time. CaptiFi's Privacy Policy explains how your number is used.", where Privacy Policy links to CaptiFi's privacy policy. If you wrote the box's wording yourself, the line starts "Marketing texts from Your Venue.". A box you've made required works the same way. On the plain sign-in page that a device gets when it can't run JavaScript, the line is always there.
At venues in the US and Canada a short carrier line always sits under the box: "Recurring marketing texts from Your Venue via CaptiFi. Msg frequency varies. Msg & data rates may apply. Not a condition of purchase. Reply STOP to opt out, HELP for help. Privacy · Terms". Privacy and Terms link to CaptiFi's privacy policy and terms.
The full text message terms are in the Terms & Conditions that guests open from your sign-in page, in a section called Text messages. It says who the texts come from, that message frequency varies, that message and data rates may apply, how STOP and HELP work, that agreeing to texts is not a condition of any purchase, and that carriers are not liable for delayed or undelivered messages.
CaptiFi adds "Reply STOP to opt out" to the end of every marketing text, unless your message already includes "STOP to opt out". A text that comes from your sender name ends "Text STOP to" and a CaptiFi number instead. Phone numbers are stored in international format automatically, whatever country your guests are from.
Colours
The Card & colours section holds the font, the theme colour, accent colour, text colour, card text colour, and link colour: match them to your brand.
Font is the typeface for the whole page, guests' form included, loaded from Google Fonts. Style from website and templates set it too. A design that already uses a font the list doesn't offer keeps it, shown as the current choice, until you pick another.
Colours are saved as hex (#1e3a5f, #1e3a5fcc), rgb()/rgba(), hsl()/hsla() or transparent. Named colours such as white are not accepted, and the card opacity is a value between 0 and 1. The builder tells you which field to correct if a value is rejected.
Connect button
Button text, colour, text colour, and corner radius.
Terms & privacy
Add venue-specific terms and privacy text. Guests accept your WiFi terms as part of connecting, and marketing consent is captured separately so you stay GDPR-compliant.
- How guests agree - the pop-up after Connect with Accept and Reject, which is the standard, or two tick boxes on the sign-in form itself (see Tick boxes on the sign-in form)
- Email marketing consent - whether guests are asked if they want your news and offers. This is on by default. Guests who say no still get online, and guests who say yes can be emailed from Campaigns, and texted as well when your form asks for a phone number and the SMS opt-in checkbox is off (see Collecting numbers for SMS Marketing). The question appears on the sign-in card itself, in place of the form, the moment a guest taps Connect, so it shows inside every phone's captive sign-in sheet. With tick boxes it is the first box on the form
- Marketing consent wording - the exact question guests are asked. Leave it blank to use the standard wording, which is translated automatically for guests browsing in French, Spanish or Dutch. Write your own if your venue has a house style, and keep it short: it is a question, not a paragraph. With tick boxes these words sit beside the marketing box
- Ask returning guests again - off by default. A guest whose email already said yes to your marketing at one of your venues connects without seeing the question again, even on a new phone. Switch it on to ask every guest every time (see Returning guests)
- Privacy collection notice - a short notice shown directly on the sign-in form itself, not behind a link. Use it where the law requires you to tell people what you collect and why at the point of collection, for example an APP 5 collection statement under the Australian Privacy Act
- Your privacy policy URL and Your terms of use URL - link your venue's own published policies. When set, they appear as clickable links on the sign-in form and inside the Terms and Privacy pop-ups, alongside any text you have written. Note: some guest devices cannot open external websites until after they connect, so keep your key wording in the collection notice and the Terms and Privacy text as well, and treat the links as the full reference copy
Tick boxes on the sign-in form
How guests agree sets how a guest gives their answers. The standard is Pop-up after Connect, with Accept and Reject: a guest fills in the form and taps Connect, then the card asks your marketing question with Accept and Reject buttons, above a line saying that joining the WiFi means agreeing to the Terms & Conditions and Privacy Policy.
Choose Tick boxes on the sign-in form and the form shows two empty boxes above the Connect button. Nothing more is asked after Connect. The first box is your marketing opt-in, and guests can leave it empty. The second reads "I agree to the Terms & Conditions and Privacy Policy" and has to be ticked: a guest who taps Connect without it is asked to tick it. The two names in that line open the same Terms and Privacy pop-ups as the standard page. Neither box is ever ticked for the guest.
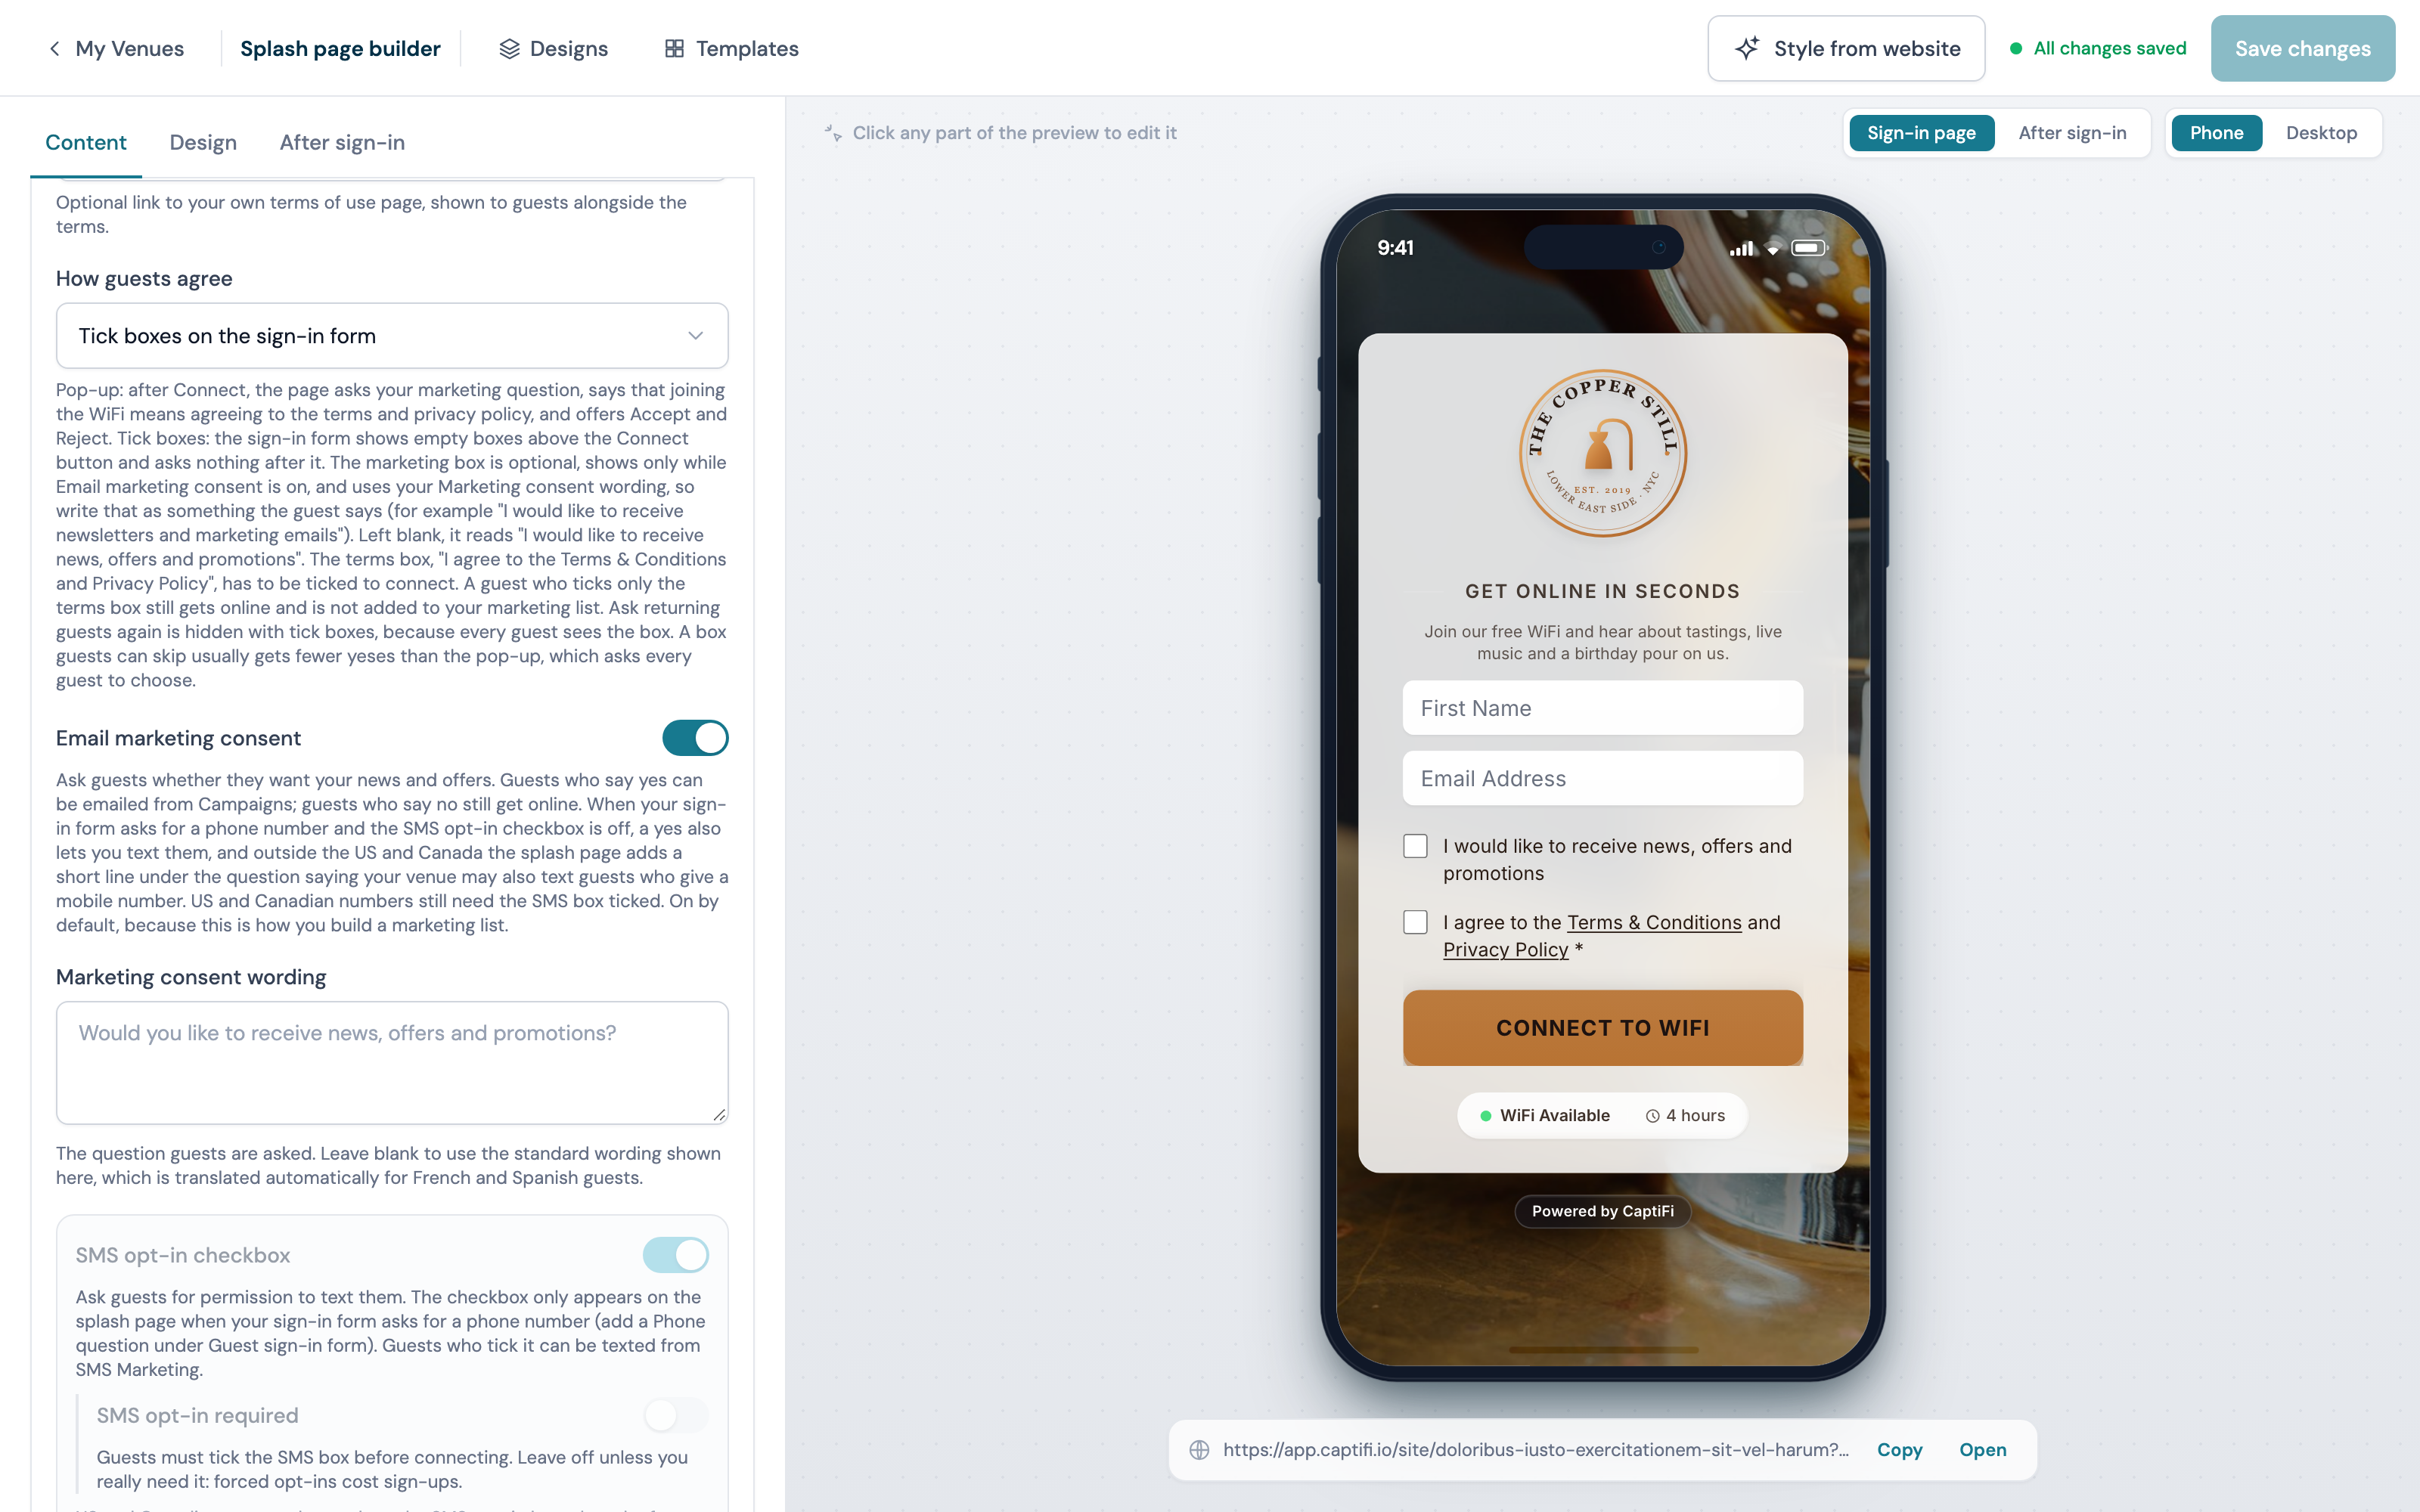
A guest who ticks only the terms box gets online and is not added to your marketing list. A guest who ticks both is opted in, the same as pressing Accept, and shows as subscribed in your guest list and your exports.
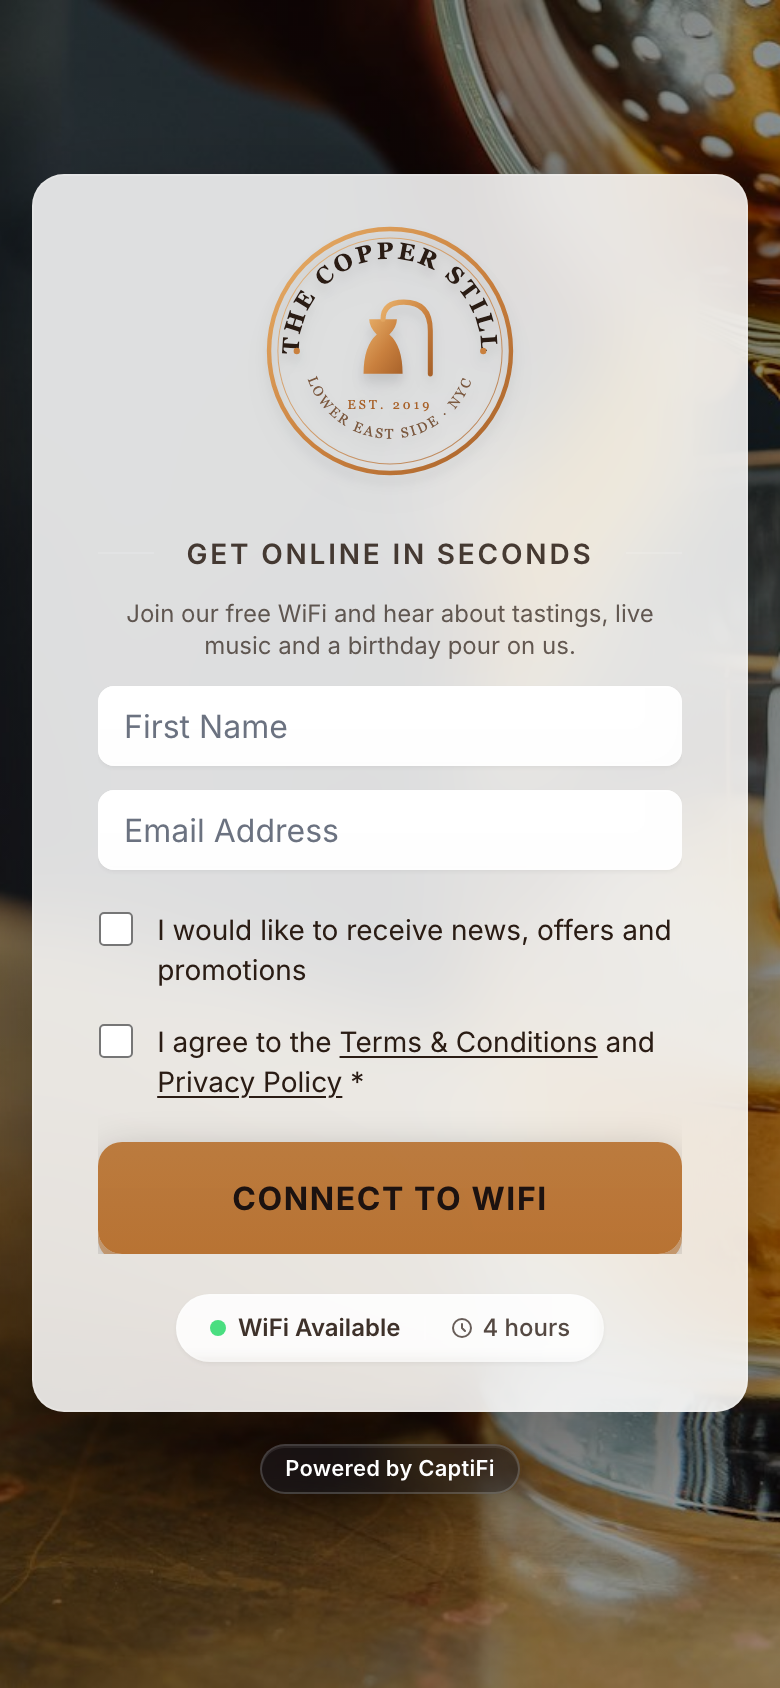
The words beside the marketing box are your Marketing consent wording, so write them as something the guest says, for example "I would like to receive newsletters and marketing emails". Leave the wording blank and the box reads "I would like to receive news, offers and promotions" in the guest's language. With Email marketing consent switched off, only the terms box shows.
With tick boxes chosen:
- Every guest who reaches the form sees the marketing box, so nothing is skipped for a returning guest and Ask returning guests again is hidden. A box left empty records no opt-in for that visit, and it doesn't unsubscribe a guest who said yes before
- A box guests can skip usually gets fewer yeses than the pop-up, which asks every guest to choose
- A returning device that Welcome Back recognises connects without seeing the form, as it always has, so it isn't asked to tick again
- The choice is saved with the design, so a WiFi area that shows another design can ask its own way
- Paid WiFi and voucher pages keep their own layout, and the builder doesn't offer the choice at those venues
Every design uses the pop-up until you choose tick boxes, and the phone preview shows the boxes as soon as you pick them.
Returning guests
Once a guest has typed their email and tapped Connect, CaptiFi checks the answers that email gave at your venues: every venue on your account, your team members' venues included, but never a demo, test or deleted venue. If the latest answer the guest gave themselves was yes (a Welcome Back visit copies an earlier answer, so it doesn't count as a new one), and since then they haven't unsubscribed at any of your venues, been suppressed on any of your venues' suppression lists or CaptiFi's, opted out of your emails or bounced, the marketing question is skipped and they get online straight away, with the yes they gave before. The new visit records which earlier sign-in that consent came from, and the guest's profile shows it under Carried consent.
The question is still asked when your venue's yes would also cover texts to a phone number that has no texts consent on file, for guests whose latest answer was no, and for guests whose latest yes was given while their date of birth showed them under 18 (see Guests under 18). On the sign-in pages some phones open, the SMS opt-in box is skipped the same way for a number already opted in and not stopped, but only when that yes was given with the same email the guest has just typed, and never at venues in the US and Canada, where the box is always shown. A box a guest can see on the form itself is always theirs to tick, which is why nothing is skipped on a design that asks with tick boxes. Walk-by offers only count a yes given with the walk-by line on screen, so a skipped question adds nobody to them.
Join our rewards
When your venue is part of a live Rewards programme, the sign-in form gains a Join {programme name} checkbox. It is unticked by default, and it is a separate consent from marketing: a guest can join your rewards and decline your newsletter, or the other way round. Guests who tick it become members and, if you have an offer set to be given on WiFi sign-in, receive their reward by email or text.
The builder's Join our rewards section, straight after Guest sign-in form, holds the settings for this line. It appears once Rewards is on your plan and switched on, and clicking the line in the live preview opens it.
- Ask guests to join shows or hides the checkbox
- Rewards wording is the sentence next to the checkbox. Leave it blank for "Join {programme name}", or write your own, up to 300 characters
- Rewards text colour sets the colour of that sentence. Leave it blank and the line matches the rest of the text on your sign-in card. Use a solid hex code such as #1f2937. See-through colours are not accepted
If your programme joins guests automatically (set on Settings → Rewards setup), the checkbox is replaced by a sentence on the form saying that connecting joins them. That sentence takes your Rewards text colour too, and its wording comes from the programme.
After the guest connects
If the guest joined and a reward was issued, the connected screen shows the offer and tells the guest where their reward has gone, for example "We have sent your reward to j***@gmail.com" or "to your phone ending 1234", with a Continue button; it moves on by itself after a few seconds. The code itself never appears on the splash page. It travels only by email or text, so a reward cannot be collected by typing in somebody else's address.
A returning guest whose phone is recognised sees their points balance and a Send my rewards link button instead of the join checkbox.
Advanced
- Session length - how long guests stay online before seeing the splash page again. Enter a number and pick a unit (minutes, hours, or days), or choose Unlimited to never ask guests to sign in again. This is a venue-wide setting: it applies whichever design is live, switching designs never changes it, and it is only editable on your live design (or under Edit venue in My Venues)
- Redirect after connect - send guests to a URL after login (your website, menu, offers page or Instagram), with an optional delay. iPhones and Macs often show the sign-in page in a small WiFi sheet that can't open apps, and Instagram and WhatsApp links try to open their app, so guests in that sheet see a "You're online" page (with your Instagram account name, for an Instagram link) and tap Done to start browsing. In Safari, Chrome and on Android, guests go straight to the link. Leave the field empty and guests go to captifi.io after signing in
- Google Analytics ID - track splash page visits in your own GA property
Design Library
Each venue keeps a small library of named splash designs, so you can prepare variations ahead of time (a quiz night page, a Christmas page) and switch between them without rebuilding anything. Exactly one design is live at a time.
Opening the library
- Go to WiFi & venues → My Venues
- Find the venue, open More on its card and choose Designs & templates
- The library opens over the splash builder, showing every saved design, which one is live, and your design allowance
You can also open it from inside the builder at any time with the Designs button in the toolbar.
Creating a new design
- Open the library (steps above)
- Click New design and give it a name, for example "Quiz Night"
- Your current design is duplicated into the library; edit the copy in the builder
- When you are ready, Activate it (or schedule it for an event window)
From the library you can also:
- Rename designs so you can tell them apart at a glance ("Default", "Quiz Night", "Christmas").
- Activate a design to make it your venue's live splash page. Activating swaps the live page immediately, and guests see the new design the next time they connect.
- Set default to mark one design as your venue's standard page.
- Delete designs you no longer need. You cannot delete the design that is currently active, the one set as the venue's default, or a design referenced by a scheduled automation (cancel the automation first).
Each venue can keep up to 5 designs on standard plans, or 10 designs on Pro. If you reach the limit, delete an old design to make room for a new one.
A different design for each WiFi network
To show a different design on each guest WiFi network, or in each part of a venue, set up WiFi areas. An area matches a WiFi network, a set of access points, or both, and sets the design its guests see along with its own session length and speed limit. Areas work on UniFi venues. The account owner first switches the page on with the WiFi Areas card under Dashboard features on the Integrations page (see Switching WiFi Areas On), and from then on the design library links to the WiFi Areas page. While it is off, the library of a venue with saved areas says where the switch is.
Schedule your designs
You can also swap designs automatically for an event window: schedule a splash swap on the Planner and CaptiFi activates the design at the start time and restores your default at the end time.
Designs assigned by CaptiFi support
If CaptiFi support has assigned a custom splash design to your venue, the library shows "Currently live: (design name), assigned by CaptiFi support" instead of marking one of your own designs as active. Scheduled swaps still work as normal: the assigned design comes back automatically when the event window ends.
Shared Designs
On Pro and Multi-Location, one design can be shared by several venues: see One splash design for several venues to start one and link venues. Edit design under Shared designs on My Venues opens it in this builder.
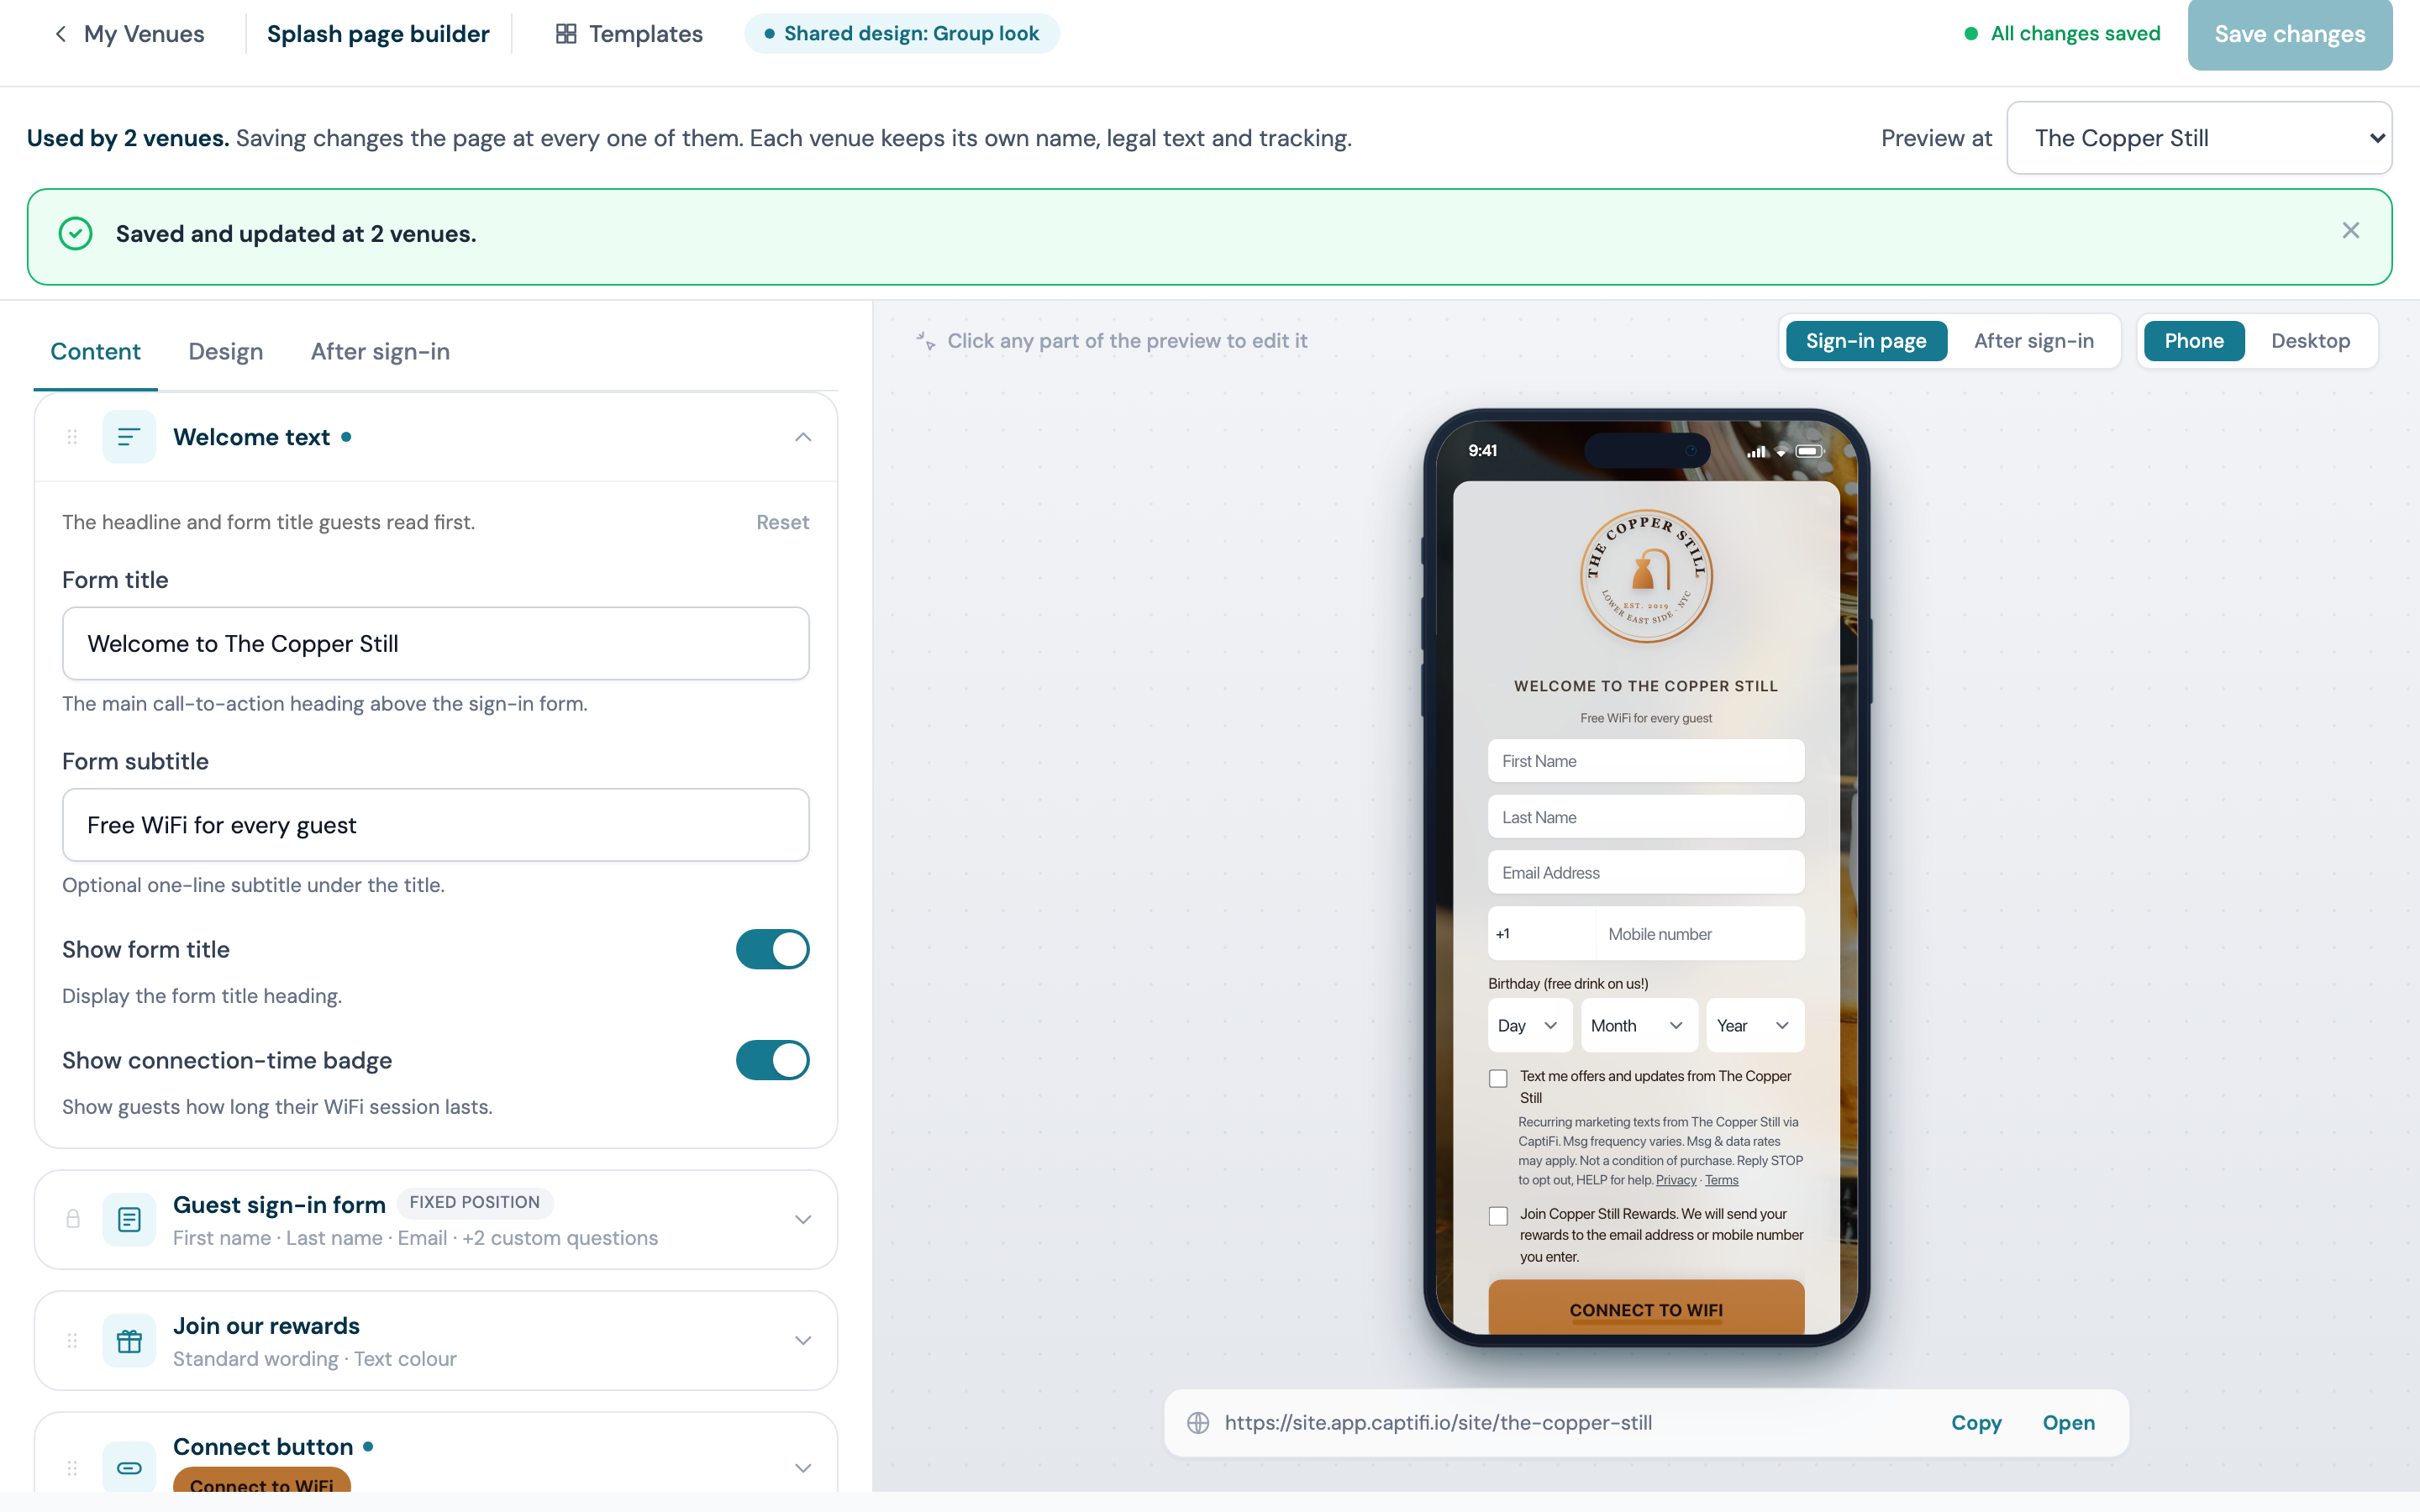
- The bar under the toolbar says how many venues use the design. Save changes updates the page at every one of them, then says how many venues it updated, and names any venue it unlinked because its design had been changed elsewhere
- Preview at picks the venue the preview shows the design at, with that venue's own name and terms, and its own logo or colours where it keeps them. Before any venue is linked, the preview uses one of your venues and the address bar says that venue's live page does not use the design yet
- The fields each venue keeps for itself, such as terms, privacy text, session length and tracking, are read only here and say so
- Templates work as usual. The design library, Style from website and promotions belong to each venue, so they are not offered here
- If a venue's name would make a line of text longer than that line can hold, the save stops and names the venue and the field, so you can shorten it
A venue that uses a shared design
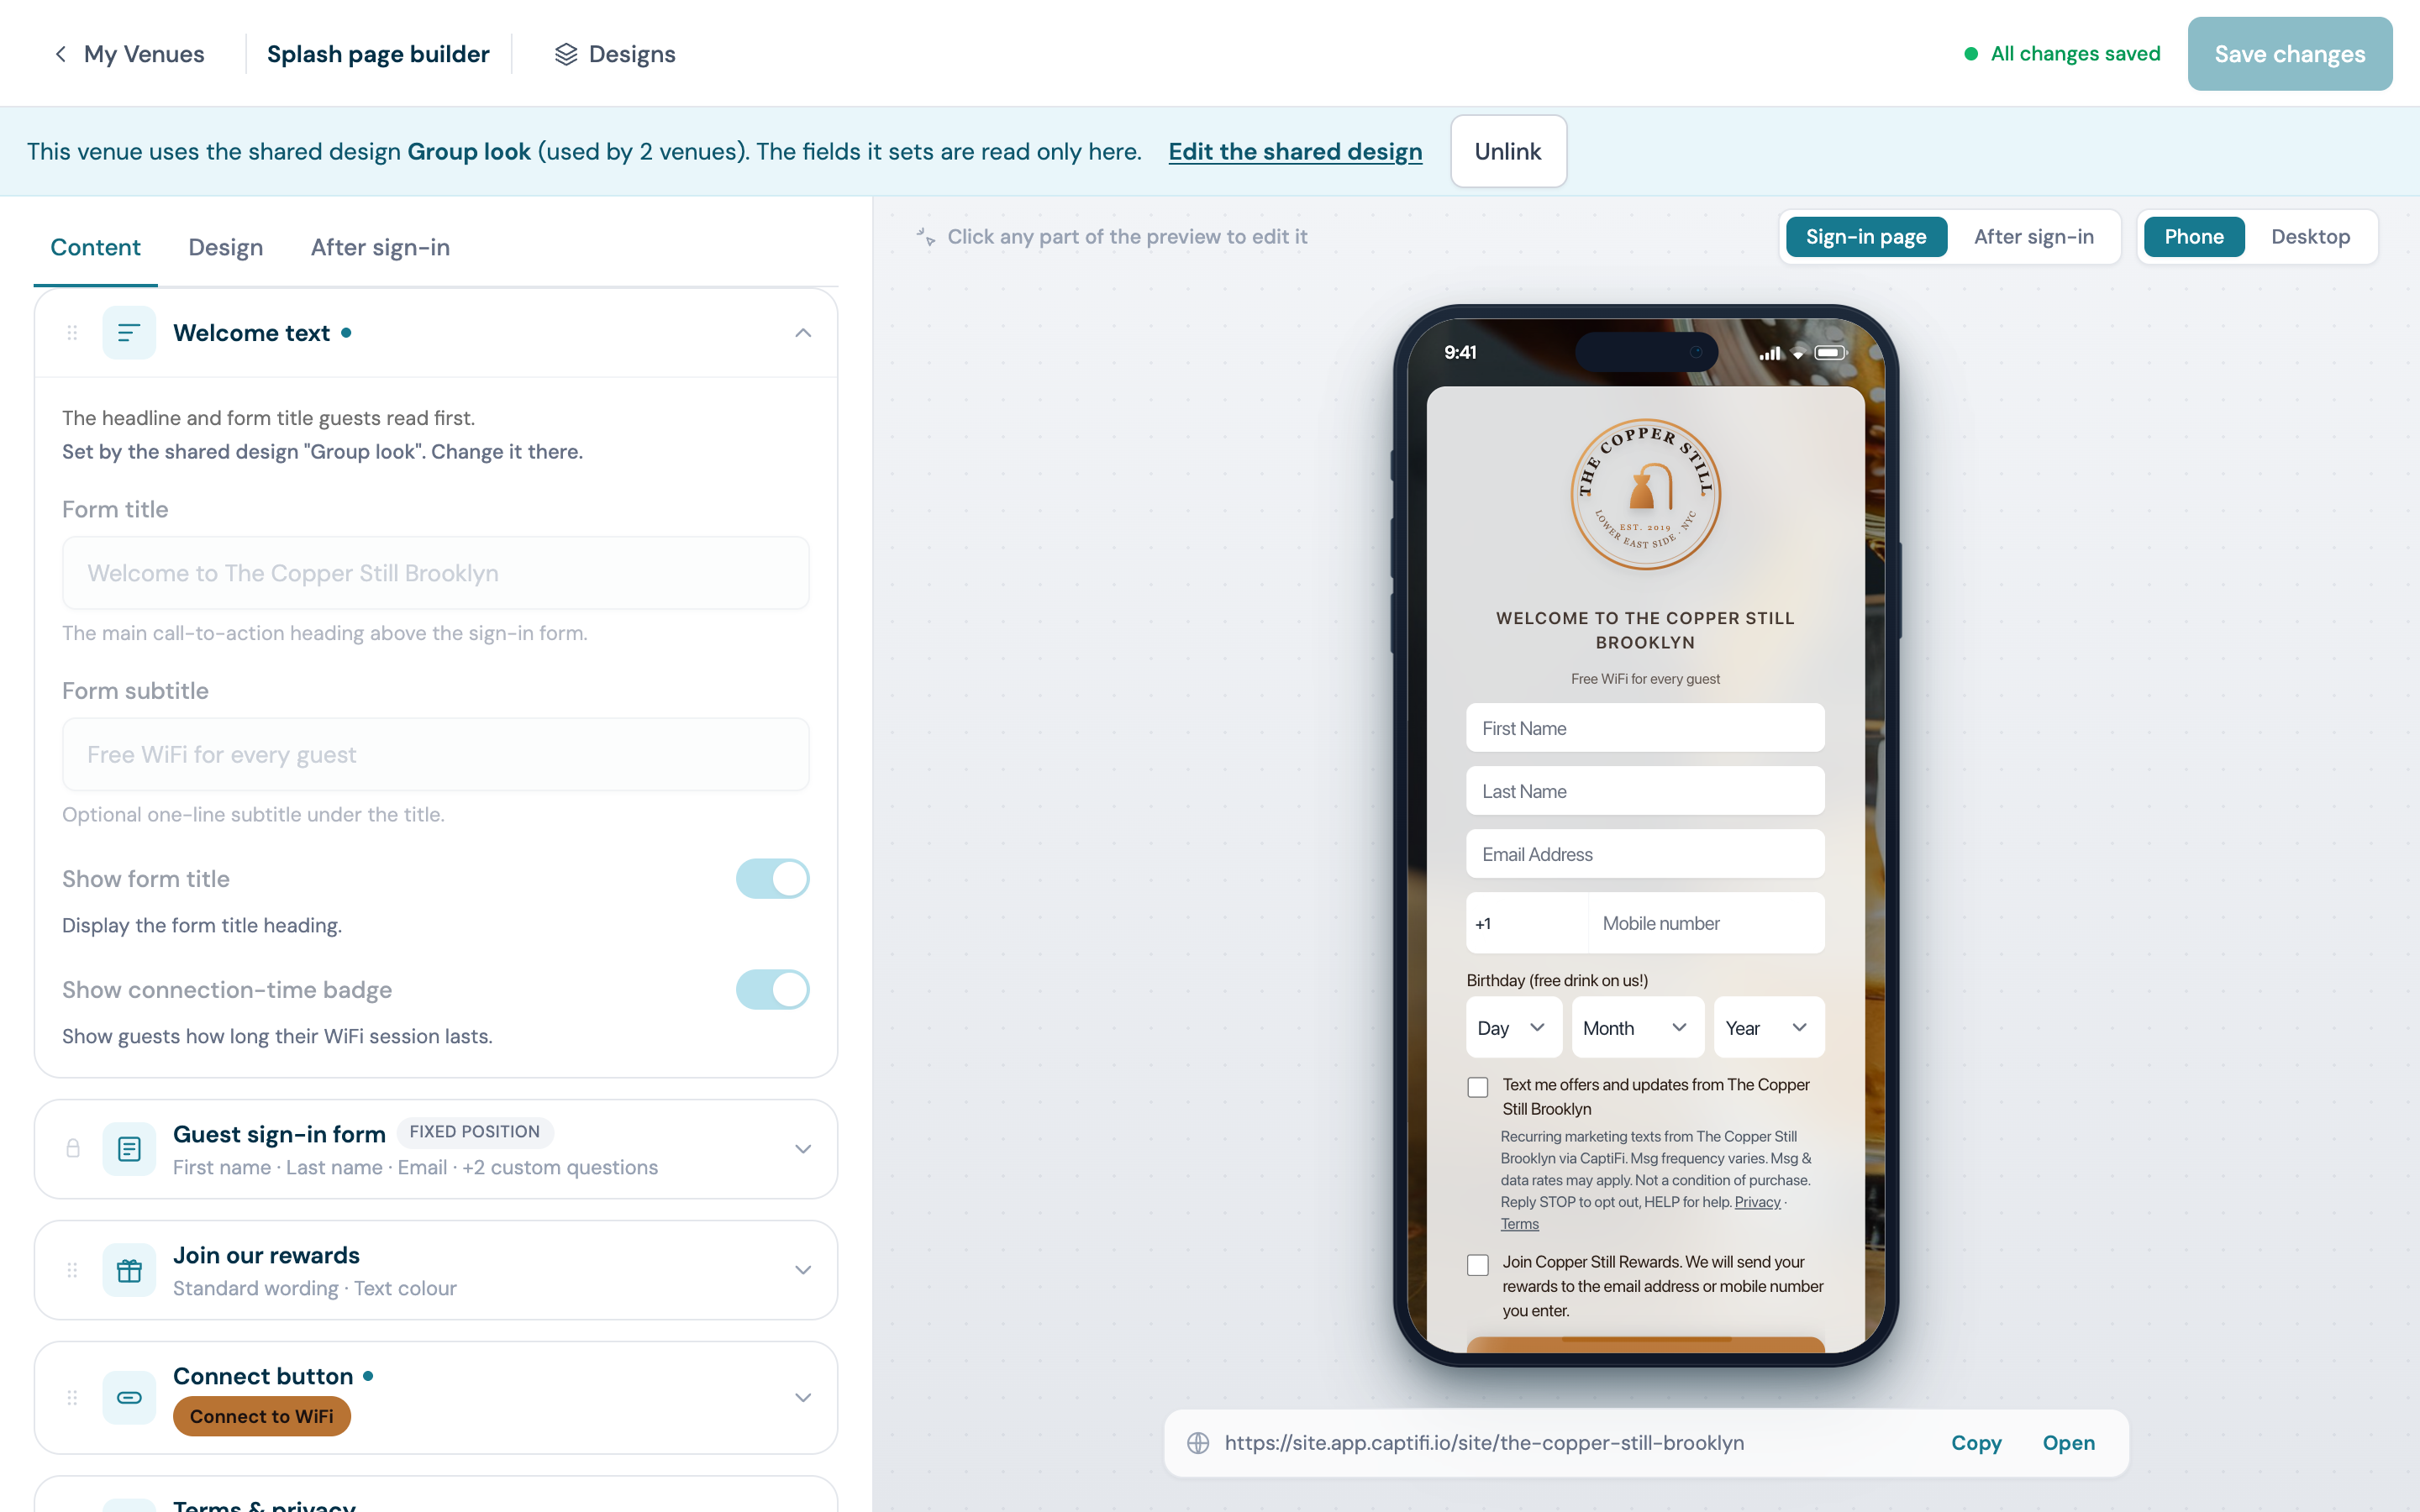
Edit splash on a linked venue opens its own builder with a bar that names the shared design, links to Edit the shared design and has an Unlink button. The fields the shared design sets are read only, and the preview shows the venue's own name in the text. The venue's own fields (terms, privacy text, redirect, tracking, and its logo or colours when it keeps them) stay editable as usual. While it is linked, the venue cannot make another design live or the default: unlink it first, with Unlink in that bar or under Shared designs, Venues on My Venues. Unlinking leaves the venue the design it shows now, and every field can be edited again. If you manage a venue for someone else, the bar shows Unlink but no link to their shared design.
Templates
Click Templates in the builder toolbar to browse 45 ready-made looks in four groups:
- Your colours: Clean, Bold, Photo, Night, Soft, Fresh, Classic and Modern. These take your own brand colour (the colour of your connect button) and your photo, so they always look like yours
- Venue types: pub and bar, café, restaurant, hotel, holiday let, brewery and taproom, gym and fitness, shop, events venue, workspace, clinic and waiting room, and campsite and outdoors
- Seasonal: Christmas, New Year, Lunar New Year, Valentine's, St Patrick's Day, Easter, Mother's Day, Father's Day, Summer, Autumn, Halloween, Diwali, Bonfire Night, Thanksgiving, Hanukkah and Eid
- Events and offers: Match Day, live music, quiz night, happy hour, Sunday roast, brunch, Black Friday, Fourth of July and Canada Day
Each card is drawn with your logo and venue name. Click Use this template and it goes into the design you are editing: the background, card, button, colours and font change, while your logo, photo, sign-in questions, terms and settings stay as they are. Venue type, seasonal and event templates also set the welcome title and button label, which you can edit afterwards. Undo at the top of the editor puts the design back until you change something else, and Save changes keeps it.
Adding a template to your library
To keep a seasonal or event look ready for later, open the design library and pick one under Start from a template. The new design is a copy of your default design (logo, photo, questions and terms) in the template's style. Edit it in the builder, activate it when the time comes, or schedule it. It counts toward your design limit once you add it; browsing templates costs nothing.
Guest Languages
Your splash page can appear in your guest's own language. Guests are detected from their phone's language setting, so most people never have to tap anything.
Setting It Up
- Go to My Venues and click Edit venue on the venue's card
- Under Guest languages, pick the languages you want to offer
- If you offer more than one, choose a default language for guests whose phone is set to something you do not offer
- Save
Currently available: English, French (Francais), Spanish (Espanol) and Dutch (Nederlands).
What Guests See
When you offer more than one language, a small row of language buttons appears at the top of the page, above your sign-in form. One tap switches the whole page, and the choice is remembered on that device for a year.
Everything CaptiFi writes is translated: the sign-in heading, the name and email boxes, the day, month and year boxes of a date of birth question, the connect button, the terms and privacy links, the session length shown on the badge, the connecting message, and the question about news and offers that appears after Connect, with its Accept and Reject buttons and the terms and privacy pop-ups. On a design that asks with tick boxes, the wording beside both boxes is translated the same way.
Your Own Text in Each Language
When a venue offers more than one language, the builder has a Text language switch at the top of the Content and After sign-in tabs. The Design tab has no text to translate, so it has no switch, and its preview shows your default text. The same goes for After sign-in at a venue that uses vouchers or Paid WiFi, where the tab holds only Promotions and Advanced. The first choice is your default text, named after the venue's default language, for example English (default). Next to it are the other languages you switched on under Guest languages.
- Open the splash page builder and pick a language, for example French
- The editor now shows only the text that can have a French version: the venue location, the welcome text, the name and email boxes, your own sign-in questions, the connect button, the rewards wording and the consent wording
- Type your French text. A box you leave empty shows in grey what French guests see instead: your default text, or CaptiFi's French wording where you kept ours
- The phone preview shows the page in French as you type
- Click Save changes
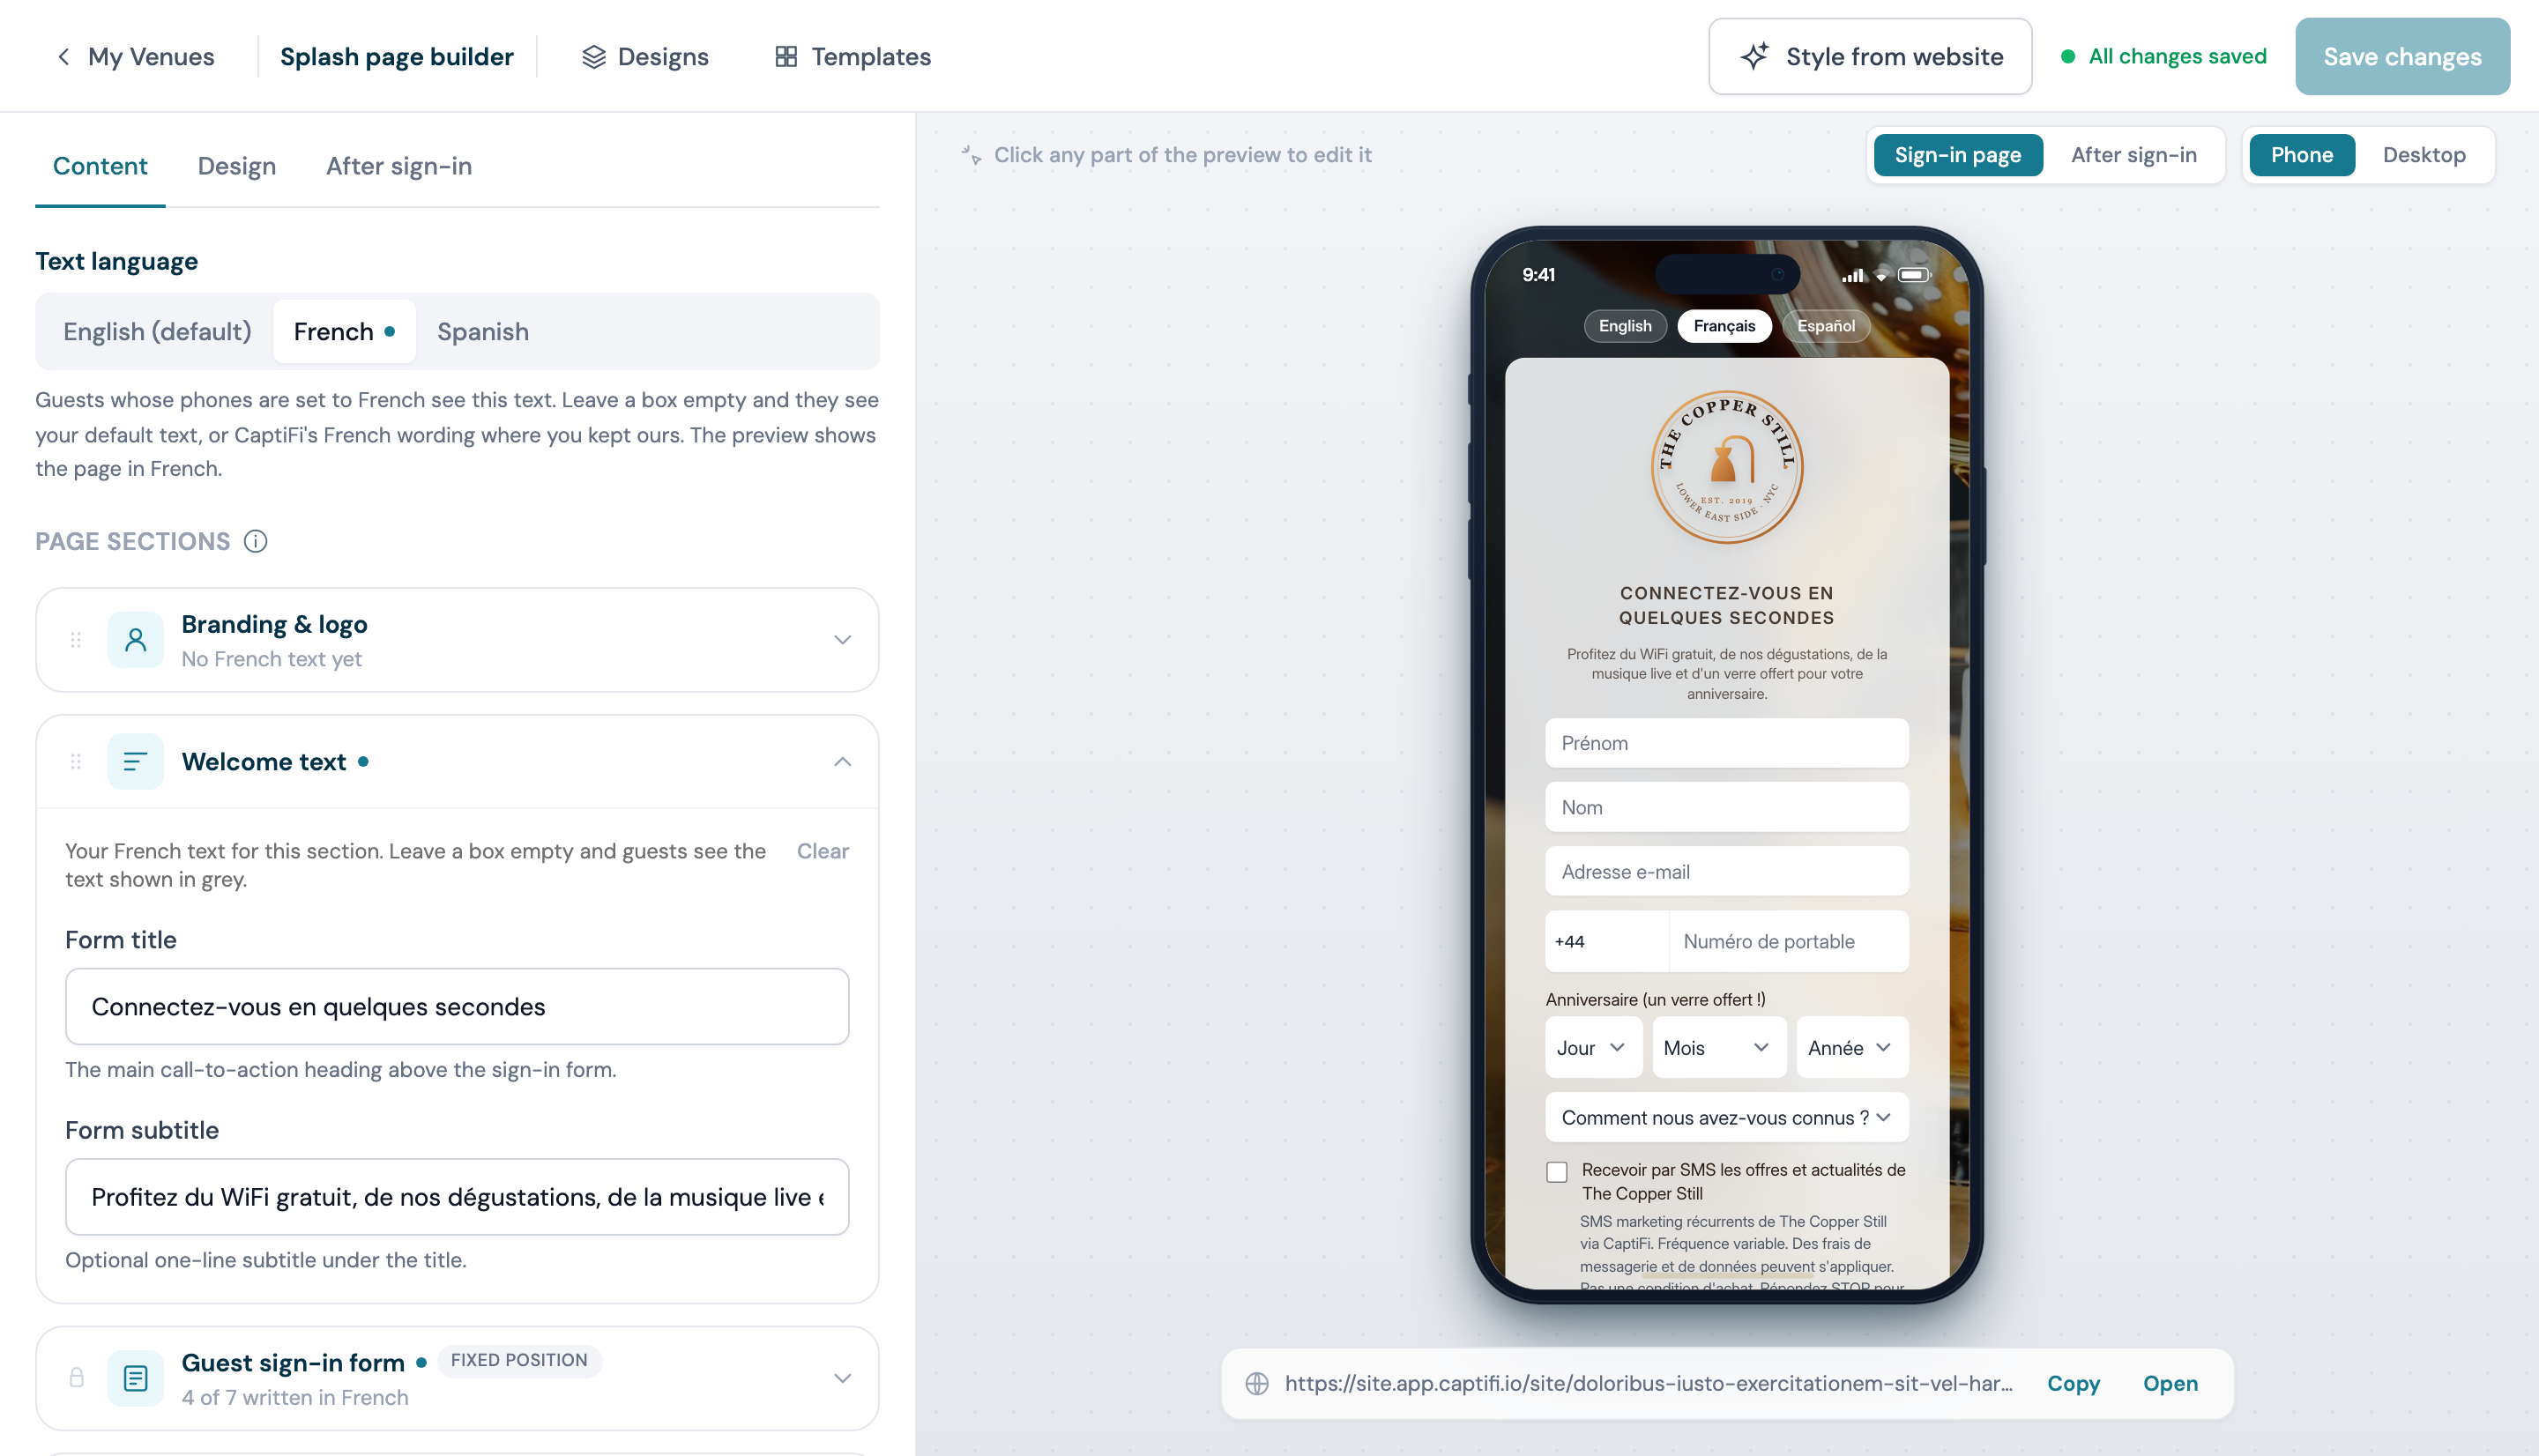
Clear on a section removes that section's French text, so French guests see your default text there again. A dot next to a language means you have written some text in it. If your venue offers only one language, a short note takes the place of the switch, with a link to Edit venue to switch more on.
Your Own Questions in Each Language
Your own sign-in questions, such as a mobile number or "How did you hear about us?", can have a French version too. With French picked, open the Guest sign-in form section. Under Your own questions there is a box for each question and, for a dropdown, a box for each option. Each box shows your own wording in grey, which is what French guests see if you leave it empty.
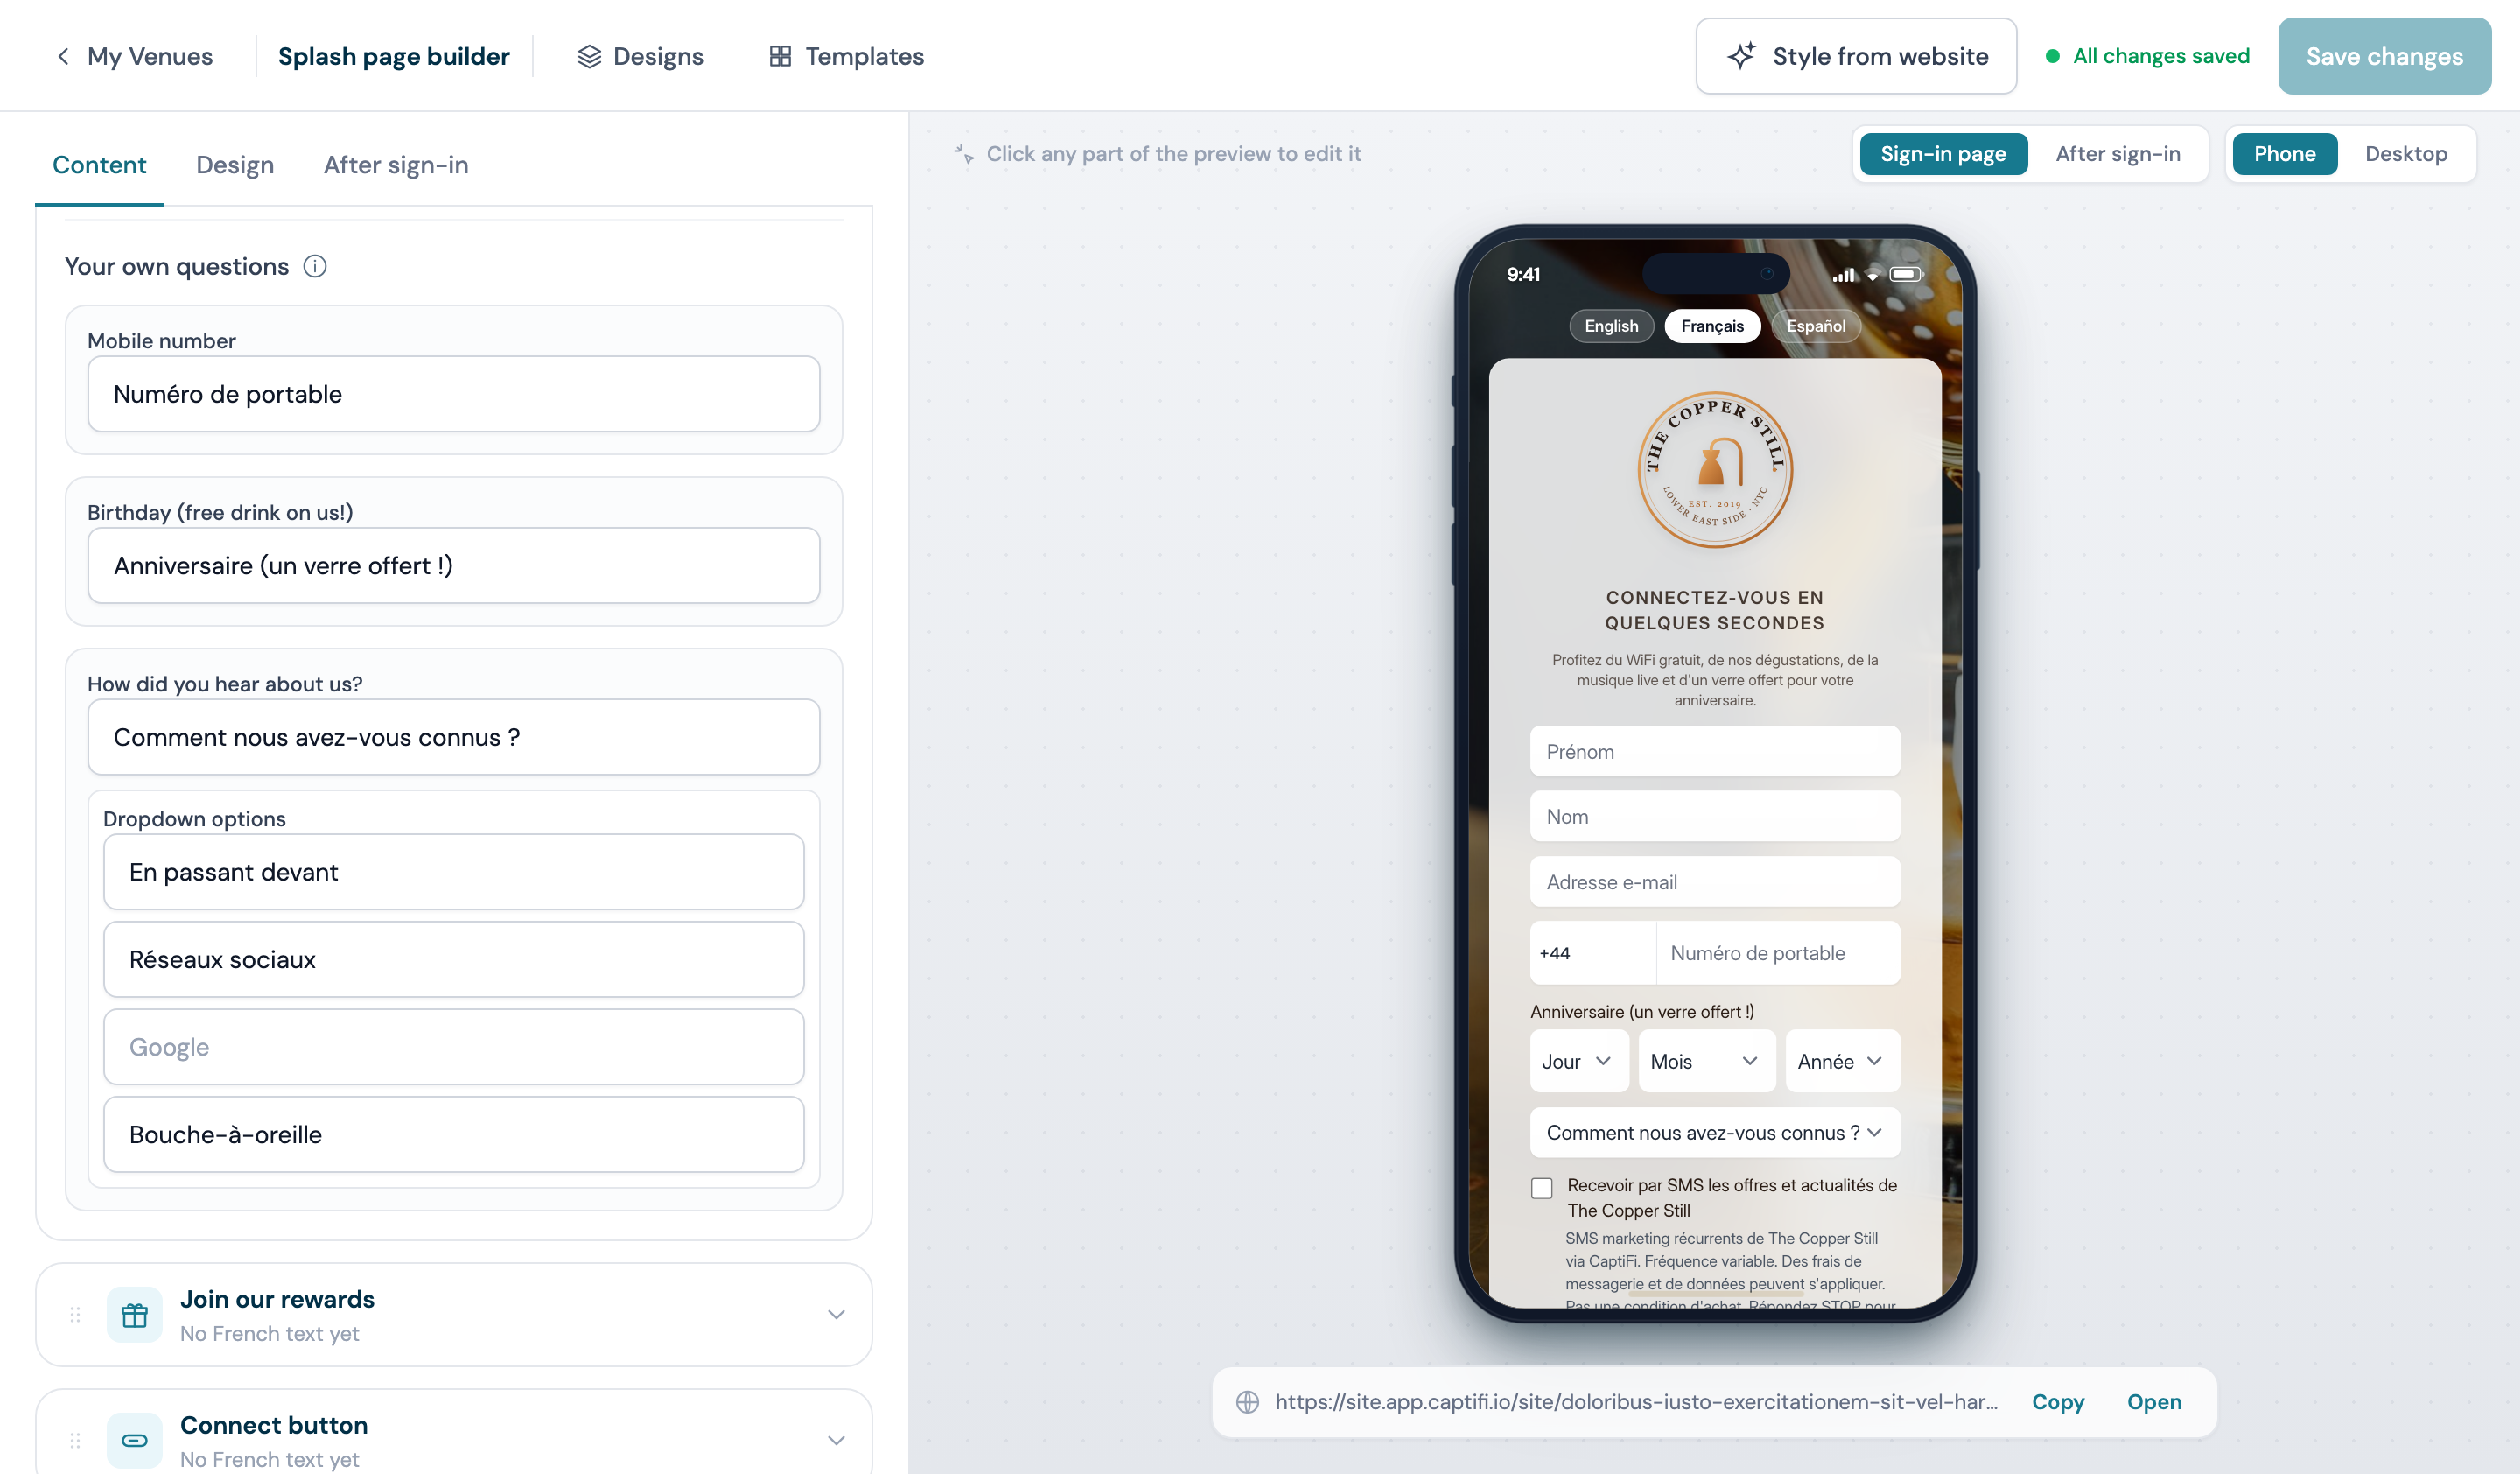
Guests' answers are kept under the same question and option whatever language they use. A French guest who picks "En passant devant" is recorded as "Walking past", so Guest Visits, exports and integrations show every guest's answers together. The French wording of a dropdown option belongs to that option: remove the option and its French wording goes with it, and if you reword an option in your default text, French guests see the new wording until you write its French version again.
What Is Not Translated
- Your own wording in a language you haven't written. Text you typed into the builder shows exactly as you wrote it in every language you have not written your own version for. We never machine translate a welcome line you chose; write your own version as above instead.
- Your terms and privacy text, which is legal wording and stays as you wrote it.
- Emails sent to guests, which are in English. The exception is the email that asks a guest to confirm marketing emails after playing one of your games on its public link, which goes out in French or Spanish to guests who use those languages.
If You Only Want English
Leave the setting alone. A venue with only English selected behaves exactly as it always has, and guests see no language buttons at all.
Venues With Paid WiFi
If Paid WiFi is switched on for the venue, guests do not see the sign-in form: they see your paid access page, where they pick a WiFi pass and pay, or pick your free plan and give their first name and email. The builder follows suit:
- The live phone preview shows your paid access page, with your real passes and prices, exactly as guests see it
- An amber notice above the sections on the Content tab reminds you Paid WiFi is on, with a link to the Paid WiFi page where passes and prices are managed
- Your branding, background, colours, button styling, and terms all apply to the paid page, so those edits show up in the preview instantly
- The Welcome text and Guest sign-in form sections are marked "Hidden by Paid WiFi": guests will not see them while Paid WiFi is on. They stay editable, and your edits are kept and apply again if you switch back to the standard splash
Session length from the Advanced section does not apply either: with Paid WiFi, each pass and free plan sets its own duration.
Message Strip
Sometimes you do not need a whole new design, just a line of text: "Happy hour 5-7 tonight". A message strip is a short dismissible banner shown on top of your venue's current splash page, whatever design is live. Guests can dismiss it, and it disappears for everyone automatically at its end time.
Message strips are scheduled from the Planner rather than the builder, so they always have a window and clean themselves up. See Message Strip on the Planner page.
Promotions on Your Splash Page
Your splash page is the one screen every guest looks at, so it is worth something. A promotion puts your own artwork on it: a Sunday roast, a happy hour, a rooms offer. The promotion guests see is an ad card on the screen they get once they have filled in your splash form. See Ad Cards After Connecting.
- Open the splash page builder for the venue
- Open the Promotions section on the After sign-in tab
- Under After connecting, click Add card
- Upload your image, up to 4 MB, then add a headline, some text and your button
- Click Save card
There is no Save changes step for promotions: a card is saved when you click Save card. Cards belong to the venue rather than to a design, so they stay put when you switch between saved designs.
The builder also lists Below the sign-in options and Above the sign-in options. Artwork you save there stays with the venue, but the splash page doesn't show those two placements to guests yet. Reconnect a test device to see a change: changes apply to new sessions.
Where to put it
| Placement | What it means |
|---|---|
| After connecting | Your ad cards, on the screen guests see once they are online. The guest is already connected, so it costs nothing in sign-ins. This is the placement guests see. See Ad Cards After Connecting |
| Below the sign-in options | Under the connect button on the sign-in page. Not shown to guests yet |
| Above the sign-in options | Before guests can connect, so every guest scrolls past it on every visit. Not shown to guests yet |
Getting the artwork right
Put the offer, the price and any dates in the image itself, in large type, so the card makes sense at a glance before the guest reads anything under it.
The headline shows under the image in large type. It is also the image description for screen readers and for guests whose connection is too slow to load the picture, so write what the artwork says rather than a title.
A link is optional and must start with https://. Bear in mind that some guest devices cannot open other websites until after they have connected, so never hide the offer behind the link.
Promotion or message strip?
A promotion is a designed image that stays up until you change it. A message strip is a line of text with an end time, scheduled from the Planner. Use a strip for "Happy hour 5-7 tonight" and a promotion for your Sunday roast.
After Connecting
Once a guest is online they see a short connected screen before they carry on to the internet.
Your Own Heading, Message and Buttons
The connected screen is yours to write too. Open the After sign-in page section on the builder's After sign-in tab, and the phone preview switches to the connected screen so you can see it as you go. You can also switch the preview yourself with Sign-in page and After sign-in above the phone.
- Heading: leave it empty to show "You're connected!" in the guest's language
- Message: a line or two, up to 300 characters
- First button and Second button: pick Your review page, Your website or Another link, then the button text. Your review page is the one set under Reviews, and your website is the one on your profile; the builder shows which address each button opens, and tells you when there is none yet. Another link needs a full address starting with https://
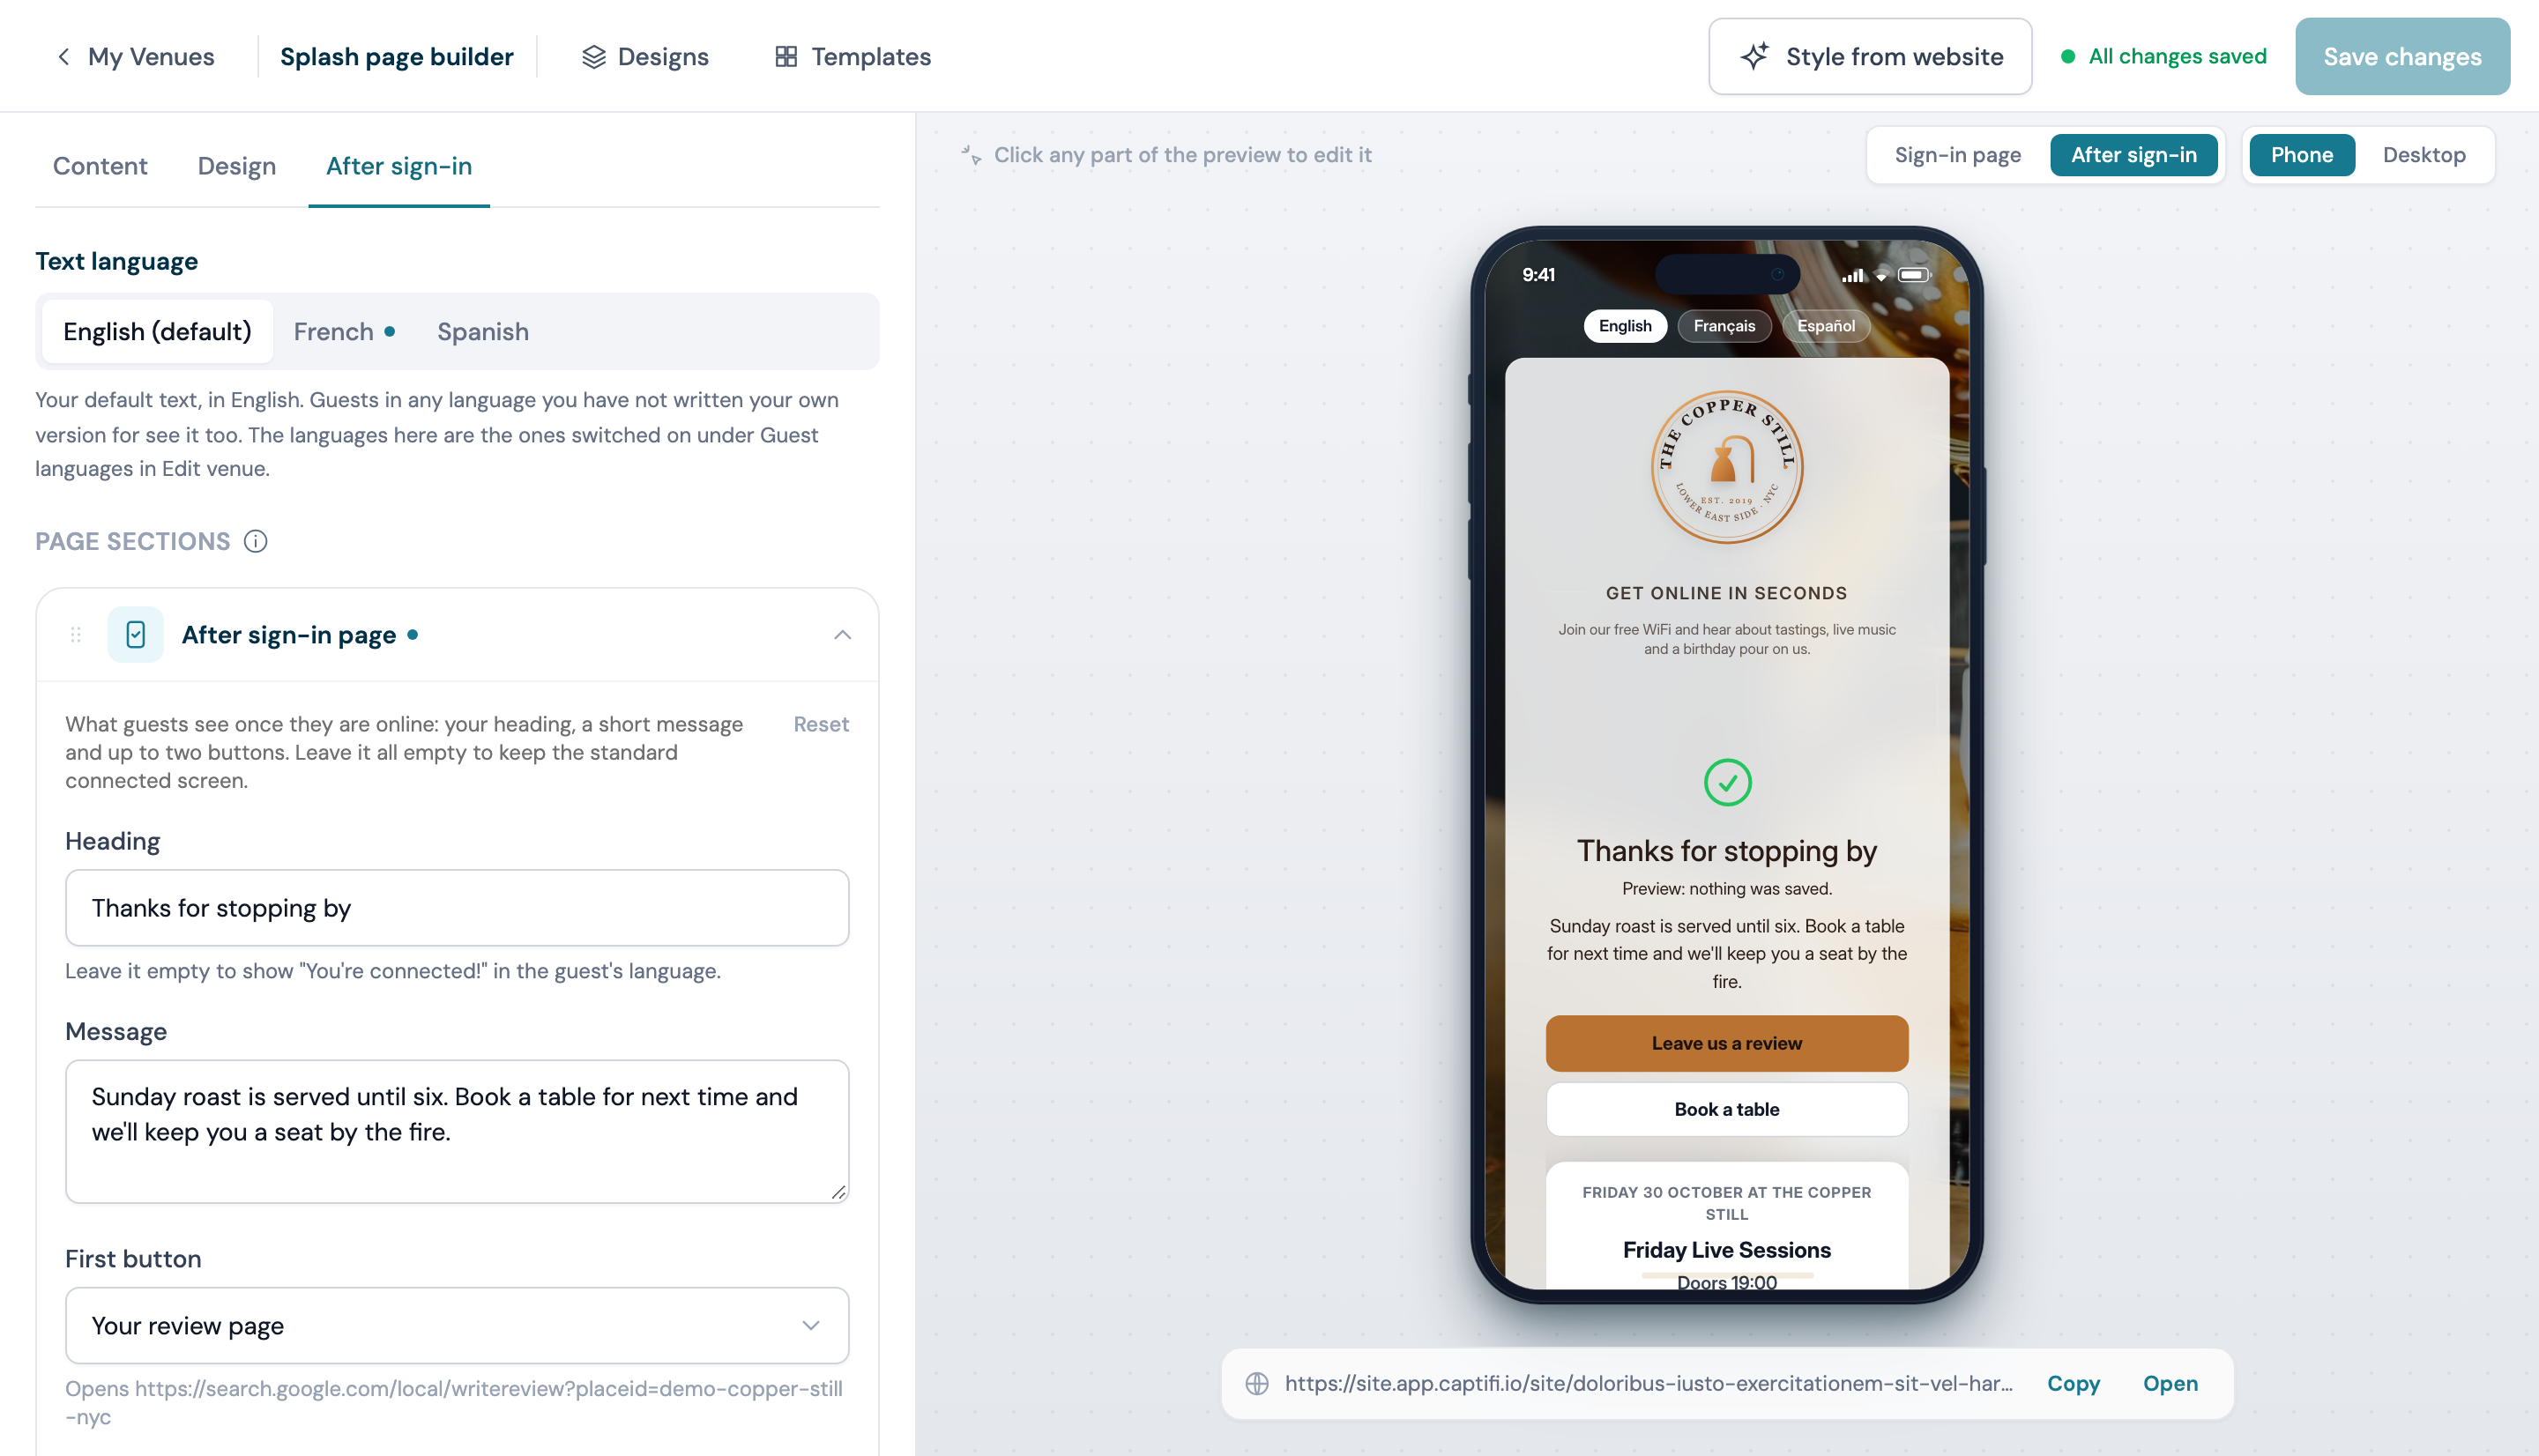
With buttons on the screen, guests stay on it until they tap a button or Continue browsing, the same way an ad card holds the screen. Buttons are left off for guests whose controller is still finishing their sign-in, so nobody taps a link before they are online. On the sign-in sheet some iPhones open, a button to an app such as Instagram or WhatsApp is left off, because the sheet cannot open apps; guests in Safari still see it.
Every tap on a button is counted, and Analytics shows the taps for each button under Ad cards and buttons, next to your ad cards. The button still opens the address you chose.
Leave the whole section empty and guests see the standard connected screen. Venues using WiFi vouchers or Paid WiFi don't have this section, because their guests sign in on the voucher or paid page, which has its own connected screen. The heading, message and button text can each have a version in every guest language: pick the language in the Text language switch and write it there.
Ad Cards After Connecting
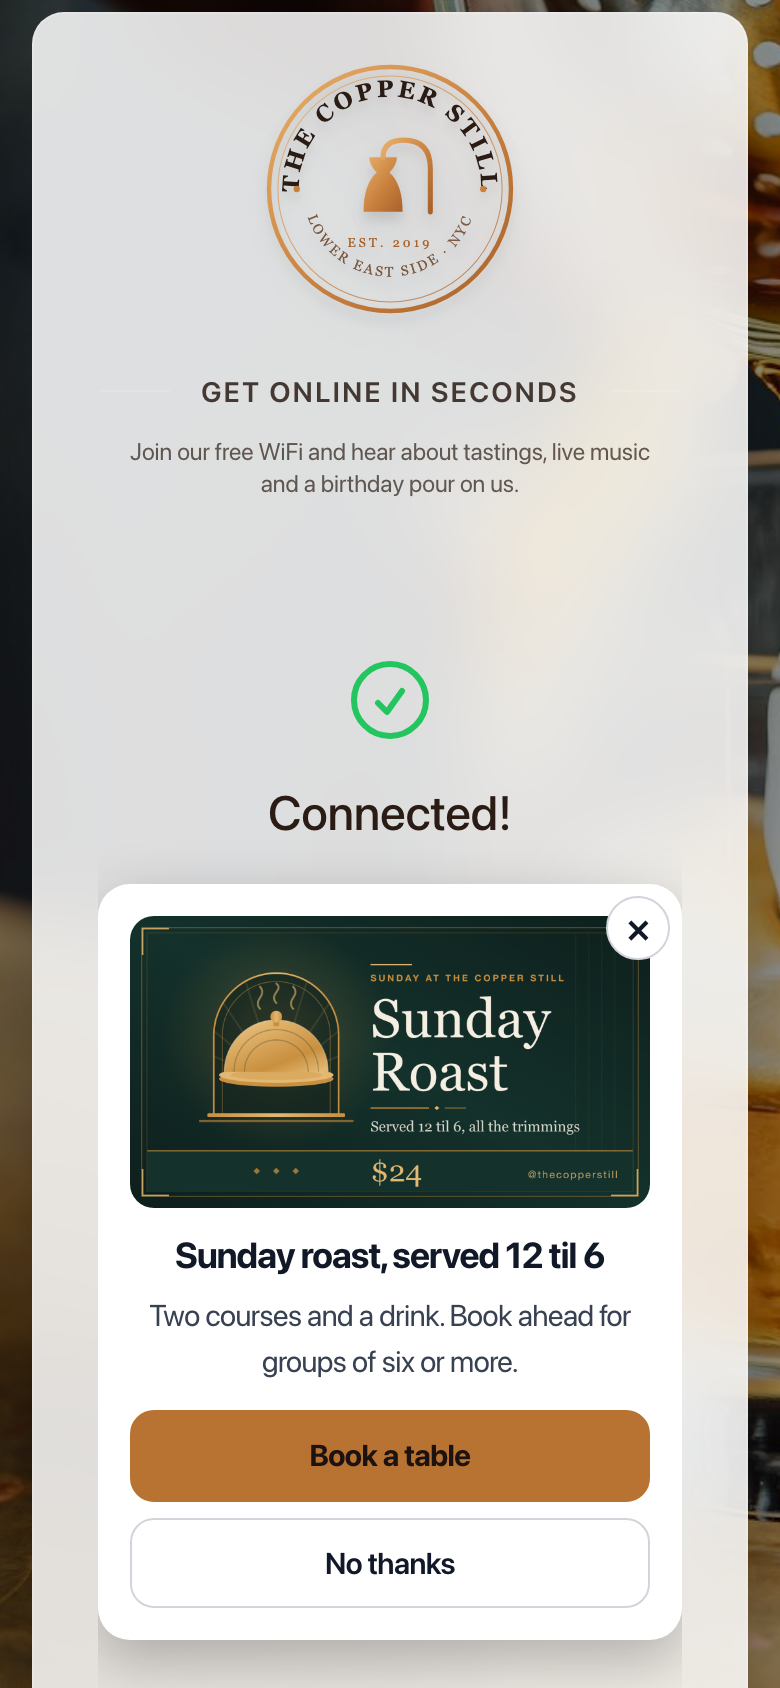
Your ad cards appear on the connected screen, the one a guest sees once they have filled in your splash form. The guest is already online, so a card costs you nothing in sign-ins, and it is the moment their attention is highest.
A card shows your image with the headline and text under it, then:
- Your button, with your own text (Find out more if you leave it empty) and the link it opens
- No thanks, which takes the guest to the internet (your redirect page, if you have set one). A card with no button link shows Continue browsing here instead
- An X in the top right corner, which closes the card and takes the guest online as well
While a card is showing the screen waits for the guest to tap, and your next event card does not show. Without one it shows for a moment and moves the guest on by itself. Cards appear on the simplified sign-in sheet some iPhones open too. Venues on Cisco Meraki show no card, because the guest is not online until Meraki's own page has loaded.
Your cards in the builder
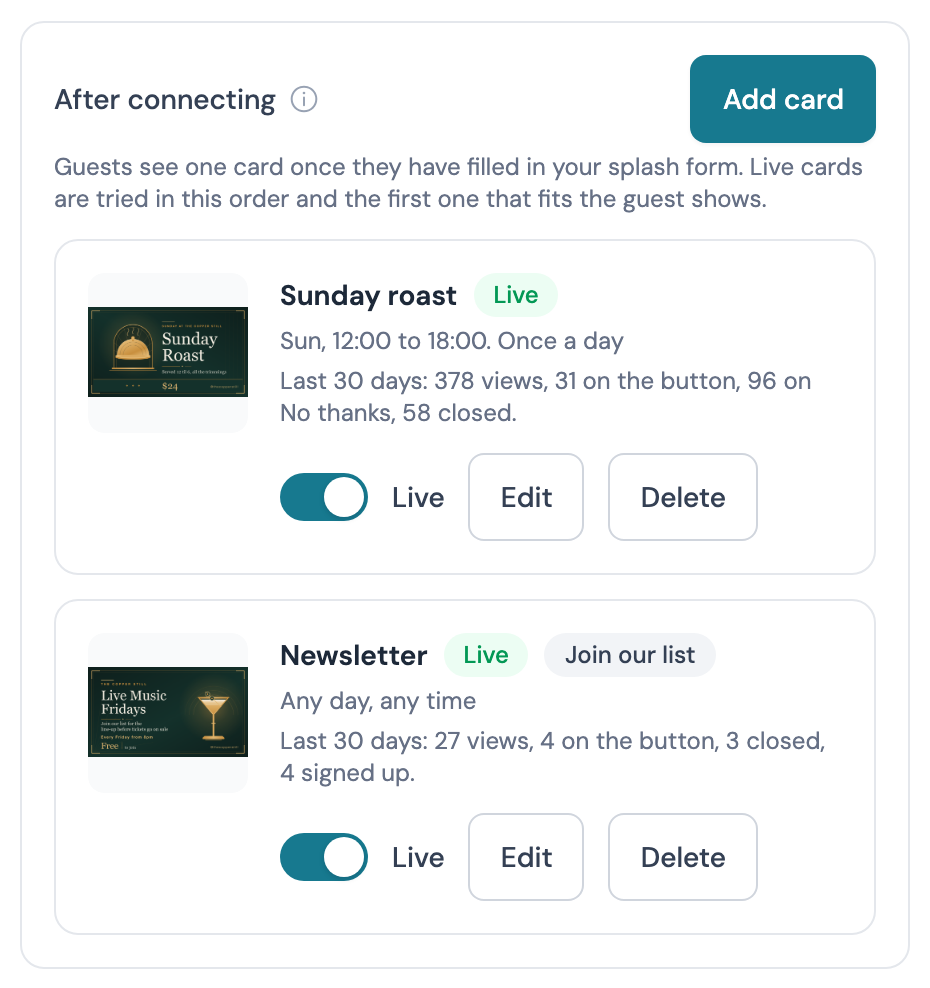
The After connecting part of Promotions lists your cards in the order the splash page tries them. Each row shows the card's image and name, Live or Off, when it shows, and its last 30 days: how many times guests saw it, how many tapped your button and how many closed it. The Live switch takes a card off the screen without losing it, Edit opens it, and Delete removes it with its numbers once you press and hold.
Several cards, schedules and audiences
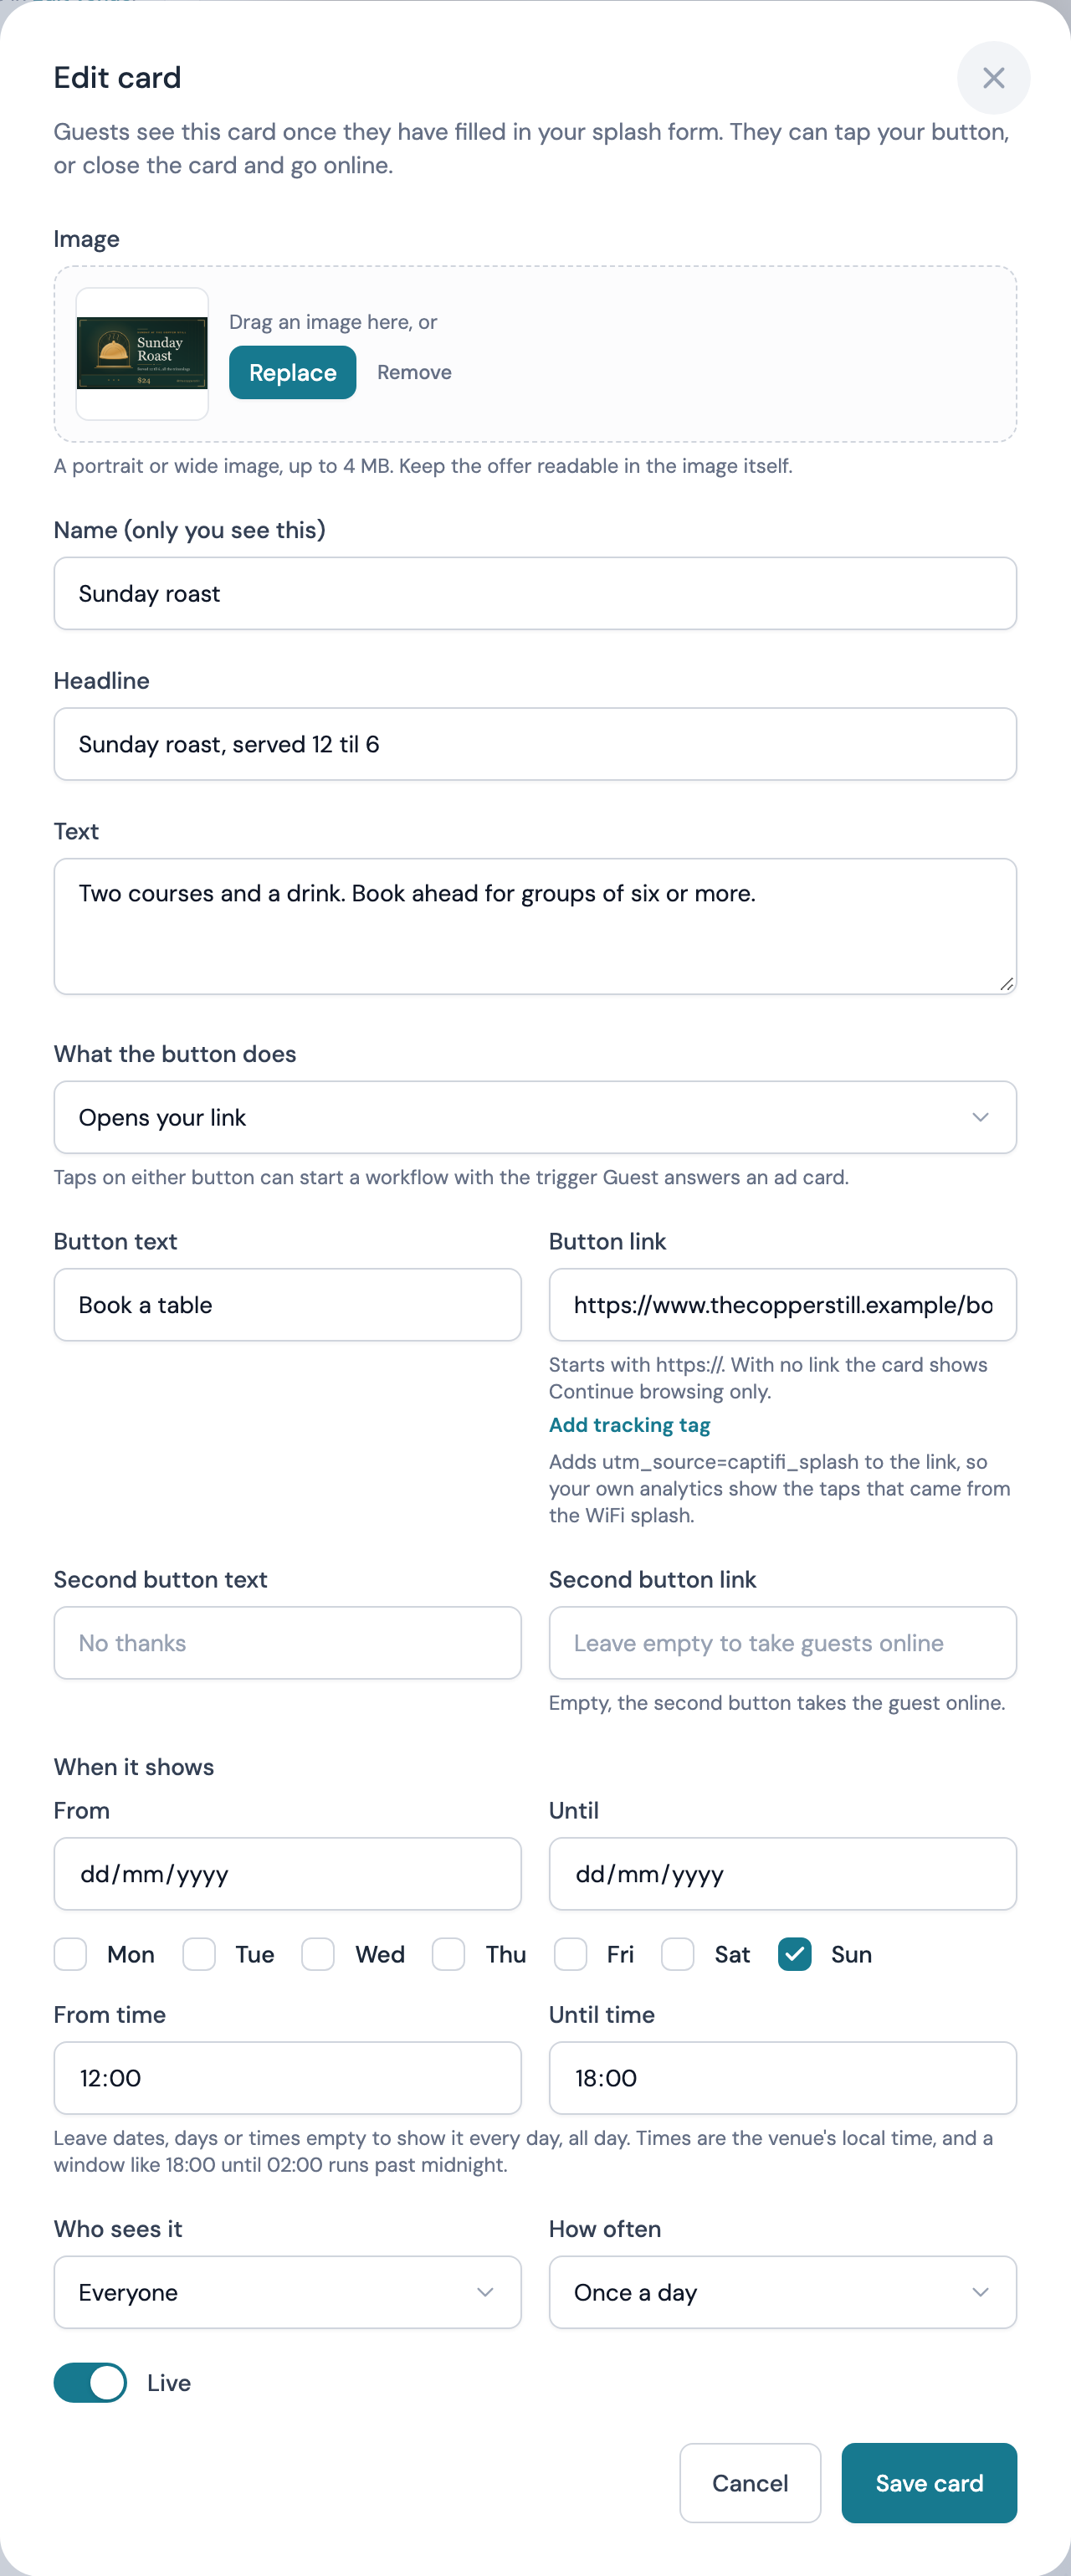
On Growth and above a venue can keep up to 20 cards live, and each card can also have:
- A second button with its own text and link, in place of No thanks. Leave its link empty and it takes the guest online
- When it shows: a first and last date, days of the week and a time window, all in the venue's local time. A window such as 18:00 until 02:00 runs past midnight and belongs to the day it started, so a Friday card still shows at 1am on Saturday
- Who sees it: everyone, guests on their first visit, guests who have been to this venue before (matched on their email address, or their mobile number when they gave no email), or only the guests a workflow picks (see Showing a card to chosen guests)
- How often: every visit, once a day, or once per guest. Once per guest means the guest sees it again only after a year without seeing it
The splash page goes down your live cards in order and shows the first one that fits the guest: its dates, days and times cover the moment they connect, they are in its audience, and they have not seen it as often as it allows. When no card fits, the guest sees the standard connected screen. On other plans one card is live at a time, and making another card live switches the first one off.
When Guest games is on for your account and a game is live at the venue, the game's card takes the place of your ad cards on this screen and the events card does not show beside it. See After connecting on the Games page.
Join our list cards
On Growth and above you can set What the button does to Signs the guest up to your list. The card's button then reads Yes, sign me up (or your own text), and the line under it tells guests that by tapping Yes they agree to receive marketing emails from your venue, by name, and can unsubscribe at any time. Tapping Yes records the guest's marketing consent, the same as ticking the box on your sign-in form, and keeps the wording they agreed to and the time. The guest then sees a thank you page with Continue browsing, or goes to the card's link if you gave it one.
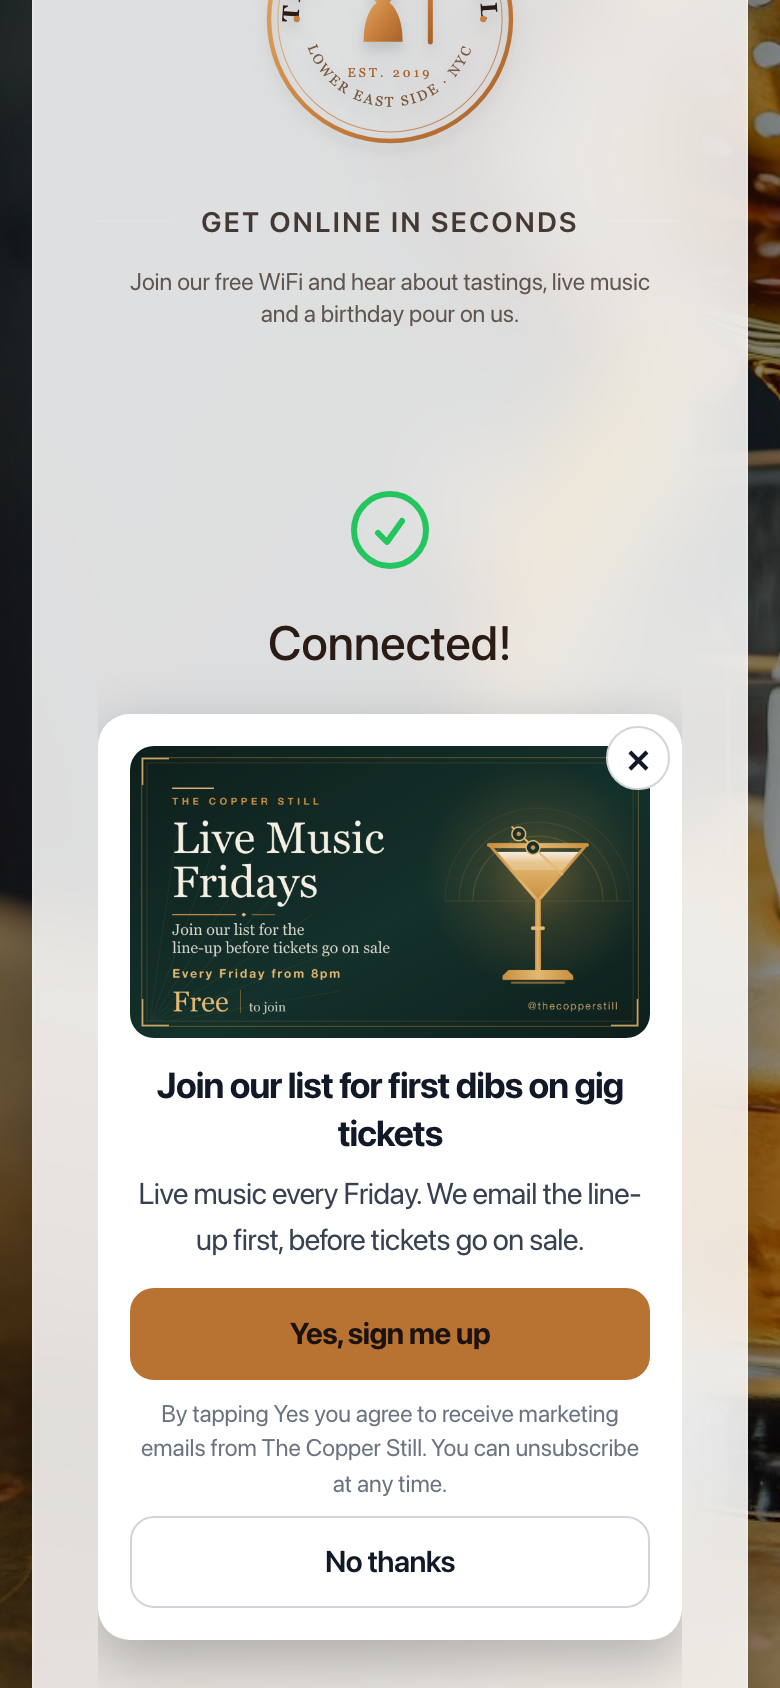
The buttons on a Join our list card always read Yes, sign me up and No thanks, so they match the consent line. A guest only sees the card when the email address they typed is the one on their visit, and only if the address can be emailed once they say yes. Guests who already said yes, on the form or on an earlier visit, guests whose address is unsubscribed, bounced or on your suppression list, and Apple Hide My Email addresses never see it; the splash page shows them your next card instead. The list counts each card's sign-ups over the last 30 days.
Starting a workflow from a card
Every answer to a card can start a workflow through the trigger Guest answers an ad card: Yes is a tap on the card's button (or joining your list), No is a tap on No thanks or the X. Pick one card or any card, and Yes, No or either. For example, a workflow on Yes to your Join our list card can send the guest to Mailchimp with Send the guest to an integration, tag them, or send a welcome email.
Showing a card to chosen guests
A workflow can choose who sees a card. Add the step Show an ad card on their next visit to a workflow and pick the card. The next time that guest connects at the card's venue it is the card they see, ahead of your other cards, as long as its dates, days and times cover the moment they connect. They see it once. A card a workflow picks while the guest is still connecting waits for their next visit, and if they have not been back within the days you set (30 unless you change it, up to 90), the card is dropped for them.
To keep the card from everyone else, set its Who sees it to Guests a workflow picks. Nobody else sees it, and the form hides How often, because each guest a workflow sends it to sees it once. The card still has to be live.
Some ways to use it:
- The trigger Tag added or removed with your
viptag, to show VIPs a members' offer on their next visit - Guest enters a segment, to show a card to the guests in one of your saved segments once they match it
- Guest answers an ad card with the answer No, to show a guest who said no to one card a different card next time
The guest is matched on their email address, or their mobile number when they gave no email, so a workflow cannot send a card to a guest who gave neither. A guest who gave only a mobile number and comes back with an email address as well is matched on the email, so they will not see a card picked for the number alone.
Showing a card for a set time
To show one card to everyone for a few hours, such as during a match or a happy hour, schedule it in the Planner with Show an ad card, or add the workflow step Show an ad card under a trigger such as Calendar event starts or Fixture starts. For the window the card goes first, ahead of your other cards, even if it is switched off and whatever its own dates, days and hours; its Who sees it and How often still apply. A card a workflow picked for a guest still comes first for that guest. When the window ends your usual cards return.
Under the button link there is an Add tracking tag control. It appends utm_source=captifi_splash to an https link, so the taps show up as splash traffic in your own website analytics, and it disappears once the link carries the tag.
Counting Views and Taps
Each card counts how many times guests saw it, the taps on its buttons and how many guests closed it with the X. The list shows the last 30 days in a line such as "Last 30 days: 120 views, 14 on the button, 9 on No thanks, 31 closed." Each button is counted under the name guests saw: No thanks, Continue browsing on a card with no button link, or "the second button" for your own second button on Growth and above. Use the line to tell whether a card earns its place and to compare one offer with the next. Reconnect a test device and tap the button yourself to see the numbers move. Counts keep 180 days of history. For any date range, and for all your venues at once, see Ad cards and buttons on the Analytics page.
Send guests somewhere they can act
Link your button to your booking or ticket page so guests can act straight after connecting. Someone who has just connected at a gig is one tap from a ticket for the next one.
Copying a Design Between Venues
Have several venues? On My Venues, open More on a venue card and choose Copy design to apply one venue's active splash design to another, then tweak the details per venue.
The copy brings over the colours, fonts, logo, background, wording and sign-in questions as they are. Where the wording names the original venue, the new venue's name is used instead, and each venue keeps its own name, location, session length and redirect page.
During Onboarding
The set-up wizard only asks for your WiFi network name. Your splash page starts from the default design, and you open this builder from My Venues → Edit splash as soon as the wizard finishes.
Best Practices
- Keep it simple: a clear headline, brief message, and a prominent connect button convert best
- Use strong branding: logo, brand colours, and a background that represents your venue
- Minimise form fields: every extra required field costs completions
- Set a redirect: send guests to your website, review page, or offers after login
- Check the preview on mobile proportions: the vast majority of guests connect on phones
- Test it live: try a sign-in on the phone preview, which saves nothing, then connect a real phone to your guest WiFi and sign in on the live page (its URL is in the top bar)
Troubleshooting
| Issue | Solution |
|---|---|
| Changes not saving | Check your internet connection and click Save changes: only edited sections are saved |
| Logo not displaying | Check the file format (JPG, PNG, GIF or WEBP; SVG files are not accepted) and size; very large images may fail to upload |
| Background image looks stretched | Use an image at least 1080px wide; portrait orientation works best on phones |
| Guests see the old design | Changes apply to new sessions: reconnect the test device to see the update |
| Custom field answers missing | Check the column toggles on Guest Visits: custom questions appear as optional columns |
| Promotion not showing to guests | Guests see the After connecting placement; the two sign-in placements are not shown to guests yet. Check you uploaded artwork for After connecting, since a headline on its own does not appear. Reconnect the test device, as changes apply to new sessions |
| Guests are not being asked about marketing | Check Email marketing consent is on under Terms & privacy for the design that is currently live |
| The Join rewards checkbox is not showing | The venue must be in a live Rewards programme (Settings → Rewards setup) and Ask guests to join must be on in the builder's Join our rewards section. In automatic join mode a sentence replaces the checkbox |
| The Join rewards line is hard to read against your card | Set Rewards text colour in the builder's Join our rewards section, or change Text colour under Card & colours, which the line follows when its own colour is blank |