
Appearance
Connect UniFi to CaptiFi
This guide takes you from a working UniFi network to guests signing in on your own branded WiFi page. Every step is numbered, and each one tells you exactly which screen you should be looking at.
Time needed: about 15 minutes for the recommended API key path.
What you end up with: guests join your guest WiFi, your CaptiFi page appears on their phone, they sign in, and their details land in your dashboard.
Signed up today?
The onboarding wizard walks you through this same flow and stops at each step. This page is the long version, with every screen, every hardware variation and every thing that can go wrong.
Before you start
You need all four of these:
- A UniFi controller: Dream Machine (UDM, UDM Pro, UDM SE), UniFi Cloud Gateway (UCG Ultra or Max), Dream Router, UniFi Express, Cloud Key, or a self-hosted UniFi Network application
- Admin access to that controller, running UniFi Network 6 or later
- A CaptiFi account at my.captifi.io
- Five minutes at the venue, or remote access to the console
Two values must be typed exactly
Later in this guide you enter the portal address 46.62.168.7 and the domain site.app.captifi.io. A single wrong character stops the sign-in page from ever appearing, and it fails silently. Copy and paste them.
Step 1: Choose your connection path
CaptiFi has to talk to your UniFi controller to read your sites and let guests online. There are three ways to do that. Pick one now, then follow only that path.
| Your situation | Your path |
|---|---|
| Your console has a public IP, or you can add a firewall rule or port forward | Path A: API key. Simplest and most secure. Start at Step 2 |
| Your console sits behind another router, your ISP uses CGNAT, or you cannot port forward | Path B: Remote Tunnel. No inbound ports at all. Start at Step 9 |
| Your UniFi Network version is too old for API keys, and you can reach the console from the internet | Path C: Username and password. Do Steps 4 to 8, then Step 16 |
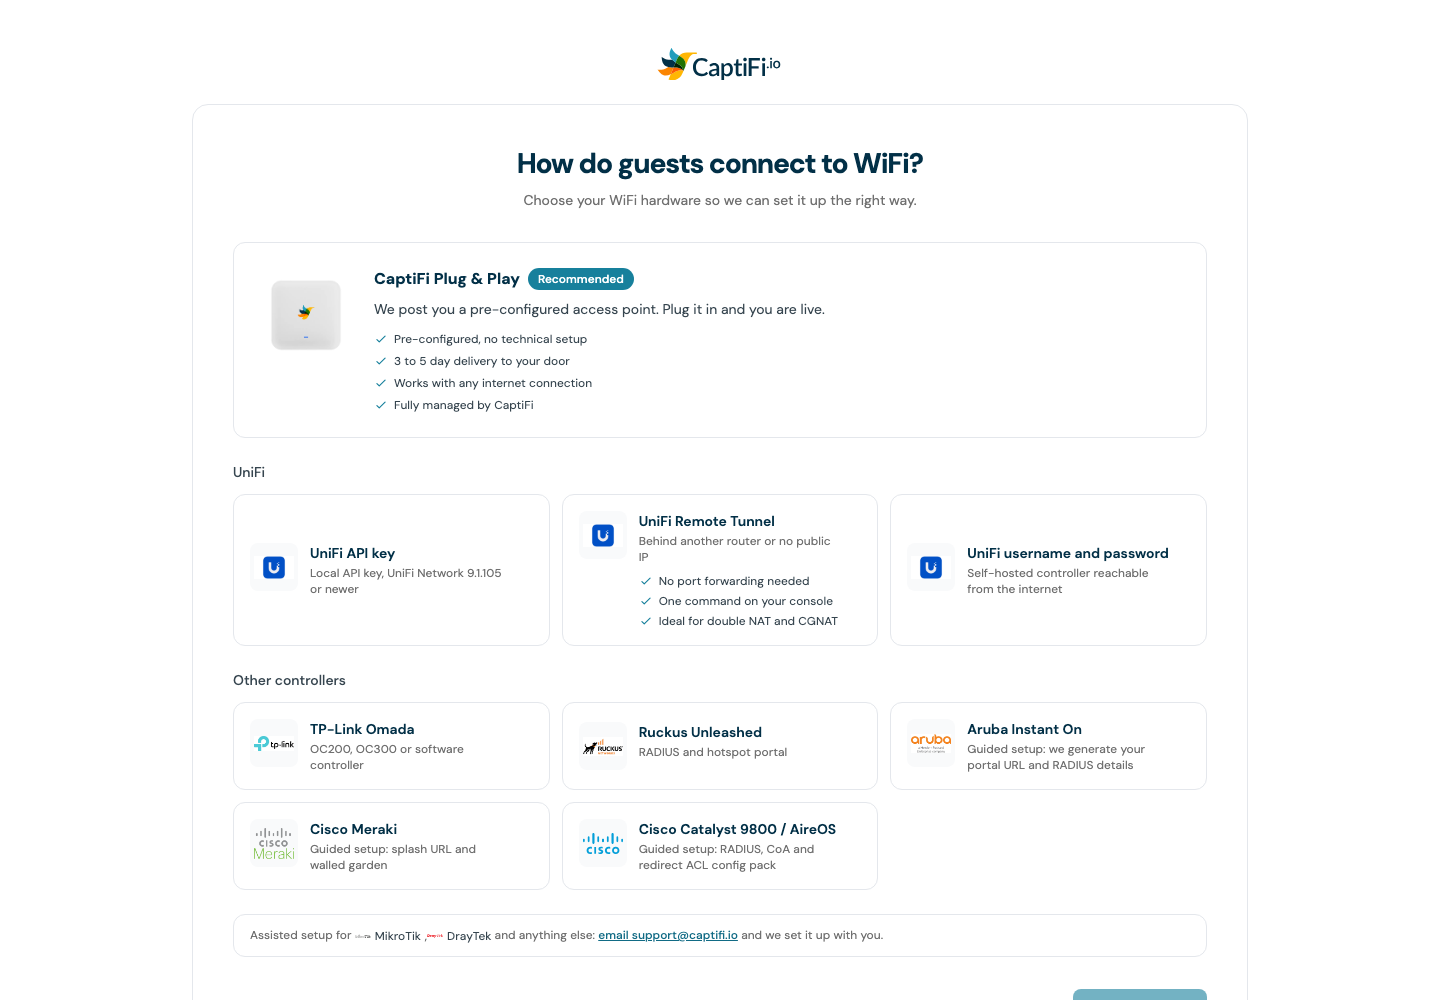
In the set-up wizard these are the three UniFi cards: UniFi API key (Path A), UniFi Remote Tunnel (Path B) and UniFi username and password (Path C):
Not sure which you have?
Open your UniFi console, go to Settings, then Control Plane, then look for Integrations. If it is there, use Path A. If it is not, update the UniFi Network application first, and only fall back to Path C if the update is not possible.
Path A: Connect with a UniFi API key
The recommended path. CaptiFi authenticates with a key you can revoke at any time from UniFi, rather than a controller login, and multi-factor authentication on your Ubiquiti account does not get in the way.
Where you can enter the key depends on where you are
If you are setting up your first venue during onboarding, the wizard asks for the API key directly and no controller login is involved.
If you are adding a venue to an existing account, the Add a venue wizard's Direct connection branch asks for a local controller username and password instead. To move that venue onto an API key, finish adding it, then open Connection status on the venue card and choose Update connection, then Use an API key instead. Step 13 walks through both.
Step 2: Check your UniFi Network version
- Open your UniFi console in a browser
- Open the UniFi Network application
- Go to Settings, then Control Plane, then Integrations
If you can see Integrations, you are ready, and you can skip the rest of this step. Newer releases move it to Integrations in the left menu rather than under Settings, so check both.
If it is not in either place, your UniFi Network application is too old for API keys. Update it from Settings, then System, then Updates, and look again. If you cannot update, use Path C instead.
Step 3: Create the API key
- On the Integrations screen, type a name you will recognise later, for example
CaptiFi - Set the role or access level to Full Control
- Set the expiry to Never expires, unless your policy says otherwise
- Click Create API Key
- Copy the key straight away and paste it somewhere safe
The key is shown once
UniFi displays the key exactly once. If you close the dialog without copying it, delete it and create another one. There is no way to read an existing key back.
Full Control is required
CaptiFi has to authorise guest devices and read your WiFi networks. A read-only key connects and then fails the moment a guest tries to sign in.
Step 4: Let CaptiFi reach your console
CaptiFi connects to your controller from one address only:
46.62.168.7How you allow that depends on your hardware. Do the one that matches yours, then jump to Step 8 to check it worked.
Step 5: Dream Machine, UCG, Dream Router or UniFi Express
On these consoles the controller runs on the gateway itself, so you need a firewall rule, not a port forward. Port forwarding sends traffic to a device behind the gateway, which is not where your controller lives.
5a. Create a port group
- Go to Settings, then Policy Engine (older firmware: Firewall & Security)
- Open Object Manager, then Port Groups (older firmware: Firewall Rules, then Port Groups)
- Create a group named
Captificontaining ports80and443 - Save
5b. Create the firewall rule
- Still in Policy Engine, open Firewall Rules and click Create Entry
- Switch the rule type to Advanced
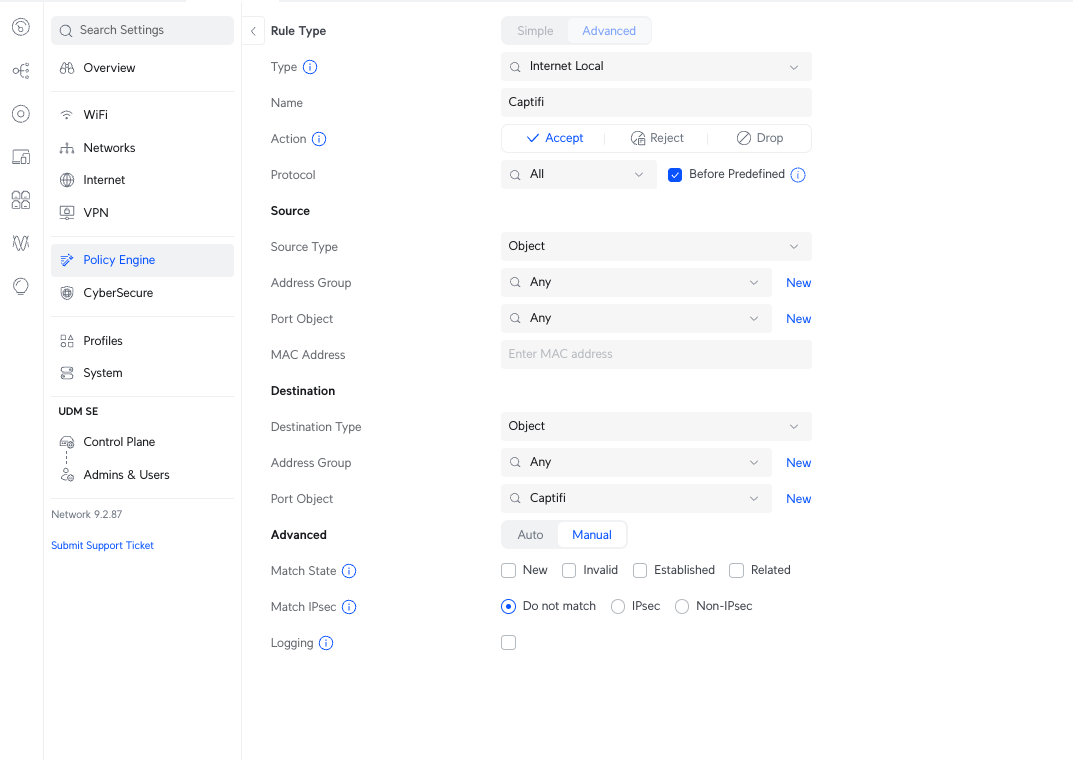
- Fill it in as below
This is the rule as it looks on a UDM SE running Network 9.2:
| Setting | Value |
|---|---|
| Type | Internet Local |
| Name | Captifi |
| Action | Accept |
| Protocol | All |
| Before Predefined | Ticked |
| Source Type | Object |
| Source, Address Group | Any |
| Source, Port Object | Any |
| Destination Type | Object |
| Destination, Address Group | Any |
| Destination, Port Object | Captifi (the group from step 5a) |
Set each Type to Object first: the Address Group and Port Object dropdowns only appear once you have.
- Save the rule
You can create the port group from inside the rule
The New link beside the Port Object field creates the group without leaving the rule form, which saves doing step 5a separately.
What does Internet Local mean?
UniFi splits inbound traffic into Internet In (from the internet to devices on your LAN) and Internet Local (from the internet to the gateway itself). Your controller runs on the gateway, so CaptiFi's traffic is Internet Local. Scoping it to the Captifi port group means only ports 80 and 443 are opened, and only to the gateway.
On older firmware with zones instead of the Policy Engine
Create the rule under Settings, then Firewall & Security, then Firewall Rules, with Source Zone set to External, Destination Zone set to Gateway, Destination Port set to the Captifi port group, Action set to Allow, and Auto Allow Return Traffic enabled.
IPv6
The rule above covers IPv4. If your site runs IPv6 as well, either add a matching IPv6 rule or make sure the controller is reached over IPv4.
Step 6: Cloud Key or Cloud Key Gen2
A Cloud Key is a separate device on your LAN, so this one is a normal port forward on whatever router sits in front of it.
- Sign in to your router or gateway
- Open its Port Forwarding settings
- Add a rule:
- External port: 8443
- Internal IP: your Cloud Key's IP address
- Internal port: 8443
- Protocol: TCP
- Save
If you cannot port forward, for example because an ISP router you do not control sits in front, go to Path B: Remote Tunnel instead.
Cloud Keys can now use the Remote Tunnel
Cloud Key hardware has no WireGuard support built into its kernel, so the tunnel used to be unavailable on it. CaptiFi now runs the tunnel a second way on these consoles, without needing that kernel support, so most Cloud Keys can use Path B: Remote Tunnel instead of port forwarding.
The installer checks your Cloud Key and tells you which way it is using. If your particular unit cannot run it either, the installer stops and says so before changing anything, and port forwarding above stays the right option. Contact support and we will work out the best option with you.
Step 7: Self-hosted controller, including UniFi OS Server on Windows
This covers the UniFi Network application installed on your own machine, VM or server.
- Make sure port 8443 (or whichever port your controller listens on) is reachable from the internet
- On your firewall, restrict inbound access on that port to
46.62.168.7only
You do not need to expose the controller to the whole internet, and you should not. One allow rule for CaptiFi's address keeps the connection working while removing your controller from public view. Combined with an API key, which you can revoke without changing any password, this is the recommended setup for a self-hosted controller.
Use an IPv4 address
Enter your controller as an IPv4 address, or as a hostname with only an A record. CaptiFi always connects from 46.62.168.7, so a single IPv4 allow rule is all you need.
Prefer a different port? You do not have to expose the controller's own port number. Forward any free external port to it and give CaptiFi the address including that port:
- Create a port forward, for example external port
7443to your controller's port8443, protocol TCP - In CaptiFi, enter the address with the port, for example
unifi.example.com:7443or203.0.113.10:7443
CaptiFi tests that exact port first, and every later connection, guest authorisation included, uses the same address.
The Remote Tunnel is not available for self-hosted controllers
The tunnel installer runs on UniFi OS consoles only, so it refuses to install on a Windows, Linux or VM-based controller. If you need zero inbound exposure on a self-hosted controller, use the single-address firewall restriction above, or move the controller onto a UniFi OS console.
Step 8: Check the controller is reachable
Do this from outside your network, for example on your phone with WiFi turned off.
- Find your venue's public IP at whatismyip.com
- Visit
https://YOUR_PUBLIC_IPfor a Dream Machine or UCG, orhttps://YOUR_PUBLIC_IP:8443for a Cloud Key or self-hosted controller - You should see the UniFi sign-in page. A browser security warning is normal and expected here, because the controller uses a self-signed certificate
If nothing loads and your gateway's WAN address is a private IP, meaning it starts with 10., 192.168., or 172.16. through 172.31., you are behind double NAT. Go to Path B.
The wizard offers the other way in
When CaptiFi cannot reach your console from the internet during set-up, the message says so and two buttons appear under it: Use the Remote Tunnel instead, which switches you to Path B without starting over, and Use a CaptiFi device instead.
Now jump to Step 13: Enter your controller in CaptiFi.
Path B: Remote Tunnel (double NAT, CGNAT or no port forwarding)
Everything in Path A relies on CaptiFi reaching your console from the internet. When your console sits behind another router that path does not exist. This is called double NAT, it is common, and it is fully supported: your console dials out to CaptiFi over a secure tunnel instead, with no changes to your router or your ISP's equipment.
Check your hardware can run the tunnel first
Most consoles run the tunnel using WireGuard support built into their kernel. Where that is missing, CaptiFi falls back to a second method that does not need it, which is what makes Cloud Keys work. Two cases still need attention:
- Cloud Key hardware, Gen2 and Gen2 Plus included. These use the fallback method, which the installer sets up for you. There is no SSH console setting in Step 11 to find on a Cloud Key, and if the fallback is not available on your unit the installer says so and you should use port forwarding instead
- Dream Machines still on UniFi OS 1.x. Update UniFi OS first. If it cannot be updated the installer stops with
RTNETLINK answers: Operation not supported
The installer checks all of this before it registers anything, so a console that cannot run the tunnel fails safely rather than half-configuring. If yours cannot and port forwarding is impossible, contact support.
Step 9: Confirm you are behind another router
Any one of these is enough:
- The UniFi app shows an Upstream NAT detected on WAN1 banner
- Your gateway's WAN address is a private IP rather than your public IP
- An ISP modem or router combo sits in front of your UniFi gateway
- Your ISP uses CGNAT, common on 4G, 5G and some fibre connections
- You do not control the upstream router
Step 10: Copy your install command from CaptiFi
The command is unique to your venue, so CaptiFi generates it as soon as that venue exists in your account. You do not need to ask us for it.
If you are still in onboarding, choose UniFi Remote Tunnel when the wizard asks how guests connect. It names the venue first, then the Install the tunnel step shows the command with a Copy command button. Leave that page open: it checks every five seconds and shows Tunnel connected on its own once the console dials in, so there is nobody to notify when you are done. The next step asks for a single UniFi API key (create it as in Step 3) and the one after lets you choose the network to gate.
If your account is already set up and you are adding this venue now, log in to my.captifi.io, go to My Locations and click Add location. Choose Ubiquiti UniFi, name the venue, pick Remote Tunnel under "How does CaptiFi reach your controller?", then click Add venue. The next screen, Install the tunnel, shows the command with a Copy button and watches for the console. Its Connect controller button stays greyed out until the tunnel is up. The full click-by-click for this wizard is in Step 13.
If the venue is already in CaptiFi, for example you are moving it from port forwarding to the tunnel, open the venue's UniFi connection screen on my.captifi.io and follow the link under "Controller behind another router or no public IP?" to get the command.
The command carries a token tied to the one venue. Treat it like a password: do not share it, and do not run it on a console at a different venue.
If you cannot get to the dashboard, email hello@captifi.io and we will send the command for your venue.
Step 11: Turn on SSH on the console
- In UniFi OS, go to Settings, then Control Plane, then Console
- Switch SSH on
- Set an SSH password and note it down. This is separate from your UniFi login
Step 12: Run the installer
- Connect to the console over SSH:
ssh root@YOUR-CONSOLE-IP, using the SSH password from Step 11 - Paste the install command you copied in Step 10
- Wait about 30 seconds for the tunnel to come up
The connection is outbound only, so it works behind any number of routers. It also reconnects by itself after a reboot or a power cut, so this is a one-time job.
Now create an API key with Step 3, then continue to Step 13. Tunnel-connected consoles authenticate with the API key alone: there is no username or password to create or share.
The "Upstream NAT detected" warning stays, and that is fine
With the tunnel in place that banner in the UniFi app is harmless. No action is needed, and you should not switch your ISP router to bridge mode to make it go away.
Step 13: Enter your controller in CaptiFi
If you are still in onboarding
The wizard asks for your controller address and API key:
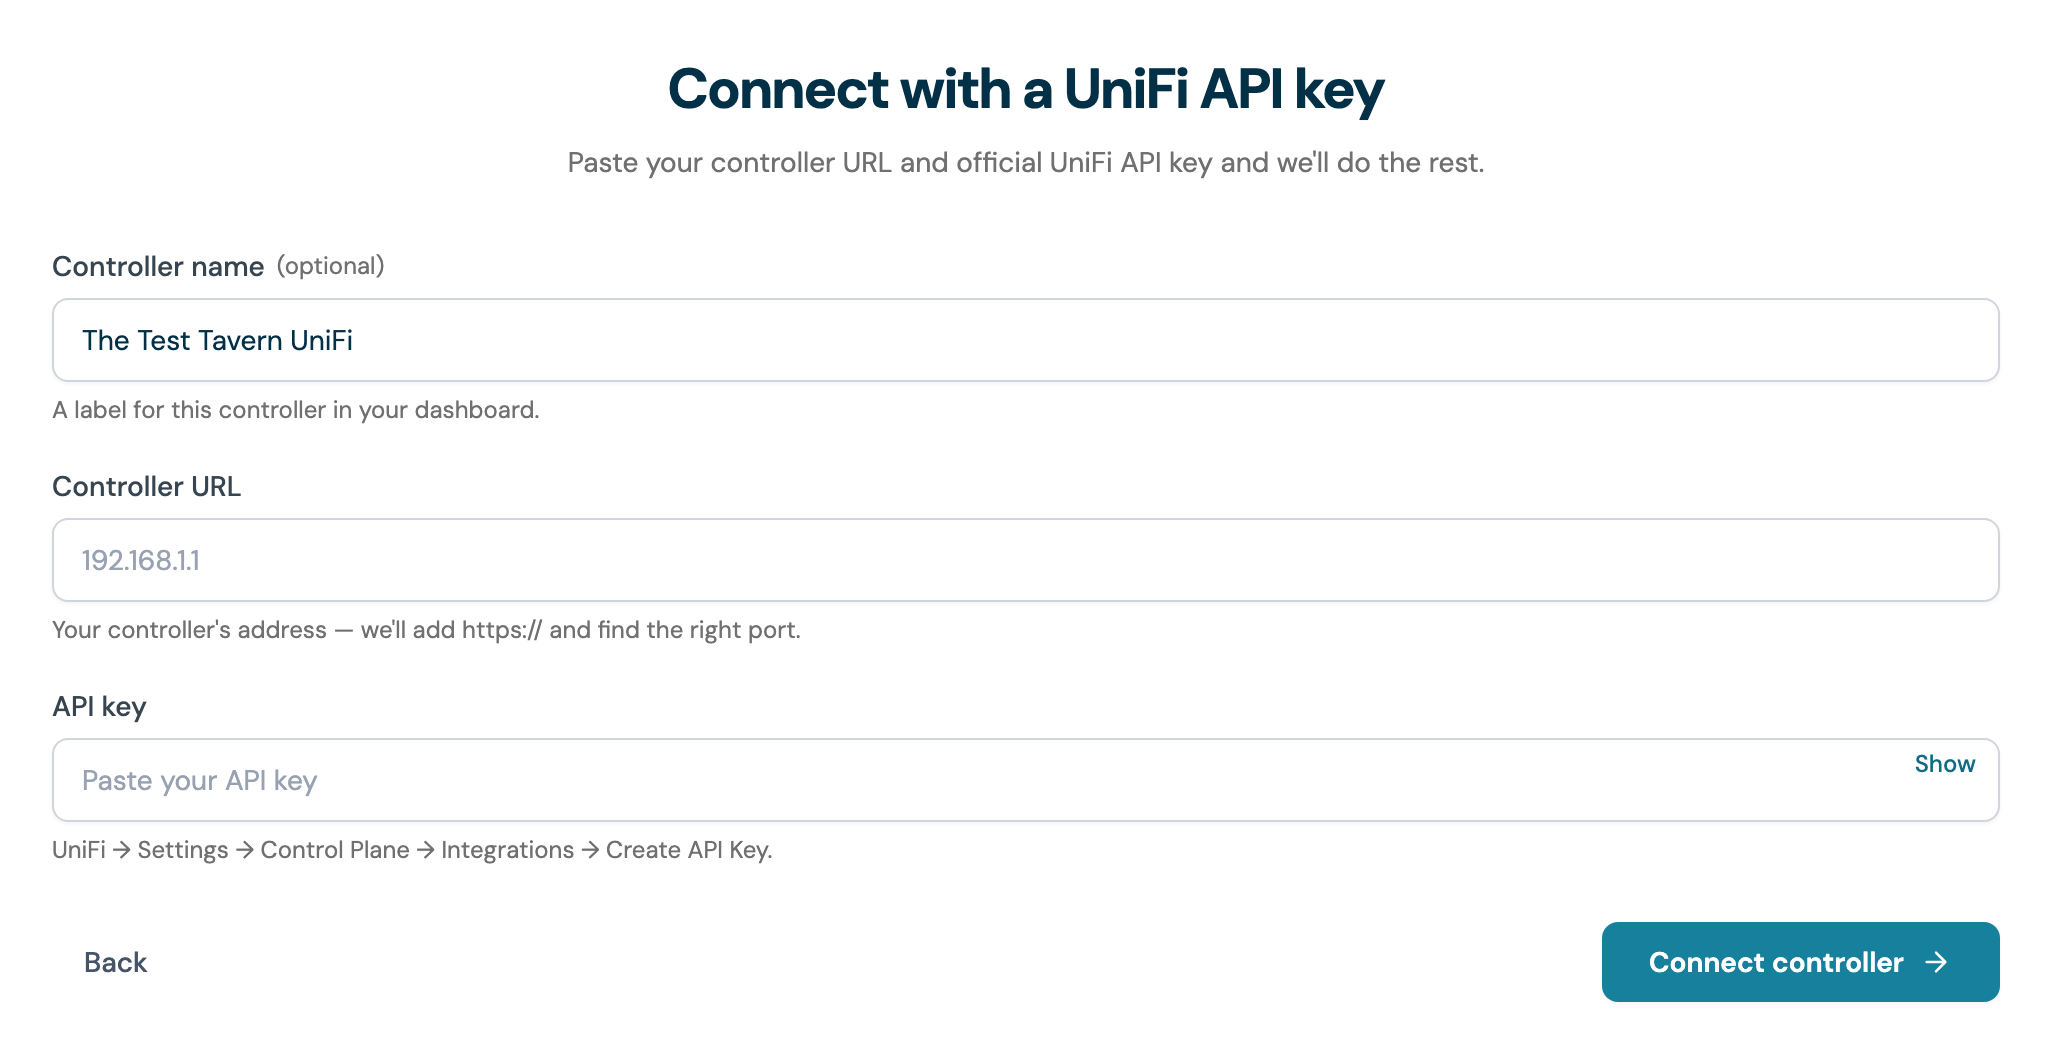
Controller name: a label for your own reference, for example
The Kings Arms UniFiController URL: the address CaptiFi should reach your controller on. CaptiFi adds
https://and finds the right port for you, so you only type a port if you forwarded a custom one, for exampleunifi.example.com:7443On Path A this is the public address or hostname you tested in Step 8. A private address such as
192.168.1.1cannot be reached from the internet; if that is all your console has, go back and choose UniFi Remote Tunnel insteadAPI key: paste the key from Step 3
Click Connect controller
CaptiFi checks the address, signs in with the key and discovers your UniFi sites.
If your account is already set up
- Log in to my.captifi.io and go to My Locations
- Click Add location
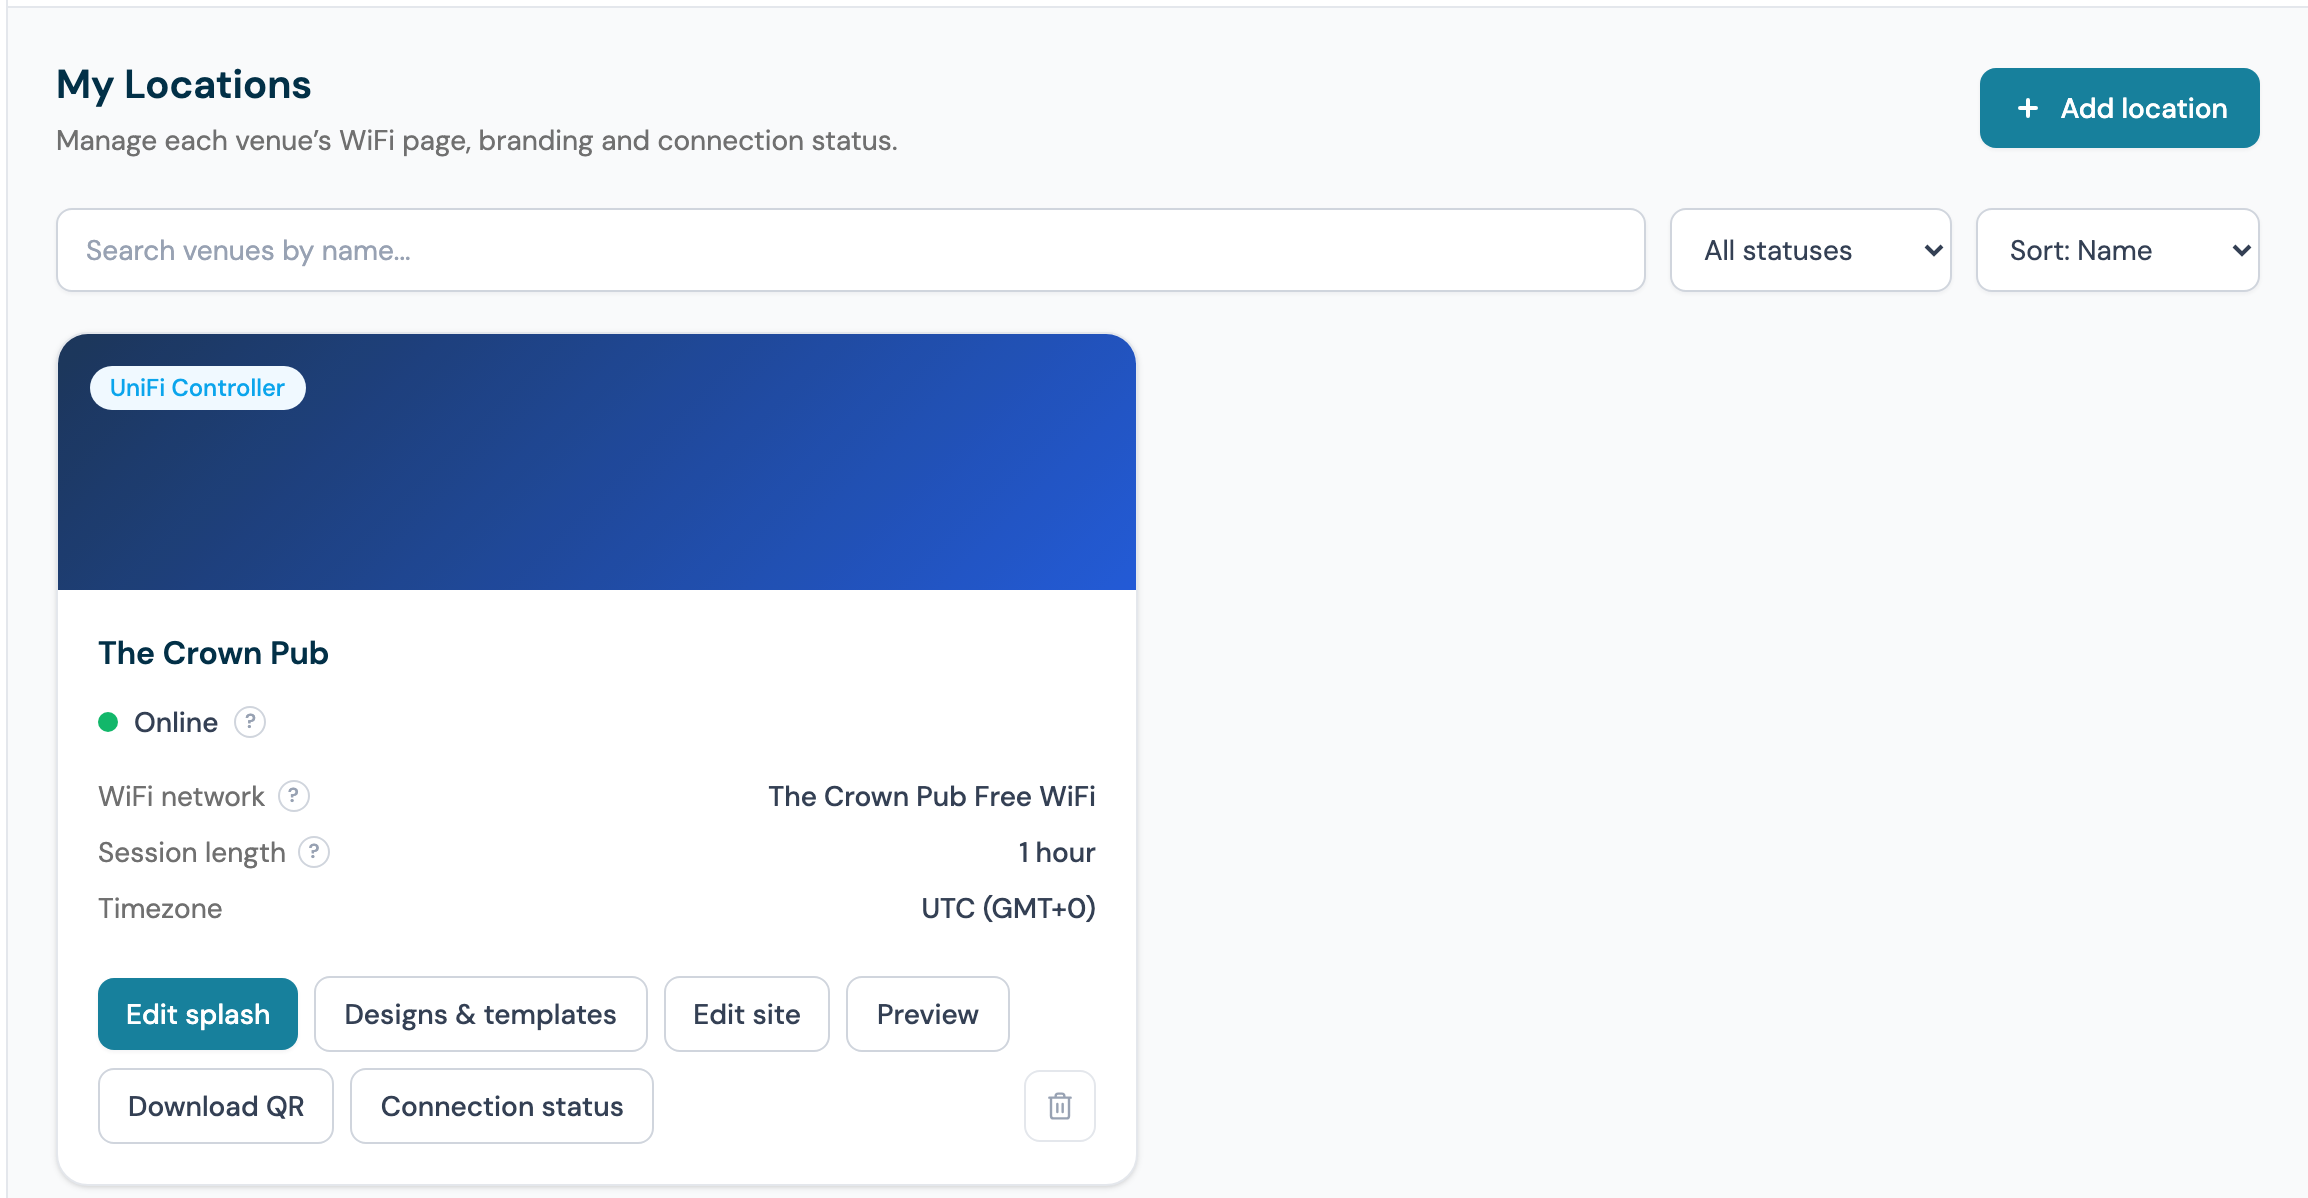
- Choose Ubiquiti UniFi and click Continue
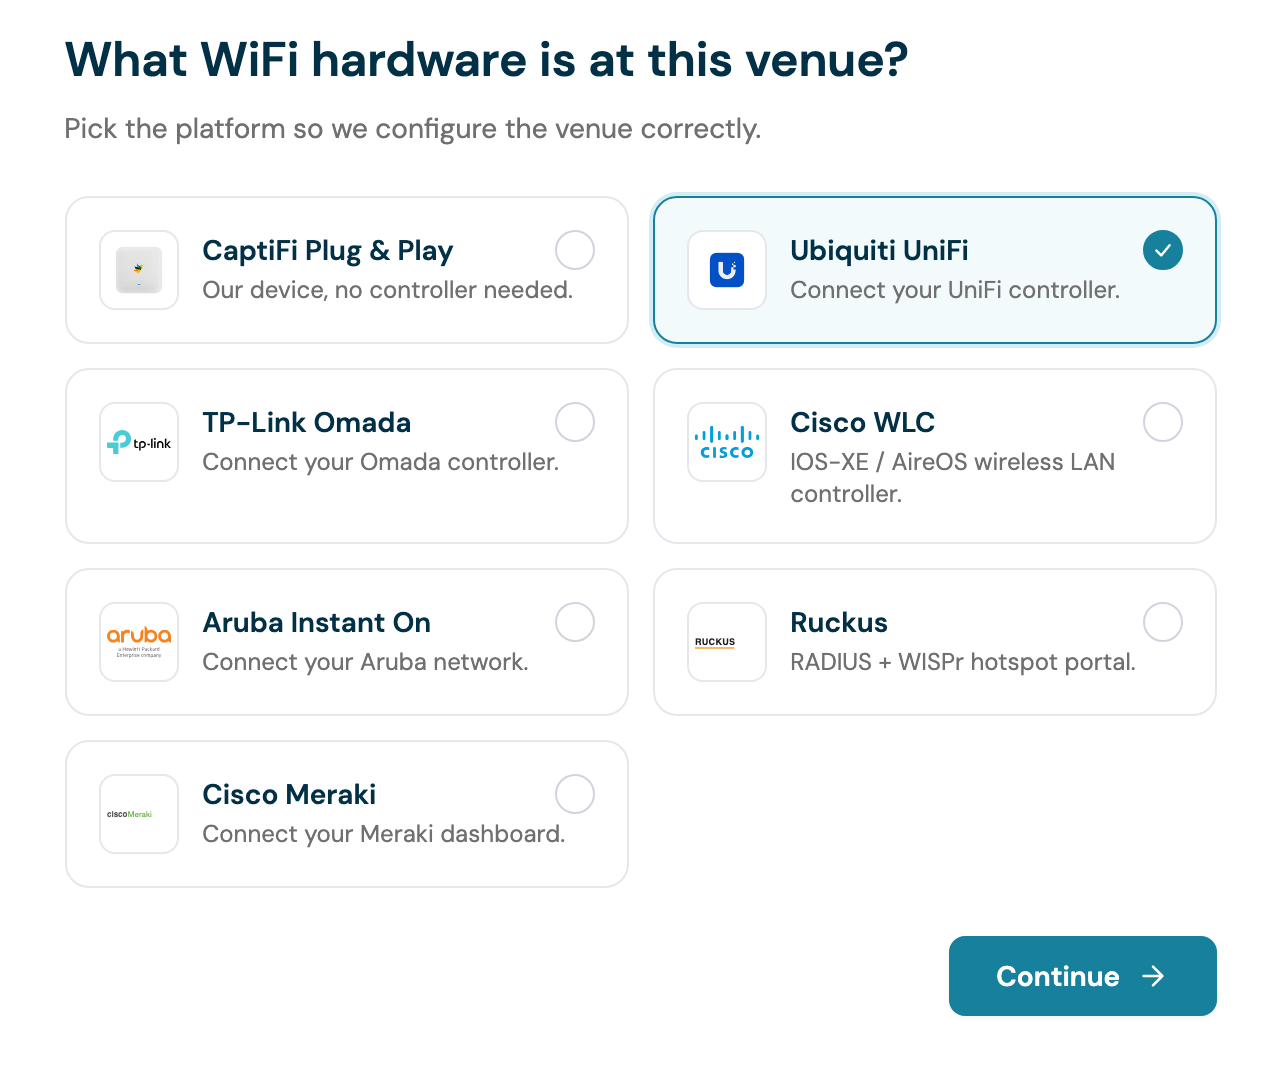
- Name the venue, set its type and timezone, then choose how CaptiFi reaches the controller: Direct connection for Path A, or Remote Tunnel for Path B
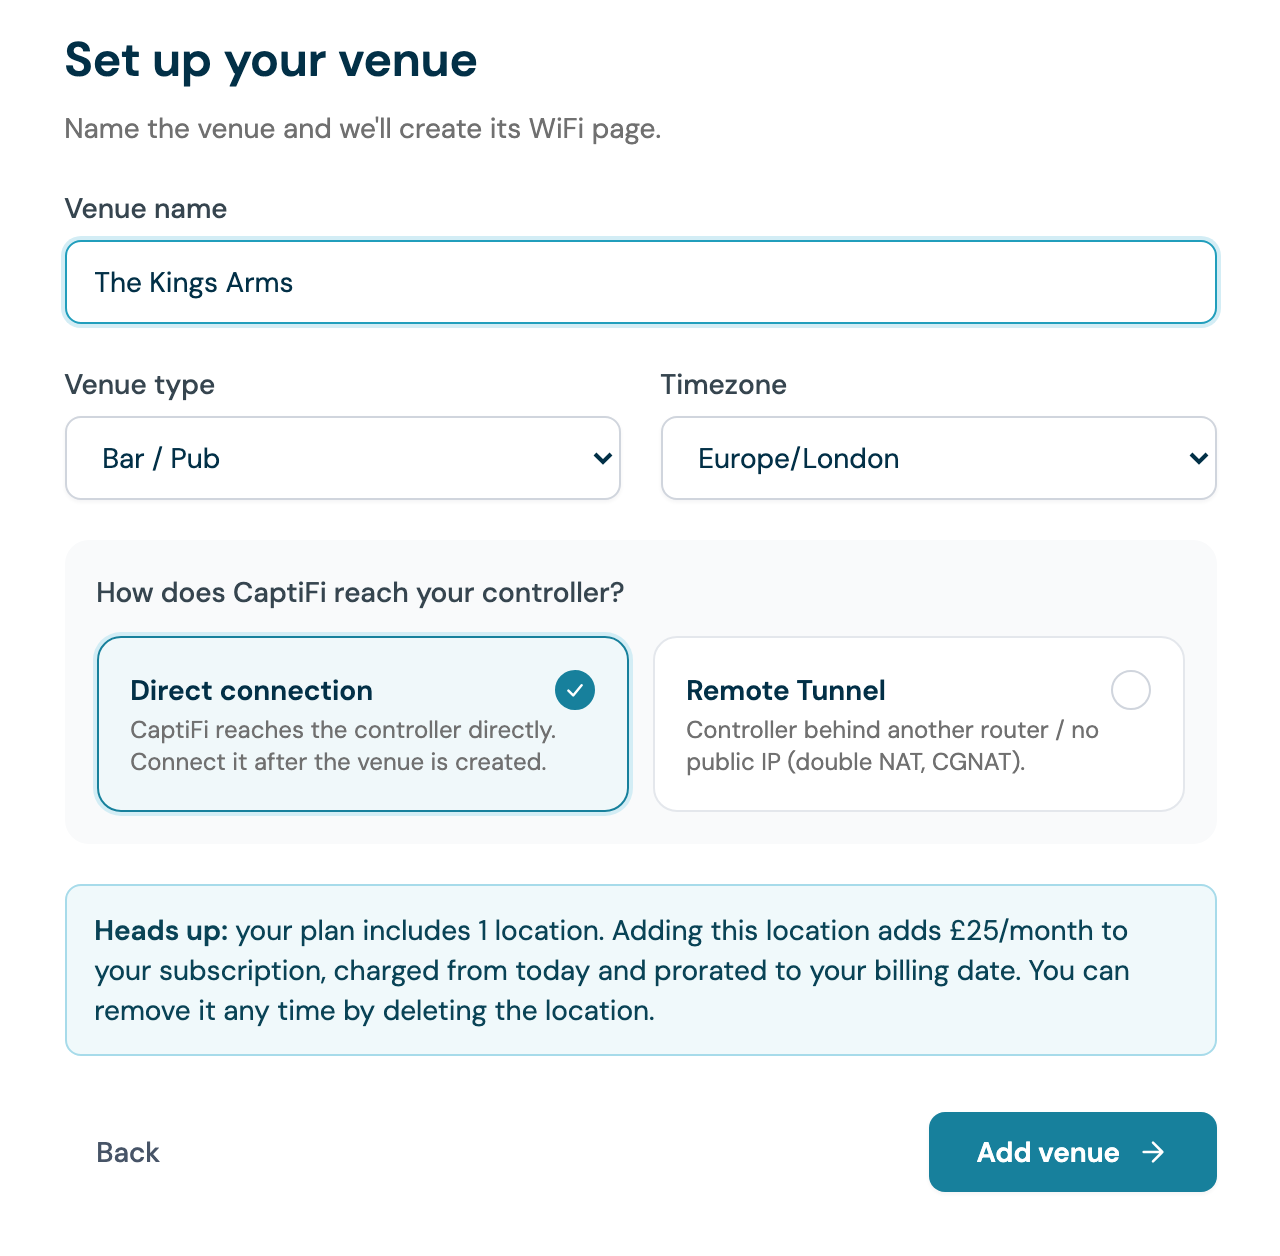
- Click Add venue. The wizard then connects the controller: Remote Tunnel asks for your API key, Direct connection asks for the controller address and a local admin sign-in
Adding a second venue changes your bill
Every plan includes one location. Lite is for one location only, so a second needs Essentials or above. Each additional location is charged at the extra-venue rate for your billing currency (£25, $35, €30, C$45, A$49 or NZ$59 per month), from the day you add it and prorated to your billing date. See Plans and pricing. You can remove it at any time by deleting the location.
If you have more than one UniFi site
Pick the right one from the Controller site dropdown before you continue. With several sites on one controller CaptiFi cannot choose for you, and it is one CaptiFi location per UniFi site.
One API key covers every site on the controller, so those locations all share a single connection. That also means rotating the key changes the connection for every venue on it, and each of those locations still gets its own splash page design.
Step 14: Choose the WiFi network guests sign in on
On the UniFi Remote Tunnel path this is the wizard's Go live step; on any UniFi venue it is the WiFi network screen on the venue card. Both list every WiFi network on your controller so you can say which one the sign-in page belongs to; the button reads Go live or Apply to match.
API key and username paths
Those two paths do not show this picker during set-up. The Activate your WiFi step creates and gates a new guest network with the name you gave on Set up your venue. To gate an existing network instead, or to change it later, open WiFi network on the venue card after the wizard.
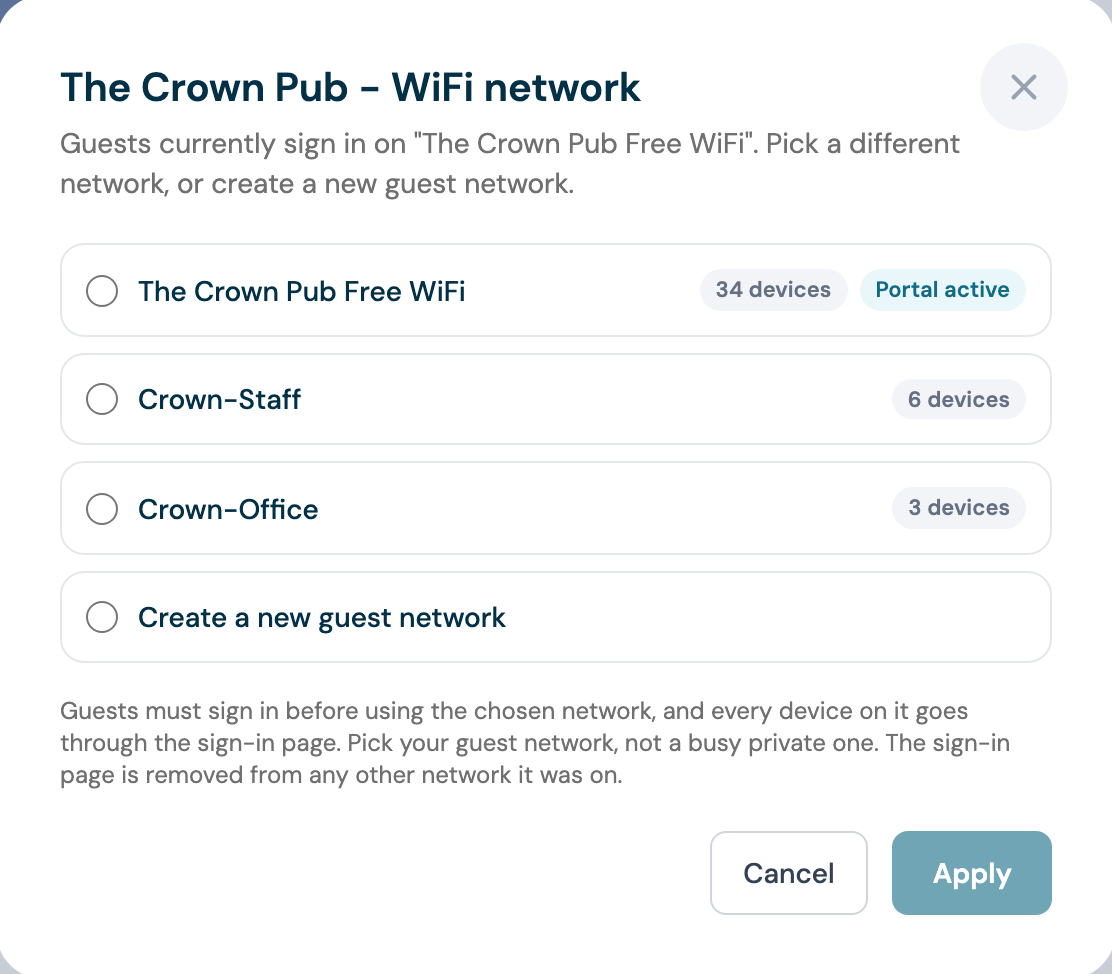
- Pick your guest network, not a private or staff one. Every device on the chosen network has to complete the sign-in page, and the device counts next to each name help you spot which network your own kit is on
- Or choose Create a new guest network (Create a new guest SSID in the wizard), type a name, and CaptiFi adds an open guest network across your access points
- Click Apply, or Go live in the wizard
CaptiFi gates your choice and removes the sign-in page from any other network it was on, so a private network never stays walled by mistake.
You are not locked in
You can swap the gated network later at any time. See Change which WiFi network the portal gates.
Newer consoles: check the Hotspot zone
On gateways with zone-based firewalling, meaning newer Dream Machines, UCG and EFG, the sign-in page follows the Hotspot zone. Go to Settings, then Policy Engine, then Zones, and make sure the network your guest WiFi uses is in the Hotspot zone, and that nothing else is. CaptiFi tells you after applying if the zone needs attention, and names the exact setting to change.
If you chose an existing network that your console already broadcasts, CaptiFi gates that network rather than creating a duplicate. Your session length and any speed limits are kept as configured.
Skip to Step 19: Test it with a phone.
Step 15: Configure the captive portal by hand
Skip this whole step if CaptiFi connected through an API key or the Remote Tunnel. It does this for you, and it does it again whenever you use Re-apply settings.
You only need this when CaptiFi cannot write to your controller: some older firmware, and some locked-down self-hosted setups.
15.1 Create or edit the guest WiFi network
- In UniFi, go to Settings, then WiFi
- Create a network, or open your existing guest network
- Set:
- Name (SSID): your guest WiFi name, for example
The Kings Arms Free WiFi - Security: Open, with no password
- Network: your guest network
- Name (SSID): your guest WiFi name, for example
15.2 Turn the hotspot portal on
- Still on the WiFi network, find Hotspot Portal and switch it on
- Under Authentication, choose External Portal Server
15.3 Enter CaptiFi's portal
| Setting | Value |
|---|---|
| IPv4 address | 46.62.168.7 |
| Domain | site.app.captifi.io |
15.4 Allow guests to reach CaptiFi before they sign in
Under Pre-Authorization Access, sometimes labelled Pre-Authorization Allowances or walled garden, add these:
| Entry | Why |
|---|---|
site.app.captifi.io | The sign-in page itself. Required |
app.captifi.io | Form submission and assets. Required |
fonts.googleapis.com | Page fonts. Required |
fonts.gstatic.com | The font files themselves. With only the entry above, the page gets the stylesheet and none of the fonts. Required |
*.captifi.io | Covers the above plus anything CaptiFi adds later, if your firmware accepts wildcards |
The first four are what CaptiFi writes when it configures a controller itself. Miss one and the sign-in page loads half-broken, or on iPhones does not load at all.
15.4b Blocked ranges
Under Post-Authorization Restrictions, add the private ranges so guests cannot reach your own network once they are online:
| Entry |
|---|
192.168.0.0/16 |
172.16.0.0/12 |
10.0.0.0/8 |
15.5 Landing page settings
Tick all of these:
- Show Landing Page
- HTTPS Redirection Support
- Encrypted URL
- Secure Portal
- Domain, set to
site.app.captifi.io
15.6 Turn off UniFi's own authentication methods
CaptiFi is the only thing that should authorise guests, so switch off Password, Voucher, Facebook, Payment and RADIUS on the hotspot portal, and leave UniFi's own portal customisation alone.
15.7 Apply
Click Apply Changes.
Paid WiFi venues
If you sell WiFi access through CaptiFi, your Stripe and wallet payment domains also need to be in the pre-authorisation list. Contact support so we can confirm the current set rather than guessing.
Path C: Username and password (legacy)
Only use this when your UniFi Network version cannot make API keys. It needs a local account on the controller. Your Ubiquiti cloud login, the one you use at ui.com, will not work: CaptiFi talks to the controller's local API, which only accepts local credentials.
Do the reachability steps first
This path still needs CaptiFi to reach your console from the internet. If you have not already, work through Step 4 to Step 8 before you start here, otherwise Step 17 fails at "Test connection".
Cloud accounts with enforced MFA cannot be used
A Ubiquiti cloud (ui.com) account always has multi-factor authentication enforced, and CaptiFi cannot complete that challenge, so the sign-in fails. The message reads "Could not sign in to your UniFi controller. Check the username and password and try again."
A local controller account with two-factor authentication is different and does work: tick the 2FA box in Step 18 and CaptiFi asks for the 6-digit code. If in doubt, use an API key, which is not affected by either.
Your UniFi controller is temporarily refusing sign-in attempts
Your controller limits how many sign-in attempts it accepts in a short time, and several tries in a row can trip that limit. It refuses the attempt before it checks your details, so this message does not mean your username, password or verification code is wrong.
Wait about a minute and try again. CaptiFi's own background checks also wait for the limit to clear, and a venue whose controller trips it for a few minutes is not reported as offline. If the controller refuses every attempt for half an hour, CaptiFi treats it as unreachable, the same as any other controller outage. The venue card on My Locations then reads Controller Unreachable, with a line under it saying the controller is refusing CaptiFi's sign-ins or requests. The limit usually lifts on its own. If it does not, check that no other app or script is signing in to the controller over and over.
While the limit is in force your controller may also refuse the sign-in CaptiFi makes when a guest joins, so a guest may need to submit the WiFi sign-in page again a moment later. Guests already online are unaffected.
Step 16: Create a local admin account
On UniFi OS (UDM, UDM Pro, UDM SE, UCG):
- Open the UniFi OS console, for example
https://192.168.1.1 - Go to OS Settings, the gear icon in the top left, outside the Network application
- Open Admins & Users
- Click Add Admin
- Choose Local Access Only, not Ubiquiti Account
- Set a username, for example
captifi, and a strong password - Set the role to Administrator, which is required so CaptiFi can authorise guests
- Click Add
On a Cloud Key or self-hosted controller:
- Open the UniFi Network web interface
- Go to Settings, then Admins
- Click Add New Admin
- Choose Local admin only, do not invite by Ubiquiti account
- Set a username and password
- Set the role to Administrator
- Click Create
Make a dedicated account
Use a username like captifi rather than sharing your own login. It makes CaptiFi's activity obvious in your controller logs, and you can revoke it without touching your own access.
Step 17: Find the controller in CaptiFi
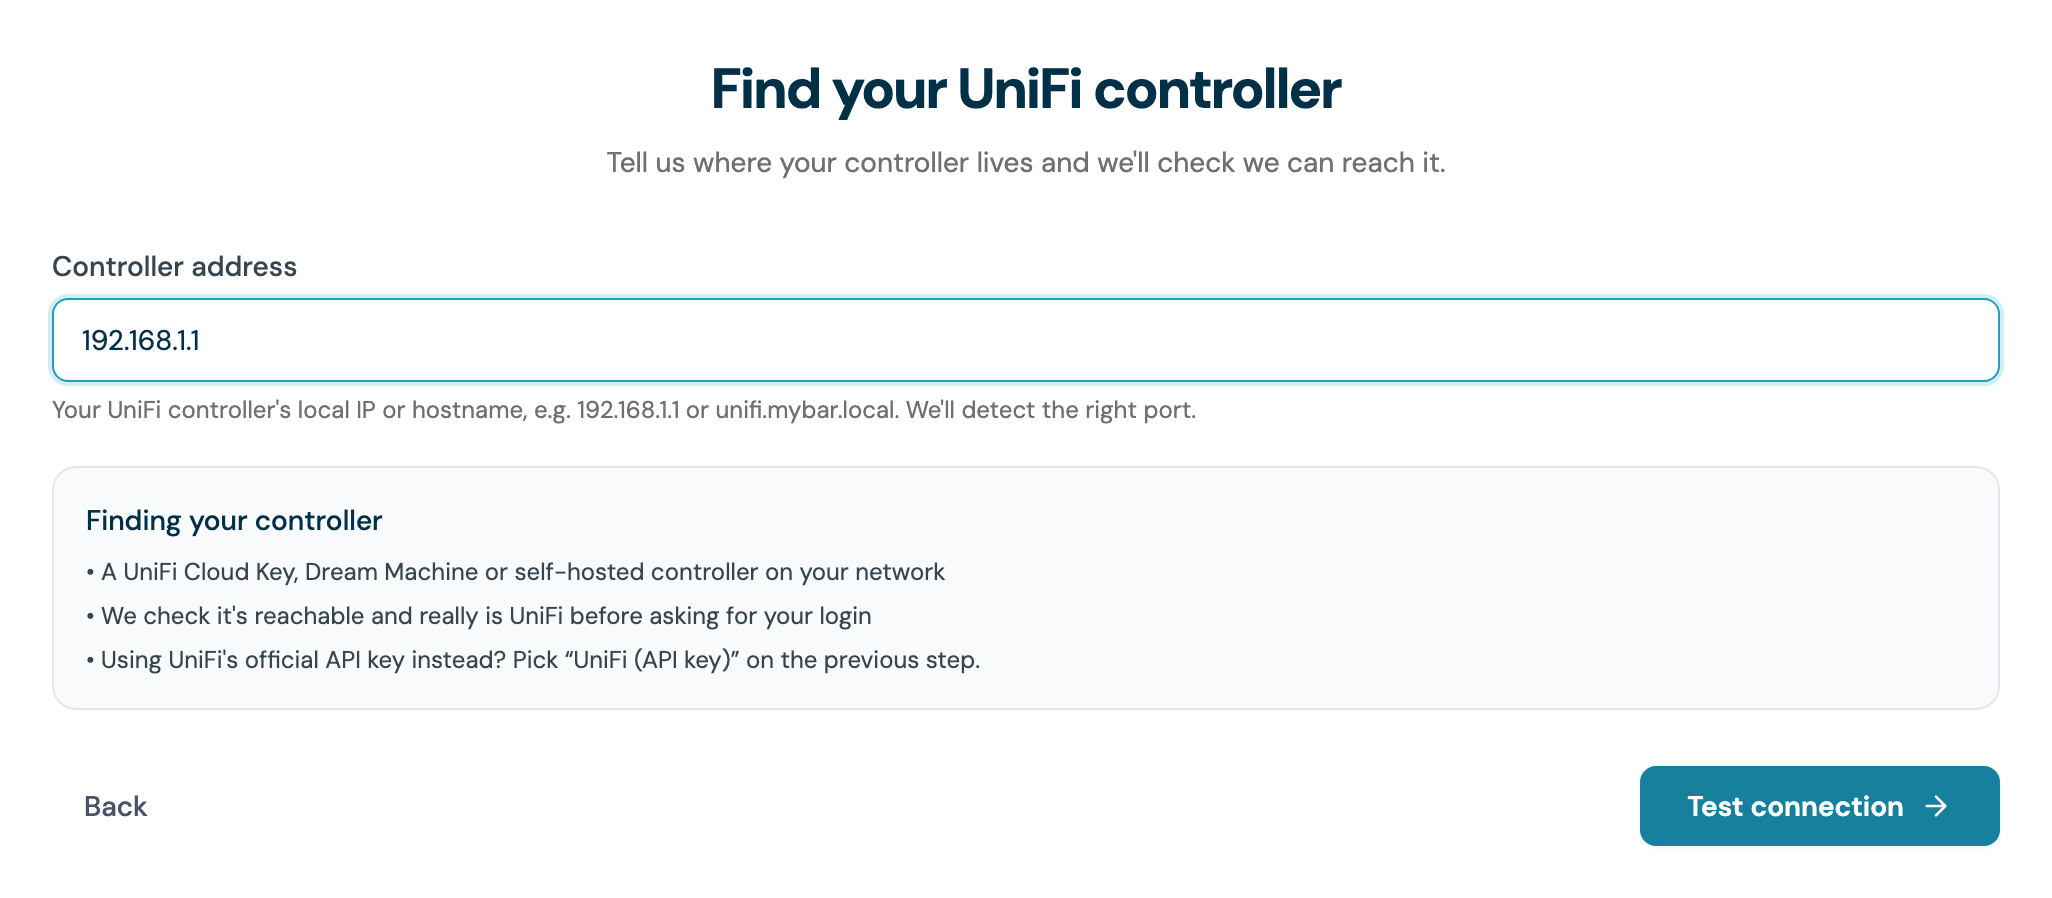
- Choose UniFi username and password when picking your hardware
- Enter the controller's address. CaptiFi checks it is reachable and really is UniFi before asking for any password, and detects the right port for you
- Click Test connection
Step 18: Sign in
- Controller name: a label for your dashboard
- Controller username and Password: the local account from Step 16
- Tick This account has two-factor authentication (2FA) enabled only if it does, and you will be asked for the 6-digit code next
- Click Connect controller
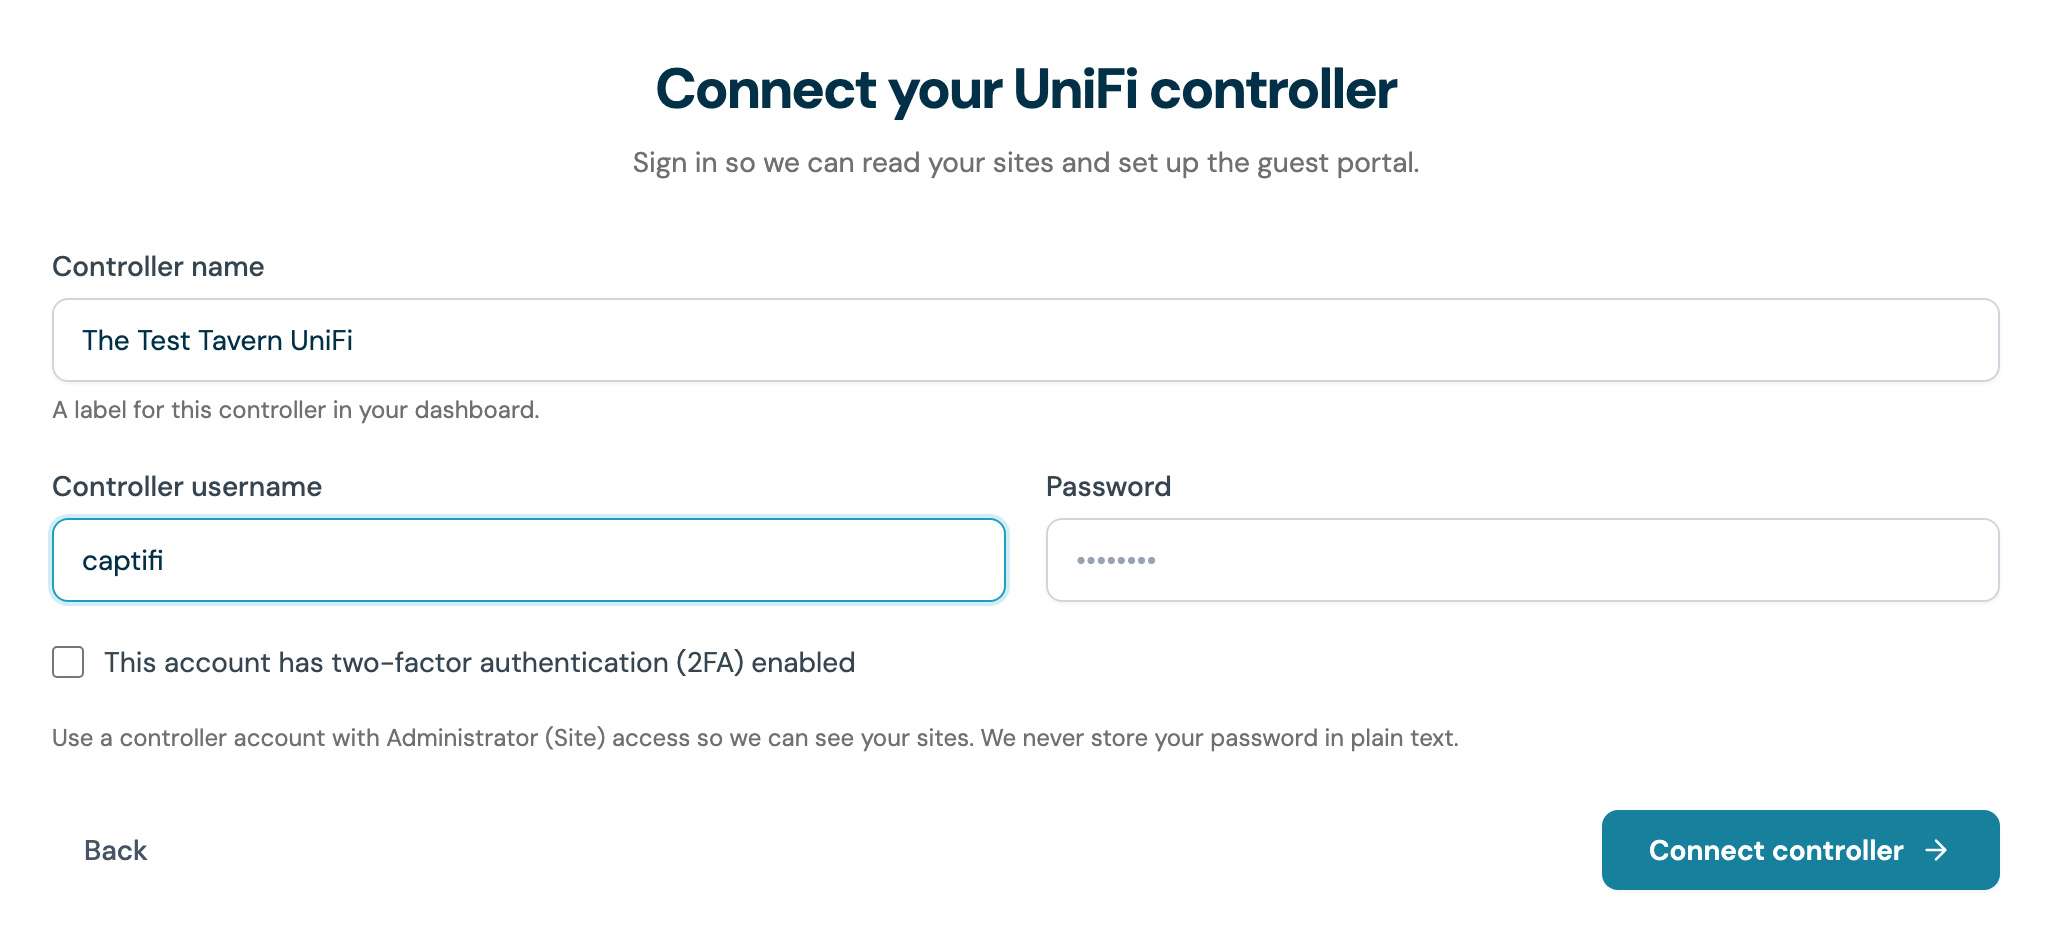
CaptiFi discovers your sites and asks you to pick one under Controller site. It is one venue per UniFi site, so choose the site this venue lives on.
Then complete Set up your venue and let Activate your WiFi create and gate the guest network. If CaptiFi reports that it could not write the captive portal to your controller, you can still finish and re-apply the settings from the venue card, or do Step 15 by hand, then test with Step 19.
Step 19: Test it with a phone
First, deal with devices that cannot sign in
Receipt printers, card machines, back-office iPads, music players and digital signage cannot display a sign-in page, so once the portal is live they lose internet the next time they reconnect. Before you test, either move them to a private password-protected staff network, which is the tidiest option, or add them under Pre-authorized devices.
- On a phone, turn WiFi off and on, then join your guest network
- Your CaptiFi page should appear by itself within a few seconds
- If it does not, open a browser and visit any
http://site, for examplehttp://neverssl.com - Complete the form
- Check the phone can browse normally
- Open Guest Visits in your CaptiFi dashboard: the visit should be listed within a minute
The portal applies gradually
Devices already connected keep working until they reconnect. The sign-in page appears for each device as it rejoins the network, so a full changeover can take a day.
Managing your venue after setup
Everything here lives in one place: on my.captifi.io go to My Locations and click Connection status on the venue card.
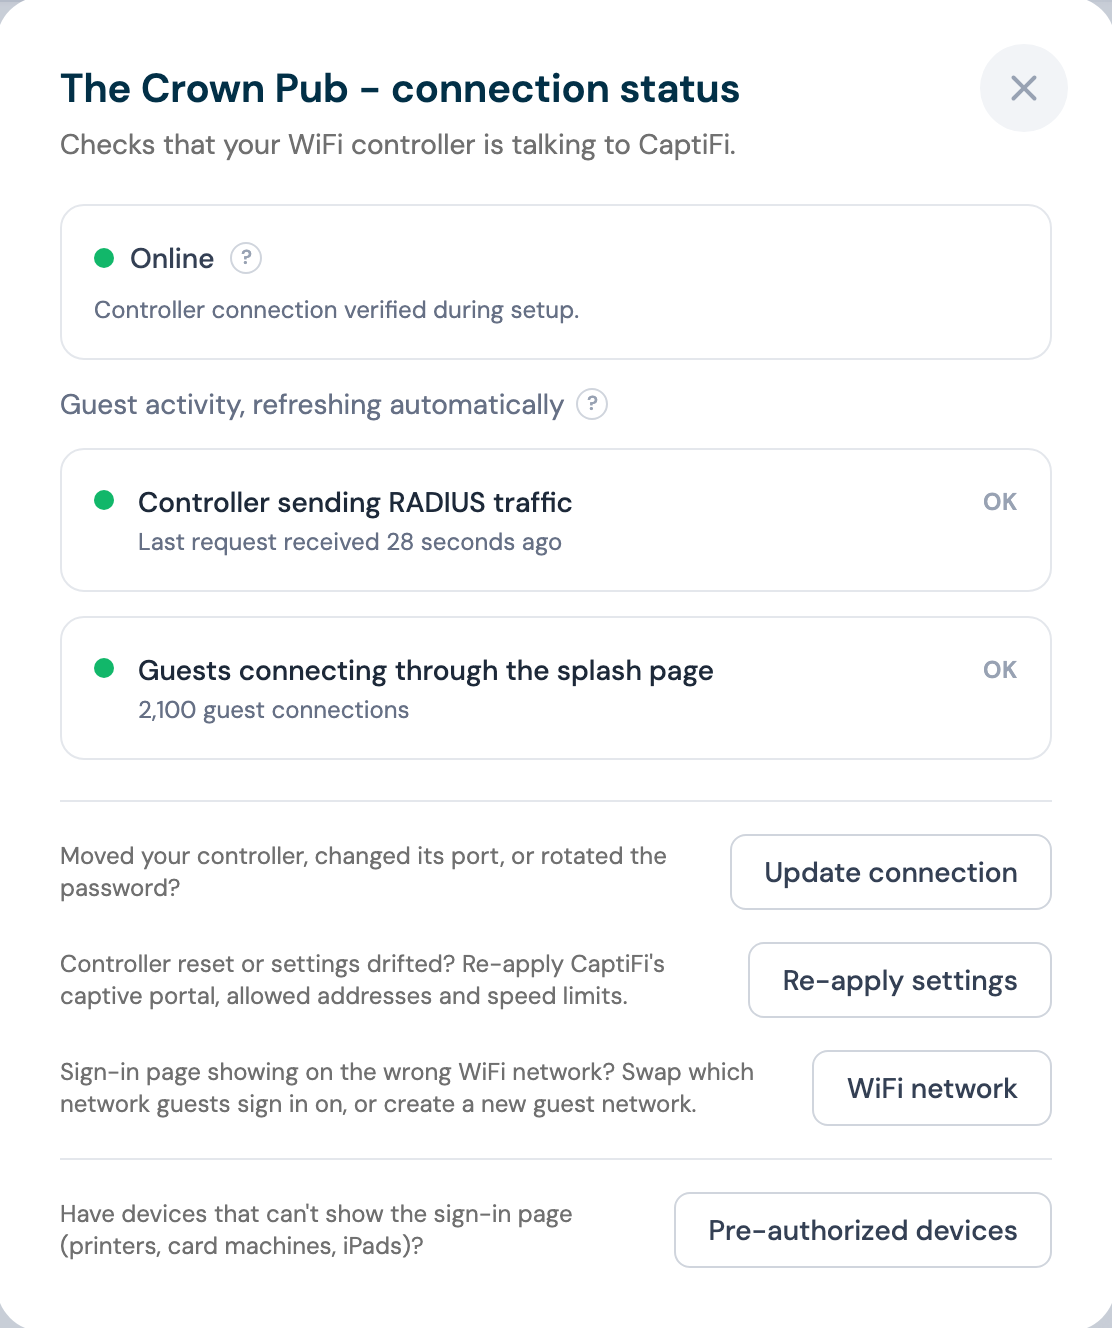
Check the connection is healthy
The panel shows three things, and refreshes on its own while it is open:
- Online means CaptiFi has a verified route to the controller
- Controller sending RADIUS traffic turns amber and reads STALE when nothing has arrived for 15 minutes. That is normal and expected at a venue that is closed or has no guests connected right now, so read it alongside the row below
- Guests connecting through the splash page counts sign-ins, so a venue with guests and a stale row above is worth a support ticket
Quote the exact message when you contact us
When an action fails, the result message includes the controller's own reply, for example an api.err code. Copy it into your email and we can usually resolve it in one step.
Update the connection after a change
Moved the controller, changed its port, rotated the password or replaced the API key? Click Update connection.
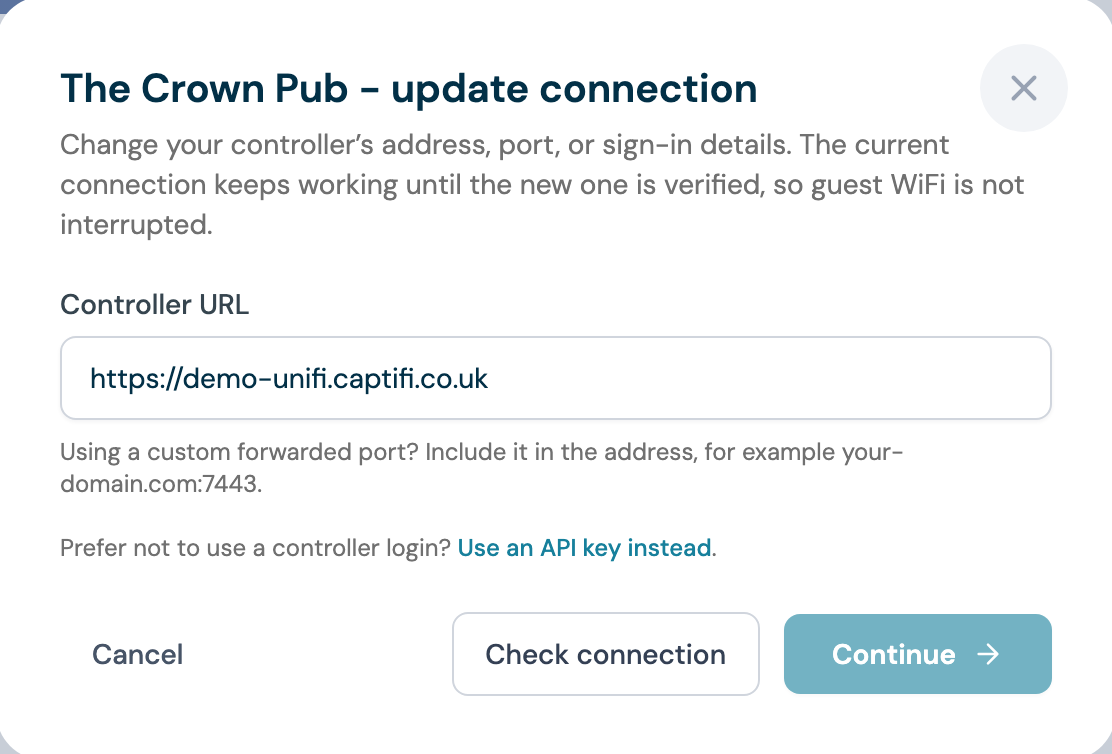
- On a username and password venue: enter the new address, test it and sign in. You only need to type a port if you forwarded a custom one: CaptiFi probes the usual UniFi ports itself. You can also choose Use an API key instead to move the venue onto the simpler, more secure method
- On an API key venue: paste the new key. If the venue connects over the Remote Tunnel its address is managed for you, so only the key can change
Your current connection keeps working until the new one is verified, so guest WiFi is never interrupted. If you are tightening your firewall at the same time, add the new port forward and allow rule first, update the connection in CaptiFi, then close the old port.
Re-apply settings after a controller reset
If the controller was factory reset, or its settings drifted so guests see UniFi's own page instead of yours, click Re-apply settings. This re-pushes CaptiFi's captive portal, the list of addresses guests can reach before signing in, and any speed limits. It recreates the guest WiFi network only if it is missing, never as a duplicate, and it does not disconnect guests who are already online.
It keeps your pre-authorisation list and replaces the rest
Every address already on the list guests can reach before signing in stays in its slot, whether CaptiFi, Paid WiFi or you put it there, and any CaptiFi address that is missing is added: site.app.captifi.io, app.captifi.io, fonts.googleapis.com and fonts.gstatic.com. Everything else in the controller's guest-access settings is written afresh, so a portal tweak you made directly in UniFi outside that list is reset.
Available on any UniFi controller of your own, whether it connects directly, by API key or through the Remote Tunnel. Not available on UniFi Cloud connections, or on controllers CaptiFi operates for you, where support makes the change.
"Set your guest WiFi network name" error?
Re-apply needs to know which network to gate. Open Edit site on the venue card, set the WiFi network name, then try again.
Change which WiFi network the portal gates
Sign-in page showing on the wrong network, for example a staff one? Click WiFi network and pick the right one, or create a new guest network. This is the same picker as Step 14 and you can use it as often as you like.
Available on direct, API key and Remote Tunnel UniFi connections. Not on UniFi Cloud connections, and not on controllers CaptiFi operates for you, where support makes the change.
Keep printers, card machines and iPads online
The same option now covers venues on CaptiFi access points: see Pre-authorised devices for the general guide, and read on for the UniFi specifics.
Click Pre-authorized devices and add the MAC address of anything that cannot show a sign-in page, with an optional label like Front-desk printer.
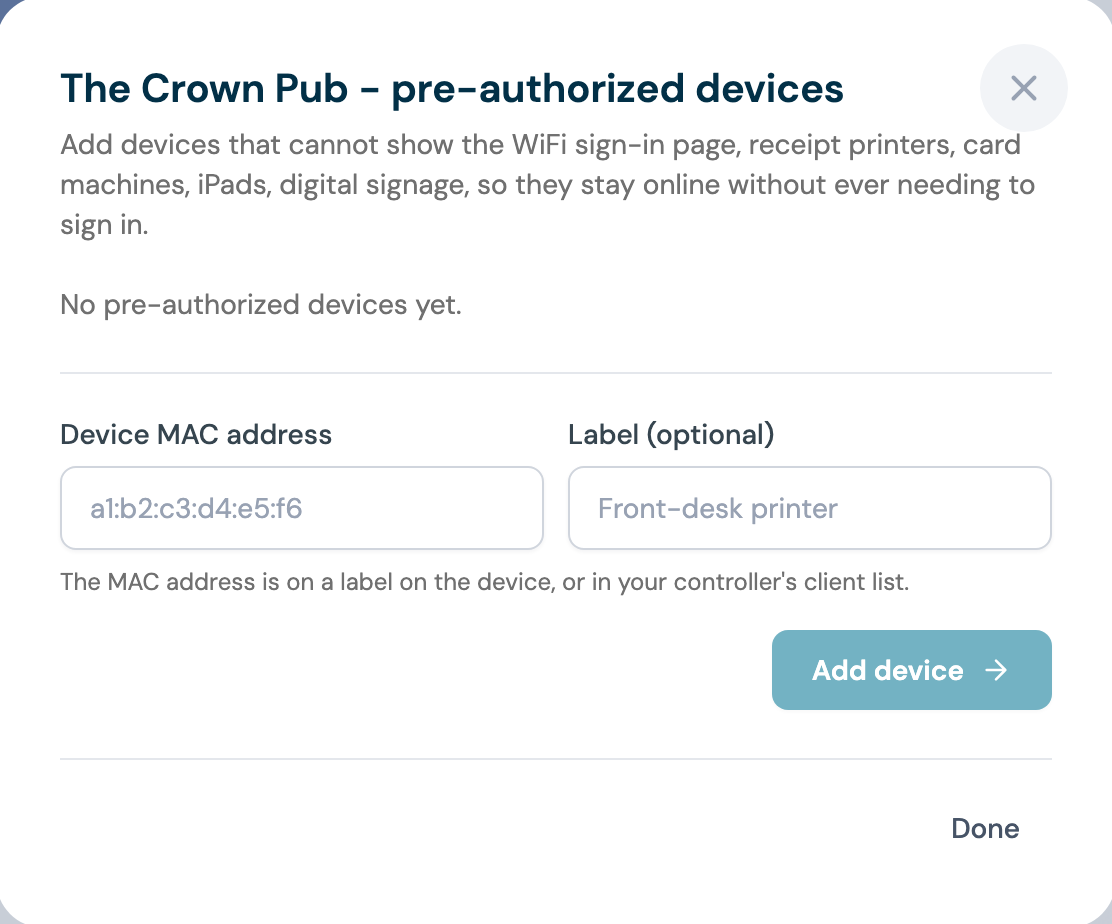
- The MAC address is on a label on the device itself, or in your controller's client list
- CaptiFi authorises it on the controller straight away, then refreshes it every night, so it survives controller reboots
- Removing a device de-authorises it, and it then has to sign in like a normal guest
- If CaptiFi cannot reach your controller at that moment the device is still saved and applied automatically within a day
- For a device that has never connected, add it once it has joined the WiFi so the controller can identify it
- Available on direct, API key and Remote Tunnel UniFi connections
A staff network is still tidier
If you have several of these devices, a separate password-protected staff network keeps them off the guest network entirely. Pre-authorized devices is the right answer when moving a device is not practical.
Troubleshooting
| Problem | What to do |
|---|---|
| Sign-in page never appears | Check the hotspot portal is on and the external portal address is exactly 46.62.168.7. On newer consoles also check the Hotspot zone, see the next row |
| No sign-in page and no internet on the guest network | On consoles with zone-based firewalling (newer Dream Machines, UCG, EFG) the sign-in page follows the Hotspot zone. Go to Settings, Policy Engine, Zones and put the guest network in the Hotspot zone |
| Sign-in page appears on a private, password-protected network | The same setting in reverse: that network is in the Hotspot zone, or is set to a Guest network type. Move it back to the Internal zone. Every device on a Hotspot-zone network gets the sign-in page, WiFi password or not |
| "Portal unreachable" | Add site.app.captifi.io to Pre-Authorization Access, see Step 15.4 |
| Guests sign in but get no internet | Check the domain is set to site.app.captifi.io in the landing page settings |
| Page loads with no fonts or images, or is blank on iPhone | A pre-authorisation entry is missing. Check every entry in Step 15.4, the two font domains included |
| Sign-in page loads over http but not https, or the browser warns about the certificate | Enable HTTPS Redirection Support and Secure Portal in the landing page settings |
| Controller will not connect | Test from outside your network, on mobile data rather than WiFi. See Step 8 |
| Cannot port forward, or "Upstream NAT detected on WAN1" | You are behind double NAT. Use Path B: Remote Tunnel |
| "Invalid credentials" | You are using a Ubiquiti cloud login. Create a local account, see Step 16 |
| "Your UniFi controller is temporarily refusing sign-in attempts" | The controller's own limit on rapid sign-in attempts has tripped, usually after several tries in a row, and your details were not checked. Wait a minute and try again, see Controller refusing sign-in attempts |
| A sign-in that keeps failing with correct details | You are using a Ubiquiti cloud account, whose enforced MFA CaptiFi cannot complete. Use an API key, or a local controller account. A local account with 2FA works: tick the 2FA box and enter the code |
| CaptiFi says it could not reach your console from the internet | The console has no public address, or the port is closed. Use the Use the Remote Tunnel instead button under the message, or complete Step 4 and try again |
| CaptiFi says the address answered but not as a UniFi console with the Integration API | Check the address and port, and that the Integration API is enabled under Settings, Control Plane, Integrations on the console |
| CaptiFi says the console refused the API key | Create a new key under Settings, Control Plane, Integrations, check its role is Full Control, and paste it whole. Keys are shown once |
| API key rejected | Check the UniFi Network version, that the key's role is Full Control, and that the key has not expired. Keys are shown once, so if you are unsure, create a new one |
| Sites not importing | The controller account or key needs access to that site. With several sites, pick one from the dropdown before finishing setup |
| Firewall rule seems to do nothing on a UDM | The destination must be the gateway itself, meaning rule type Internet Local or destination zone Gateway, and the port group must contain 80 and 443 |
| iPhone shows "Cannot Verify Server Identity" | The device is still behind the portal wall. Open the WiFi sign-in page and complete it, or rejoin the network. See Network troubleshooting |
Need help?
UniFi setups vary with hardware and firmware version, so if a screen does not look like the one described here, tell us the console model and the UniFi Network version and we will point you at the right setting.
- Email: hello@captifi.io
- Live chat: on captifi.io
Related guides: Multi-venue management, Splash page builder, Network troubleshooting.