

Appearance
Paid WiFi Access
Turn your guest WiFi into a revenue stream. Guests pick a timed pass on your branded splash page, pay by card, Apple Pay, or Google Pay, and are online seconds later. Payments go straight to your own Stripe account, and CaptiFi takes no commission.
You can also put a free plan beside your passes, so guests get basic WiFi for nothing and pay when they want it faster.
Paid WiFi is ideal for hotels, co-working spaces, event venues, and anywhere internet access has real value. It is on every plan from Essentials up and is not on Lite. It is not available on Aruba Instant On, FortiGate, MikroTik or Ruckus networks.
Where to Find It
- Log in to my.captifi.io
- Go to Integrations and click Configure on the Paid WiFi (Stripe) card, or once configured, open WiFi & venues → Paid WiFi in the sidebar
Full first-time setup (Stripe keys, walled garden domains) is covered step by step in the Paid WiFi (Stripe) setup guide.
The Paid WiFi Page
Everything is per venue (use the venue selector if you have several):
- KPI cards: Total revenue, Last 30 days, Online now (paid), and Passes sold. The revenue figures are shown in one currency at a time. If you have taken payments in more than one currency (for example after changing your Stripe currency, or across venues that sell in different currencies), the cards show your main currency and a note underneath lists what was taken in each of the others. Amounts in different currencies are never added together
- Stripe connection: your publishable and secret keys (stored write-only and encrypted), currency, and which payment methods to offer. Card is always on; Apple Pay and Google Pay can be toggled. Use Test connection to verify your keys. A team member needs View guest data as well as Manage integrations to change them
- Access plans & pricing: up to 40 plans, each with an optional label (e.g. "All Day"), a duration (from 30 minutes up to 7 days), an optional data allowance (100 MB up to 10 GB, or Unlimited), optional download and upload speeds (1 Mbps up to 500 Mbps, or your venue default), a price or Free, and an active toggle. When the venue has WiFi areas, each plan also has an Area
- WiFi access mode: switch between Standard Splash and Paid WiFi. Paid WiFi replaces the standard splash page at that venue, so to keep free WiFi as well, add a free plan. Switch back at any time. The card says what guests are offered, and a preview URL lets you see your paid splash page before going live
- Payments received: every payment and every free plan sign-in, with the guest's name, email, plan, amount, status, and time left online (tabs for All / Active / Expired). A team member needs View guest data to see this table
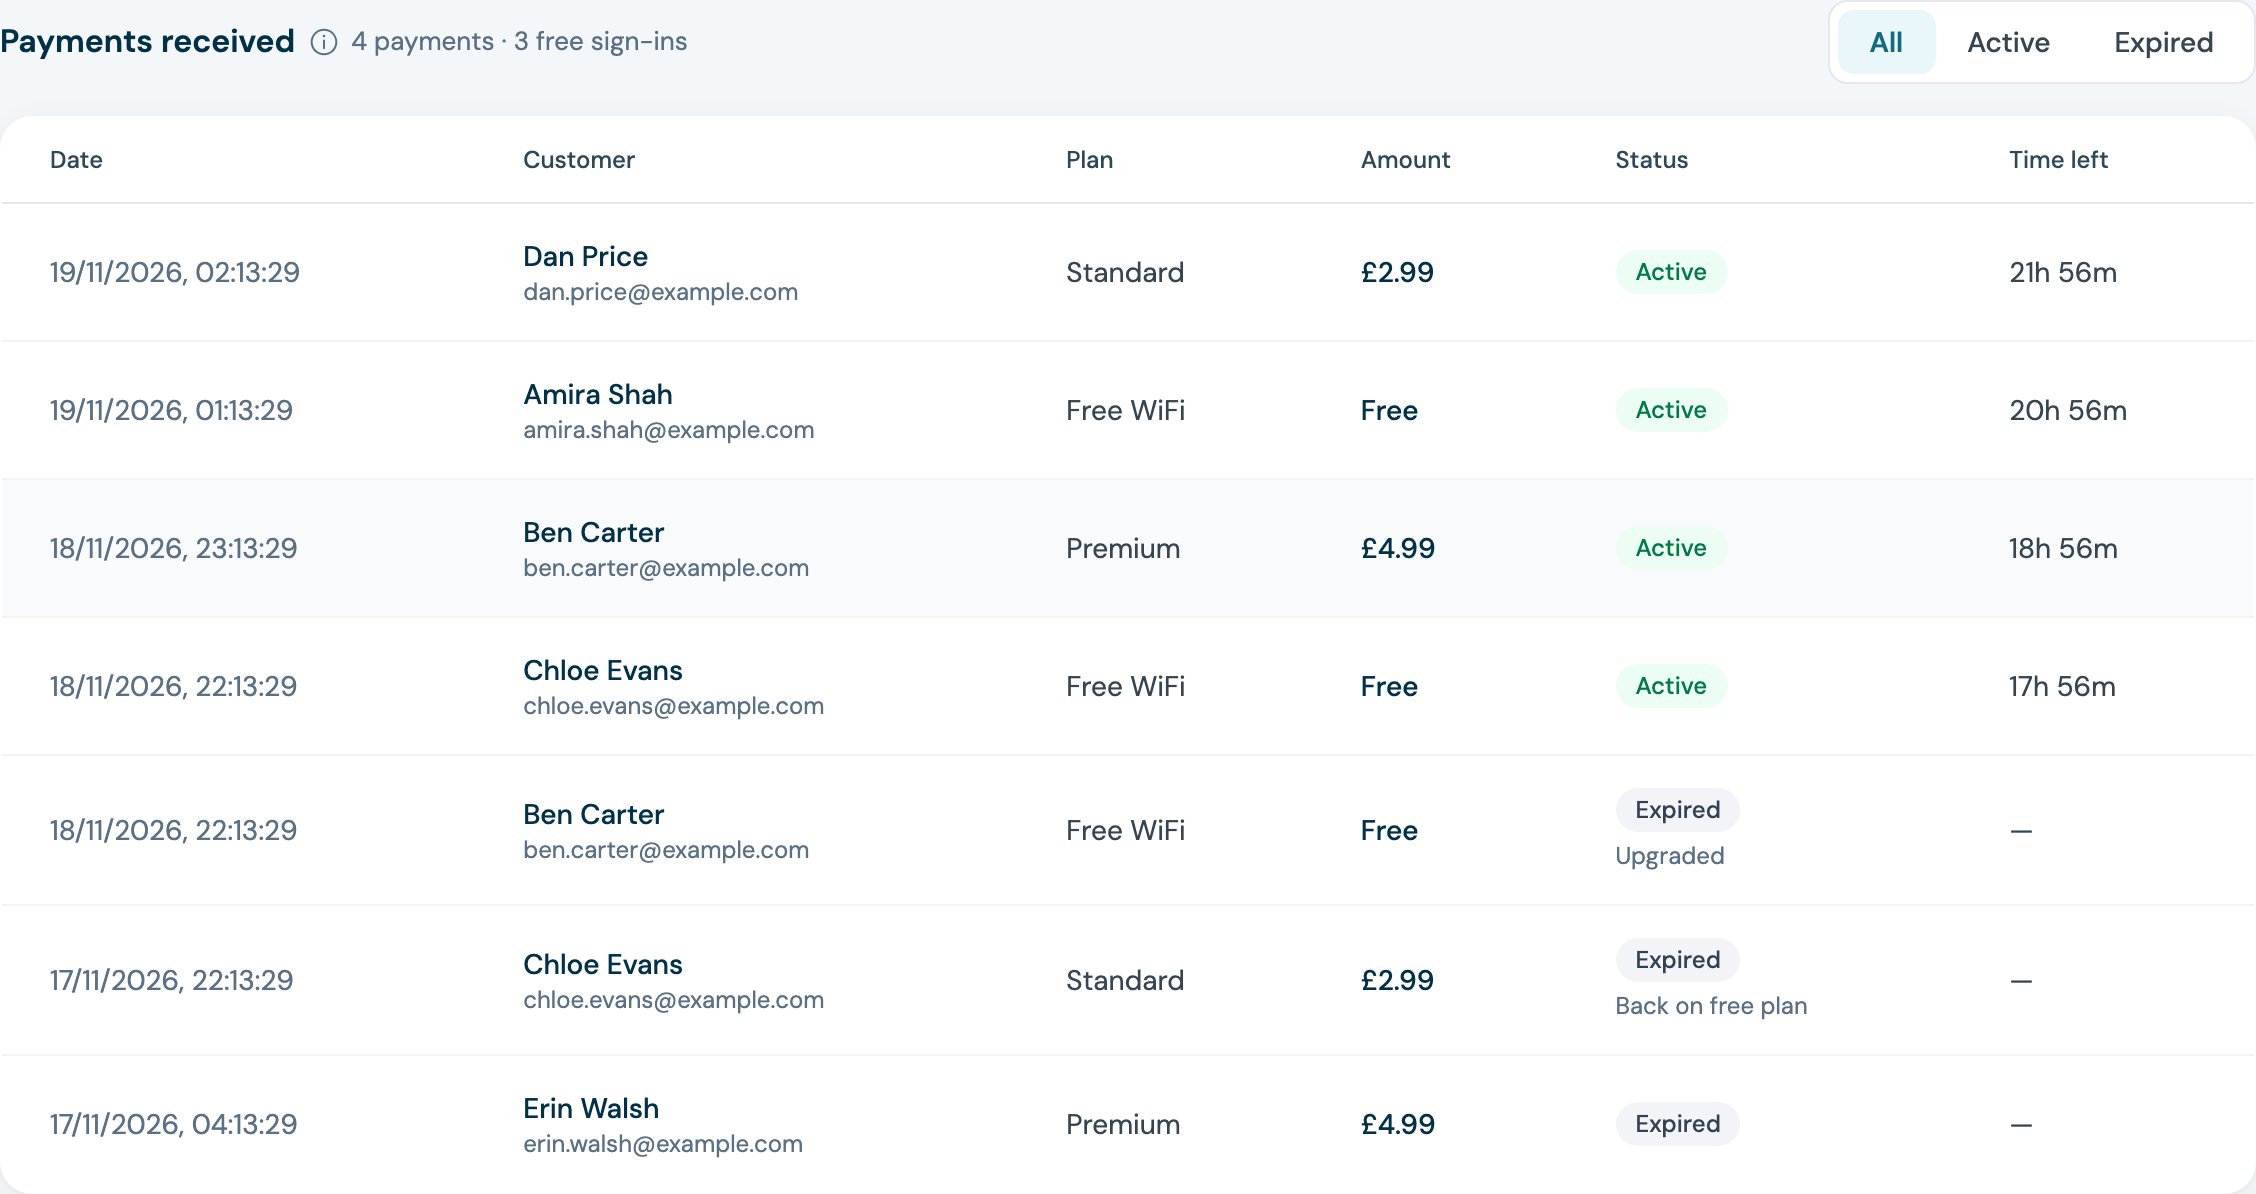
Free plan sign-ins show Free in the Amount column and are counted apart from payments, as in "4 payments · 3 free sign-ins". A session that ended early carries a note under its status: Upgraded when the guest bought a pass while on the free plan, and Back on free plan when a pass ended and the guest moved onto the free plan.
How Guests Pay
- Guest joins your WiFi and the paid splash page appears with your pricing cards
- They pick a pass and accept your WiFi terms
- A secure Stripe payment form takes their card, Apple Pay, or Google Pay
- On successful payment they're online immediately, and disconnected automatically when their time runs out, or when they use their full data allowance if the pass has one (whichever comes first). To reconnect they buy a new pass. At a venue with a free plan they go back on the free plan instead (see below)
Guests who buy a pass don't fill in a sign-up form: CaptiFi records their name and email from the Stripe payment details, so they still appear in your guest database and marketing audiences. Guests who pick a free plan enter their first name and email on the same page instead.
A Free Plan Beside Your Passes
A free plan lets guests online at no charge, with your paid passes listed under it as the faster or longer option. A campsite might offer:
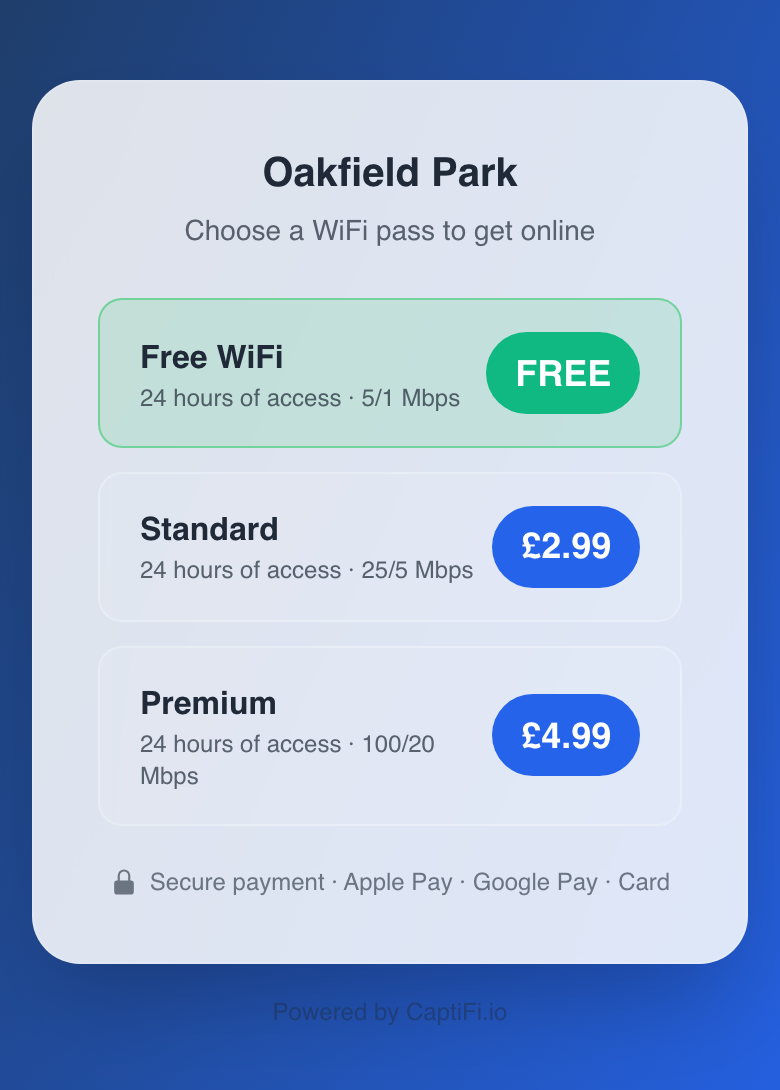
- Free WiFi: 5 Mbps for 24 hours, free
- Standard: 25 Mbps for 24 hours, £2.99
- Premium: 100 Mbps for 24 hours, £4.99
Free plans need a UniFi controller connected with a controller login or a local API key. They depend on speed limits for each guest and on moving a guest from one plan to another while they stay connected, which those connections support. On any other connection the plans card states this requirement in place of the Free tick box.
Setting It Up
- Open WiFi & venues → Paid WiFi and pick the venue
- In Access plans & pricing, click Add plan
- Give the plan a label such as "Free WiFi" and tick Free. The price box changes to Free
- Choose its Duration, and the Download speed, Upload speed and Data allowance guests on the free plan get
- Leave Active ticked and click Save plans
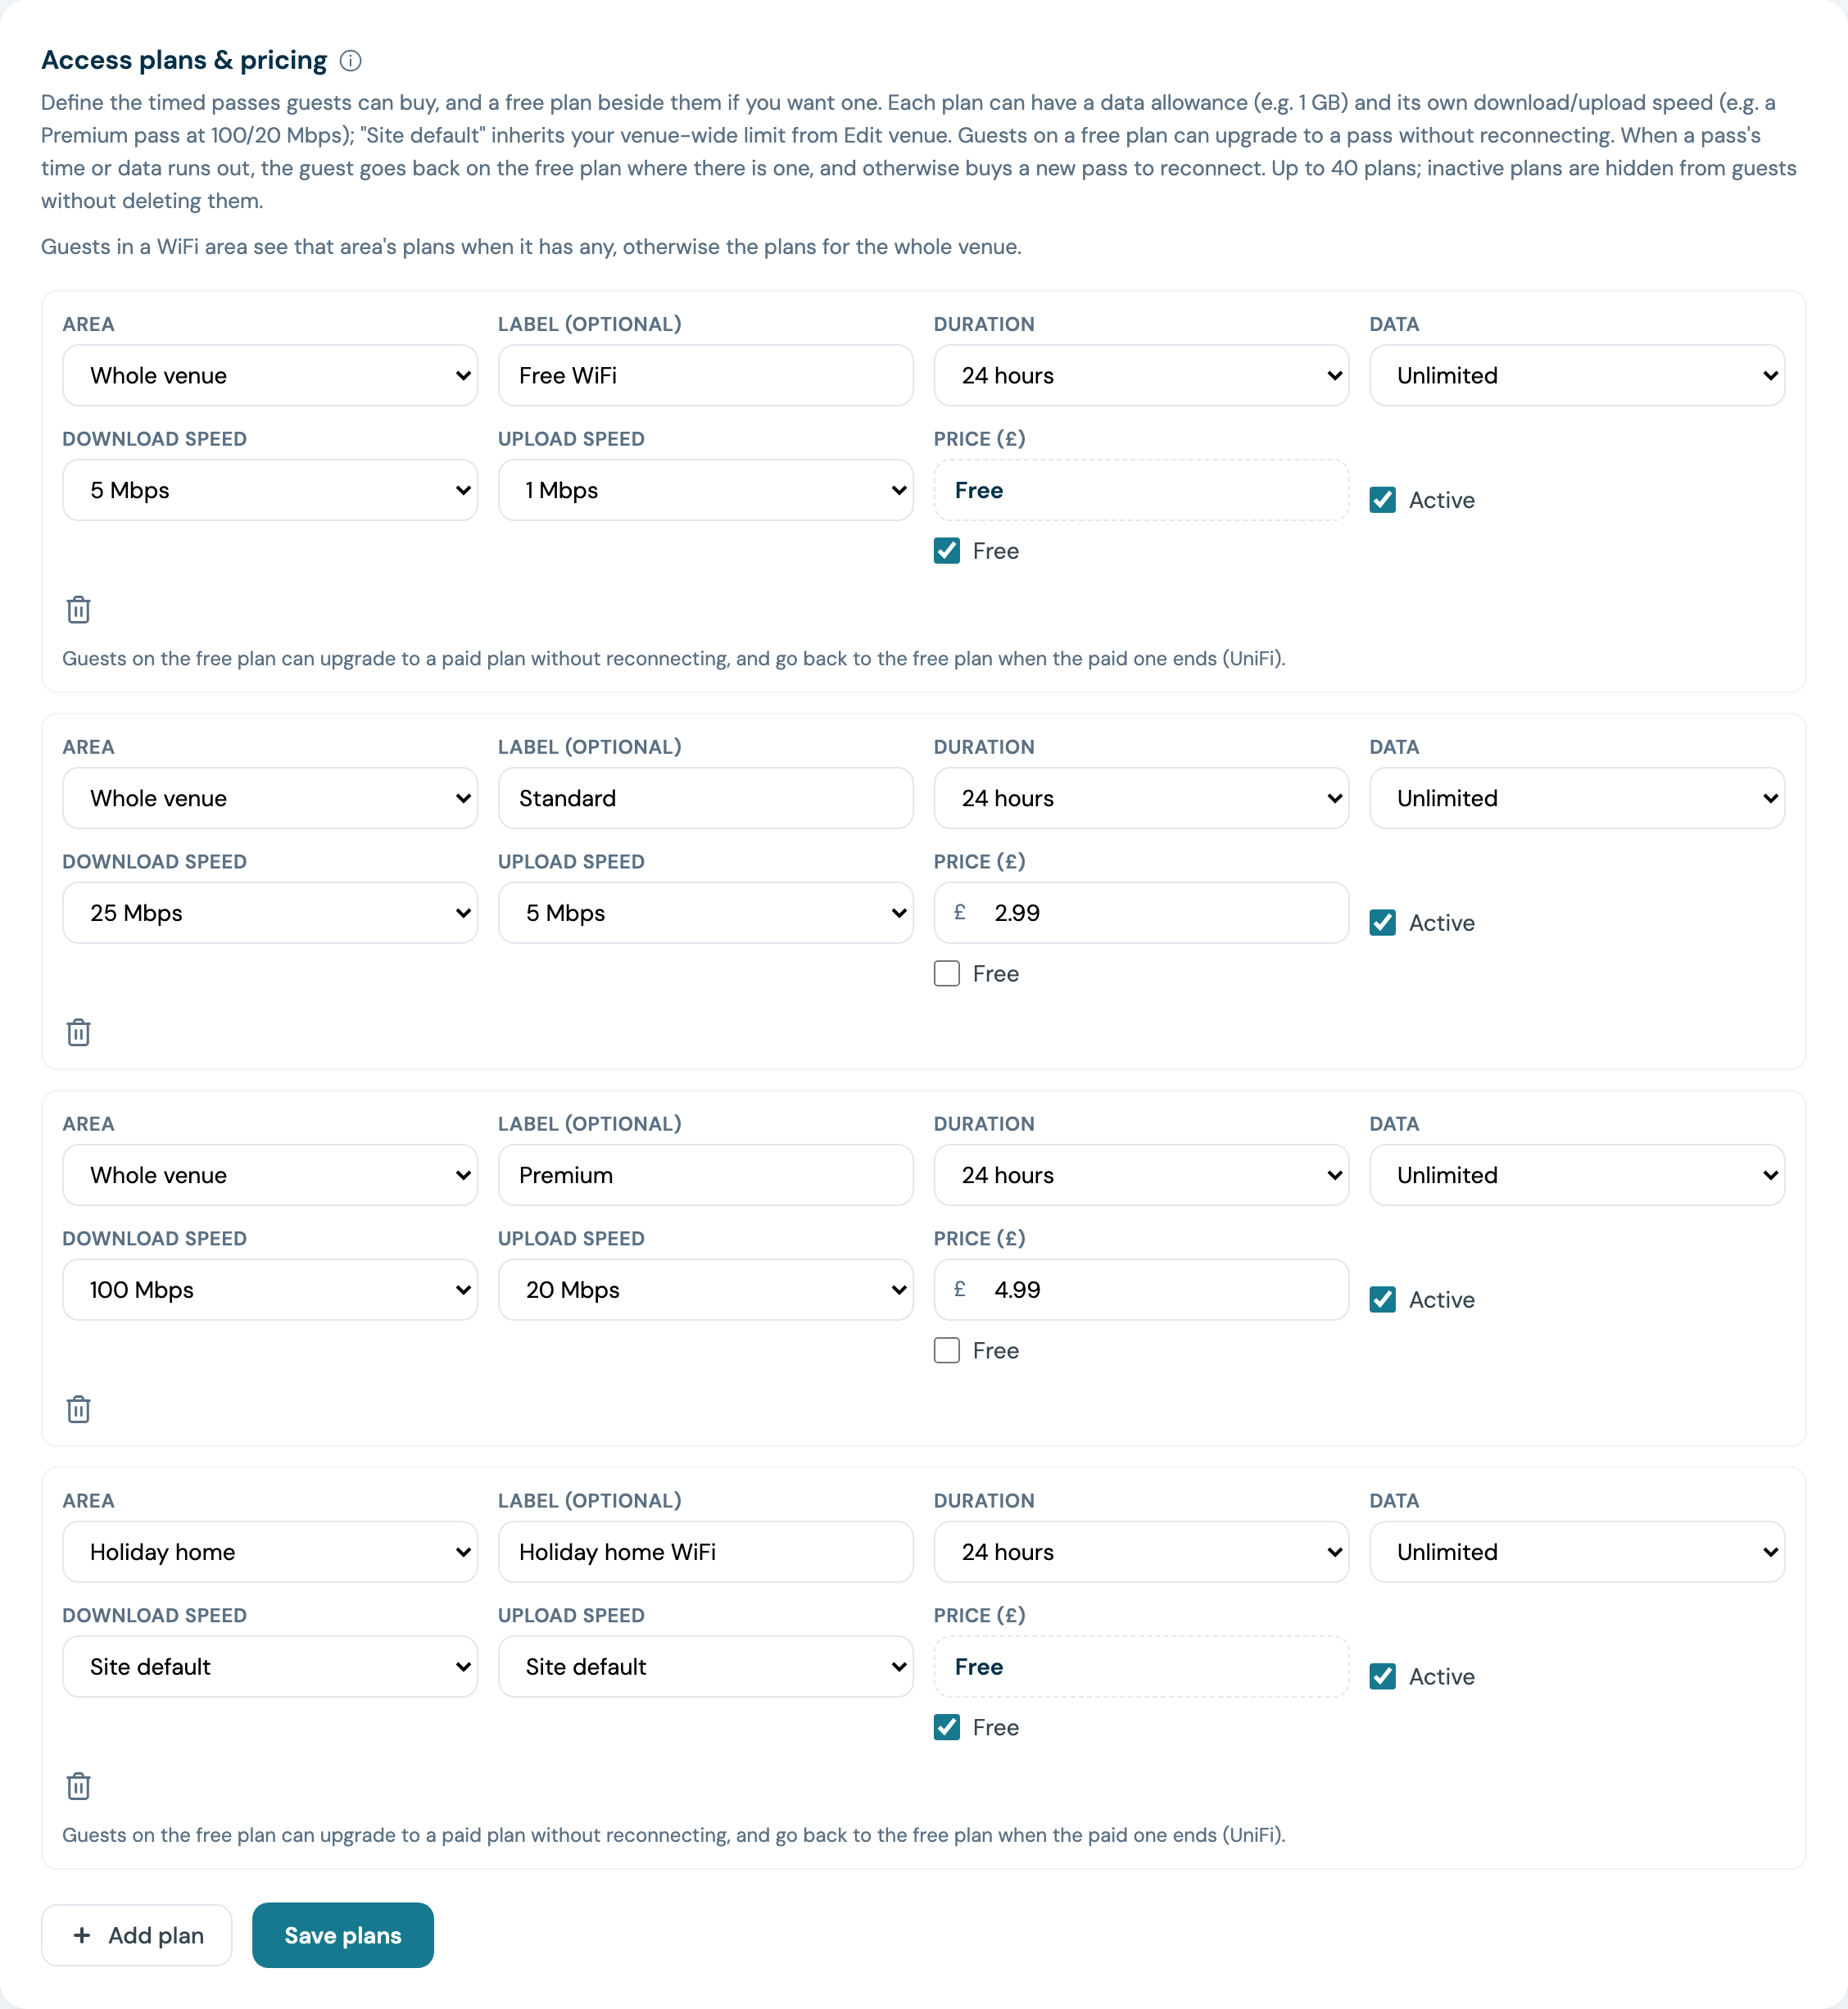
The whole venue can have one active free plan, and so can each WiFi area. Untick Active to take a free plan off without deleting it. The WiFi access mode card then reads, for example, "Guests pick the free plan or buy a pass to get online at this venue."
What Guests See
- Guests join your WiFi and the paid page lists the free plan first, marked FREE, with your passes under it
- A guest who taps the free plan enters their first name and email and taps Get online
- They answer your WiFi terms and marketing question, as they would for a pass, and are online straight away with the free plan's time, speed and data allowance
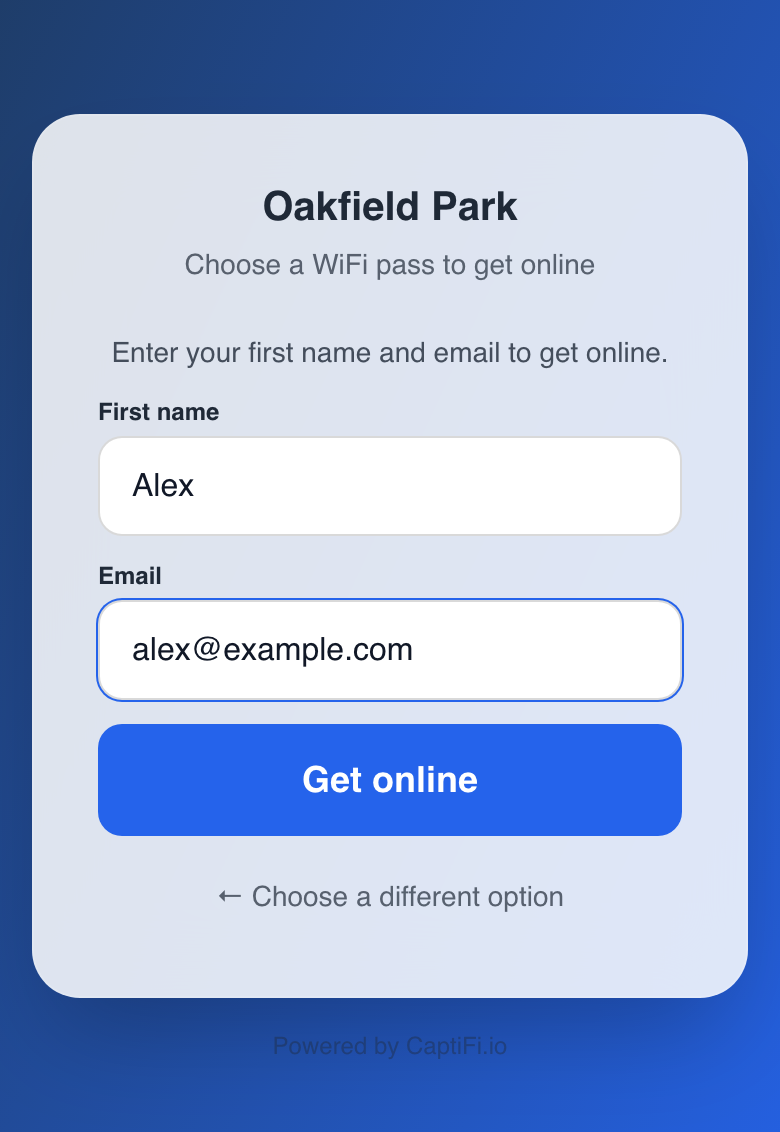
A free plan sign-in is a guest visit like any other, so the guest joins your guest list, and your marketing audiences if they agree to marketing. Free plan sign-ins count towards your plan's new guests each month, as sign-ins on the standard splash page do.
Upgrading Without Reconnecting
After a free sign-in, the guest's connected screen lists your passes under Need faster WiFi? A guest who buys one there gets the pass's speed and time straight away, without reconnecting to the WiFi. The screen also has Open the upgrade page, a link they can open in their browser to upgrade later in their stay. Their free session then shows Upgraded in Payments received.
A guest who already has a pass running can't start a free sign-in on top of it: the page shows the pass they have and keeps them on it.
Back on the Free Plan When a Pass Ends
At a venue with a free plan, a guest whose pass ends goes back onto the free plan, with the free plan's full time and data allowance. The connected screen tells them when they buy, for example "When your pass ends you go back to Free WiFi." In Payments received the pass shows Back on free plan, and the free plan session that follows has its own Free row.
How the move happens depends on what ended the pass:
- When its time runs out, CaptiFi moves the guest onto the free plan just before the controller would end the pass, so they normally stay connected
- When its data allowance runs out, the controller ends the connection itself, because every pass sends its allowance to your UniFi controller. CaptiFi then moves the guest onto the free plan once the controller's usage figures show the allowance used, usually within a minute or two, so the guest can be cut off for a short while in between
Fair Use
- A device can sign in free once per free plan length, so once a day with a 24 hour free plan. If it uses the free plan's data allowance early, the page says when free WiFi is back on that device, for example "at 14:30", and offers your passes meanwhile
- A free sign-in your controller refuses doesn't count, so the guest can try again straight away
- If the page can't tell which device a guest is on, it asks them to reconnect to the WiFi first
- Free plan sign-ins never count towards your revenue, Passes sold or payments
- Where a guest's plans include a free plan, the free data allowance isn't offered
Plans for Each WiFi Area
If the venue has WiFi areas, each plan has an Area: Whole venue, or one of your areas. A guest in an area with active plans of its own sees only that area's plans, and every other guest sees the plans for the whole venue. The paid page also uses the area's splash design when the area has one. Areas are set up on the WiFi Areas page, which the account owner switches on from Integrations.
A holiday park, for example, can sell its passes with a free plan across the site and give the holiday home its own free plan with no speed limit and nothing to buy. The WiFi access mode card spells out what each set of guests is offered, such as "Guests outside Holiday home pick the free plan or buy a pass. Guests in Holiday home see only that area's plans and get the free plan."
- While Paid WiFi is on, keep at least one active plan for the whole venue, so guests who are not in a WiFi area always have something to choose. A save that would leave none is refused with "Keep at least one active plan for the whole venue, for guests who are not in a WiFi area."
- Each area can have its own free plan
- If you remove an area, its plans move to the whole venue, switched off, so nothing goes on sale where you didn't put it
- An area that can't take guests at the moment, for example at a venue that isn't on UniFi, is marked (not in use) in the Area choice. Nobody is offered its plans, and each of them says why
- When a guest signs in free or starts paying, CaptiFi compares their area with what your UniFi controller last reported for their device. If the controller puts them in another area, the page switches to that area's plans and asks them to choose again
Designing Your Paid Splash Page
The paid page carries your venue's splash design automatically: logo, background, colours, button styling, and your terms all come from the Splash Page Builder. Open My Venues → Edit splash and the live preview shows your paid access page, with your real passes and prices, exactly as guests see it. Sections that only exist on the standard splash (welcome text and the sign-in form) are marked "Hidden by Paid WiFi" in the builder. See Venues With Paid WiFi for the details.
Pricing Your Passes
You set your own prices per venue. As a starting point: around £1 for an hour and £3-10 for a day pass works for most venues; airports, events, and conference spaces can charge more.
Speed Tiers
Each plan can carry its own download and upload speed, so you can sell faster WiFi as a premium. A typical setup:
- Free guests: a free plan at 5 Mbps down / 1 Mbps up, or your venue-wide limit from My Venues → Edit venue if the free plan is left on Site default
- Standard pass: 20 Mbps down / 5 Mbps up
- Premium pass: 100 Mbps down / 20 Mbps up
To set it up, open the Access plans & pricing card and pick a Download speed and Upload speed for each plan. Leaving a plan on Site default means it inherits your venue-wide guest bandwidth limit (and if you have no venue-wide limit, the plan is unrestricted). The speed is applied automatically the moment the guest's payment completes, and the pass button on your splash page shows the tier (for example "24 hours of access · 100/20 Mbps"), so guests can see exactly what they are buying.
Notes:
- Speed tiers are enforced on UniFi (controller login or local API key). On other platforms the tier is saved with the pass and shown to the guest, but the network does not apply it yet, so only sell speed tiers if your venue runs on UniFi
- Speed tiers combine with durations and data allowances freely: a pass can be faster, longer, and larger all at once
Data Allowances
Add a data allowance to any pass (for example, 24 hours with 1 GB of data). CaptiFi tracks each guest's usage and disconnects them when the allowance is used up; the Payments received table shows a Data used column so you can see each guest's consumption against their allowance. Usage is checked continuously via your controller's traffic counters and enforced within a few minutes of the allowance being reached. A pass without a data allowance of its own keeps your venue's own guest limits.
Notes:
- Enforcement is strongest on UniFi (the controller itself also enforces the quota natively), CaptiFi devices, and Cisco over RADIUS
- On Cisco Meraki click-through the allowance cannot be enforced (Meraki gives CaptiFi no controller access), and on TP-Link Omada it is best effort
- Passes are not refunded automatically when the allowance is used before the time runs out; guests simply buy a new pass to continue, or go back on your free plan if the venue has one
Free Data Before Payment
Want to let guests try your WiFi before asking them to pay? Give every device a free data allowance: guests browse for free until the allowance runs out, then they're disconnected and asked to buy a pass.
For free WiFi that carries on beside your passes, use a free plan instead. Where a guest's plans include a free plan, the free data allowance isn't offered.
Setting It Up
- Open the Paid WiFi page for your venue
- In the Stripe connection card, find Free data before payment
- Choose an allowance (50 MB up to 1 GB) and click Save Stripe settings
Choose None (the default) to turn the free allowance off and send every guest straight to the payment page.
The Guest Journey
- Guest joins your WiFi and sees a green Free WiFi button above your paid passes (for example, "250 MB of free data, buy a pass when it runs out")
- They tap it and are online immediately, with no card and no sign-up form
- When the free allowance is used up, they're disconnected automatically
- The next time they join, the free button is gone and your paid passes are shown. To keep browsing, they buy a pass
Fair Use Rules
- Each device gets one free session per 24 hours, tracked by its hardware (MAC) address
- Free sessions also end after 24 hours even if the data allowance isn't used
- Devices that hide their hardware address from the network can't claim a free session (they go straight to the payment page)
- Free sessions never count towards your revenue figures: the KPI cards and Payments received totals only include paid passes
Enforcement uses the same data tracking as paid data allowances, so the same platform notes apply (strongest on UniFi, CaptiFi devices, and RADIUS platforms; best effort on Omada; not enforceable on Meraki click-through).
Guest Languages
Your paid WiFi page can appear in your guest's own language. Guests are detected from their phone's language setting, so most people never have to tap anything.
Setting It Up
- Go to My Venues and click Edit venue on the venue's card
- Under Guest languages, pick the languages you want to offer
- If you offer more than one, choose a default language for guests whose phone is set to something you do not offer
- Save
Currently available: English, French (Francais), Spanish (Espanol) and Dutch (Nederlands).
What Guests See
When you offer more than one language, a small row of language buttons appears at the top of the page, above the WiFi passes. One tap switches the whole page, and the choice is remembered on that device for a year.
Everything CaptiFi writes is translated: the pass names, the prices, the free data message, the payment screen, the card form itself, and the confirmation. Their language also survives the payment step, including bank verification screens that take the guest away from the page and back again.
What Is Not Translated
- Your own custom wording. Anything you typed yourself stays exactly as you wrote it. If you want your venue name or a welcome line in another language, you will need to write it that way.
- Your terms and privacy text, for the same reason.
- Receipts and emails, which are still sent in English.
The same setting also covers your standard (free) splash page. See Guest Languages on the splash page.
If You Only Want English
Leave the setting alone. A venue with only English selected behaves exactly as it always has, and guests see no language buttons at all.
Managing Sessions & Refunds
- Revenue: the dashboard KPIs give you the headline numbers; your Stripe dashboard has full payment history, payouts, and reporting
- Refunds: refund a payment from your Stripe dashboard as normal (refunds don't yet end an active session automatically)
- Receipts: Stripe emails guests a receipt automatically
Troubleshooting
| Issue | What to Do |
|---|---|
| Payment form doesn't appear | Check your Stripe keys are saved and Test connection passes |
| Apple Pay / Google Pay buttons missing | The wallet buttons only show on supporting devices (Apple Pay: Safari on iPhone/iPad/Mac; Google Pay: Chrome/Android), and both must be enabled in your Stripe Dashboard under Settings → Payment methods |
| Guest pays but doesn't get online | Verify your venue's controller/device is Online under My Venues. The payment is still recorded and refundable via Stripe |
| Payment declined | Guest should try another card; details are in your Stripe dashboard |
| Splash page can't reach Stripe | On Omada, Meraki or Cisco, add the Stripe domains to your walled garden. See the setup guide |
| No Free tick box on the plans | Free plans need a UniFi controller connected with a controller login or a local API key. On other connections the plans card says so in place of the tick box |
| Saving plans or switching Paid WiFi on says "Keep at least one active plan for the whole venue, for guests who are not in a WiFi area." | Set Area to Whole venue on at least one active plan, so guests outside your WiFi areas always have something to choose |
| A guest can't sign in on the free plan again | Each device can sign in free once per free plan length. The page shows the guest when free WiFi is back on their device, and offers your passes meanwhile |
Related Features
- Paid WiFi (Stripe) setup guide: first-time setup, including walled garden domains
- WiFi Vouchers: controlled access with codes instead of payments
- WiFi Areas: split a venue into areas, each with its own plans and design. The account owner switches the page on from Integrations
- Splash Page Builder: branding carried onto the paid splash page